Project maps
Project maps provide a hierarchical tree structure that defines the URL architecture for your digital experience, enabling both developers and business users to manage, visualize, and resolve URLs at scale.
Composable architectures focus on freeing developers from monolithic platforms, but this often omits features that matter to business users, such as:
- URL management, and how nested URLs are generated, accessed, maintained, and resolved
- Deriving navigation and menus from content trees
- Generating sitemap.xml files for search engines
Project maps in Uniform address these needs by providing a structured approach to URL management that works seamlessly with composable architectures.
tip
Learn about how to work with project maps in your application.
Project maps can transform how to work with composable at scale, without compromising any of the underlying tools. Business users get a familiar interface to visualize a digital experience and locate their work, letting them own what matters to them. This is especially true at enterprise scale, where the lack of headless tools with structure has been a major barrier to adoption and effective implementation.
Architectural concepts#
Project maps are comprised of:
Project map: Represents the hierarchical URL structure of the information architecture of a website or any other digital property. A project map has a name, ID and nodes. Currently only one project map per project is possible.
Nodes: A node is an element within the project map, representing a unique URL with exactly one parent (excepting the top-level node).
There are two types of nodes:
- Composition node: A composition node is connected to an existing composition within your project. Within a project map a composition can only be attached to a single node.
- Placeholder node: A placeholder node isn't connected to a composition and provides structure in the tree.
How URLs are structured#
The URL structure of a project map node is made out following parts:
- Base URL: The base from which all full URLs of the project map nodes are derived. For website projects, this is usually is the website domain but could also point to a sub-folder or any other valid URL. The base URL is optional.
- Path: The path is the part of the URL that comes after the base URL. The path of a node is obtained by combining its path segment with the hierarchical path segments of its parent nodes.
- Path segment: Part of the path that's defined by an individual node. Delimited by slashes.
Nodes contain path segments that, along with segments of parent and grandparent nodes, combine to create the URL path. Only the path segment is stored with the node. When a path segment of a parent node is updated, inheritance derives the new URL.
Here is a breakdown of the individual URL parts for above example:
Use a project map#
Learn how to add, edit, and delete project maps in Uniform.
Create a project map#
In Uniform, navigate to Experience > Compositions and click on Project Map in the "Manage in" section of the left sidebar.
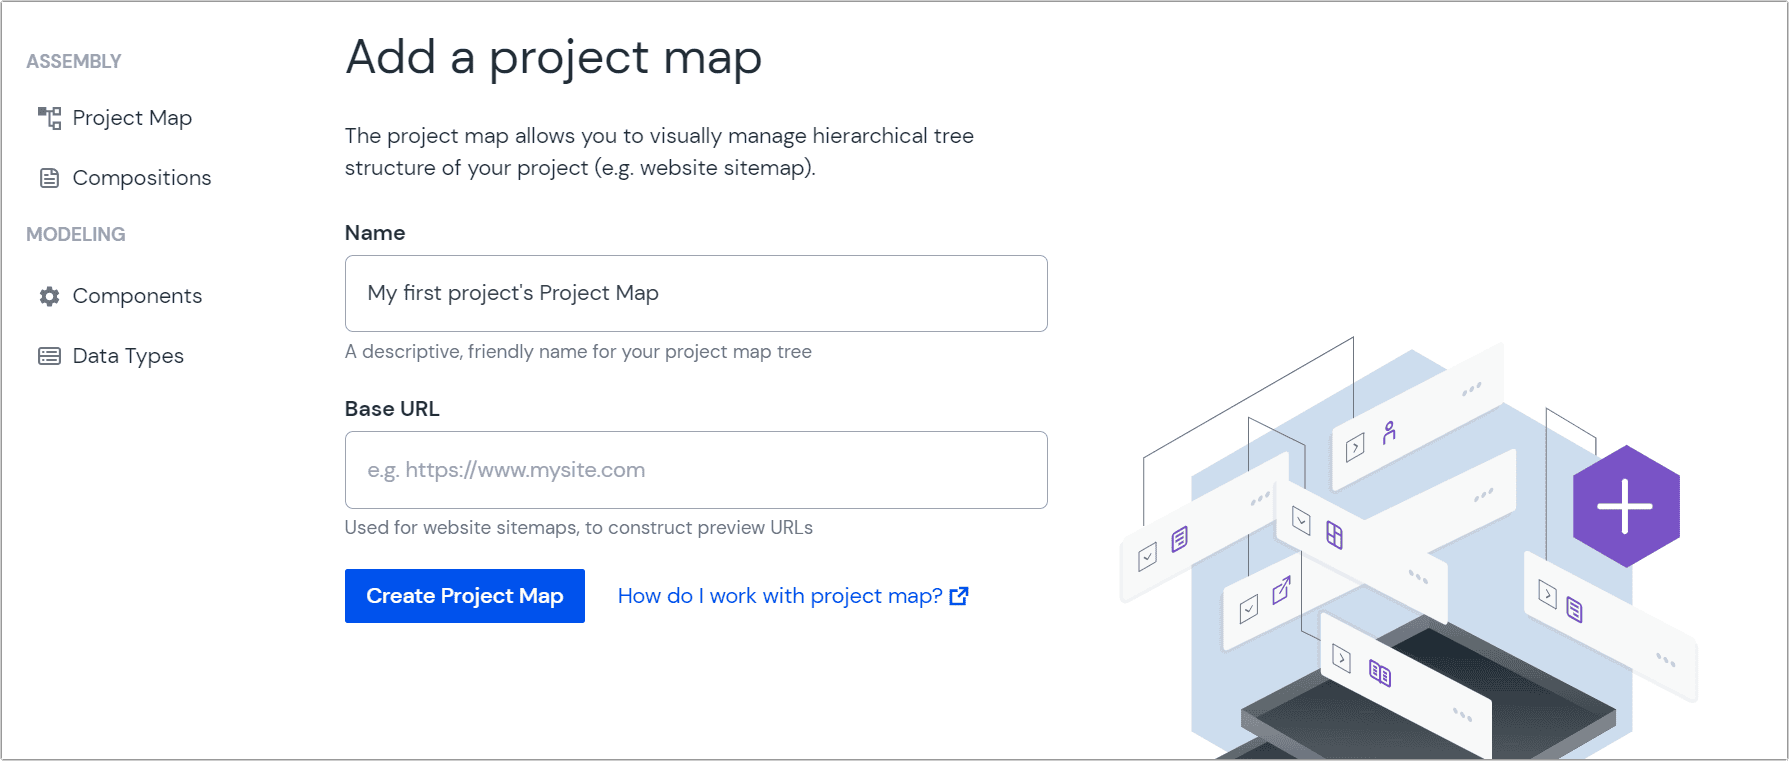 Add a project map.
Enter the following values:
Field Value Name A descriptive name for the project map. Base URL (optional) Base URL is used to create urls for the pages in project map so they can be previewed. This value can also be used for generating a sitemap.xmlfile.Click Create project map.
The project map is displayed.
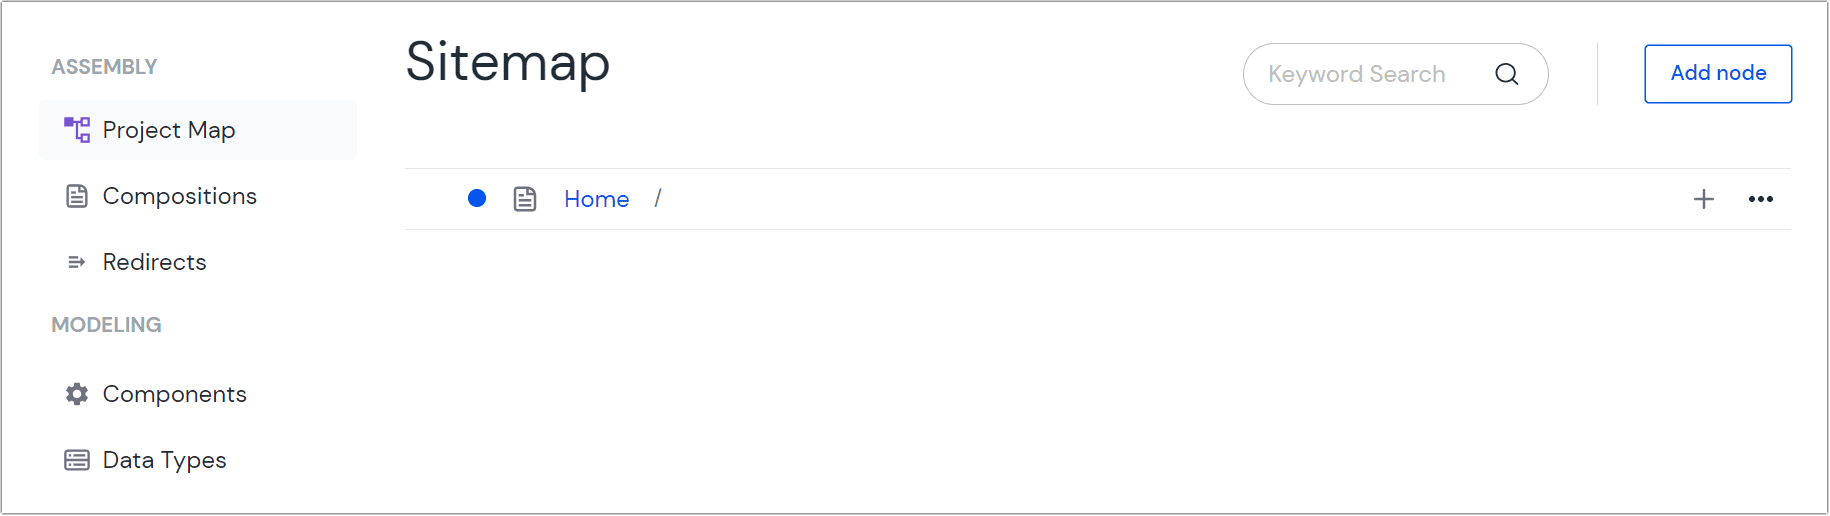 The Uniform app after a project map has been created
Delete a project map#
- In Uniform, navigate to Settings > Project map.
- Click the Delete project map button.
- In the confirmation modal enter the deletion code (which you can copy from the box above)
- Click Yes, delete to delete the project map.
Edit a project map#
- In Uniform, navigate to Settings > Project map.
- Edit the fields you want to change.
- Click Save project map.
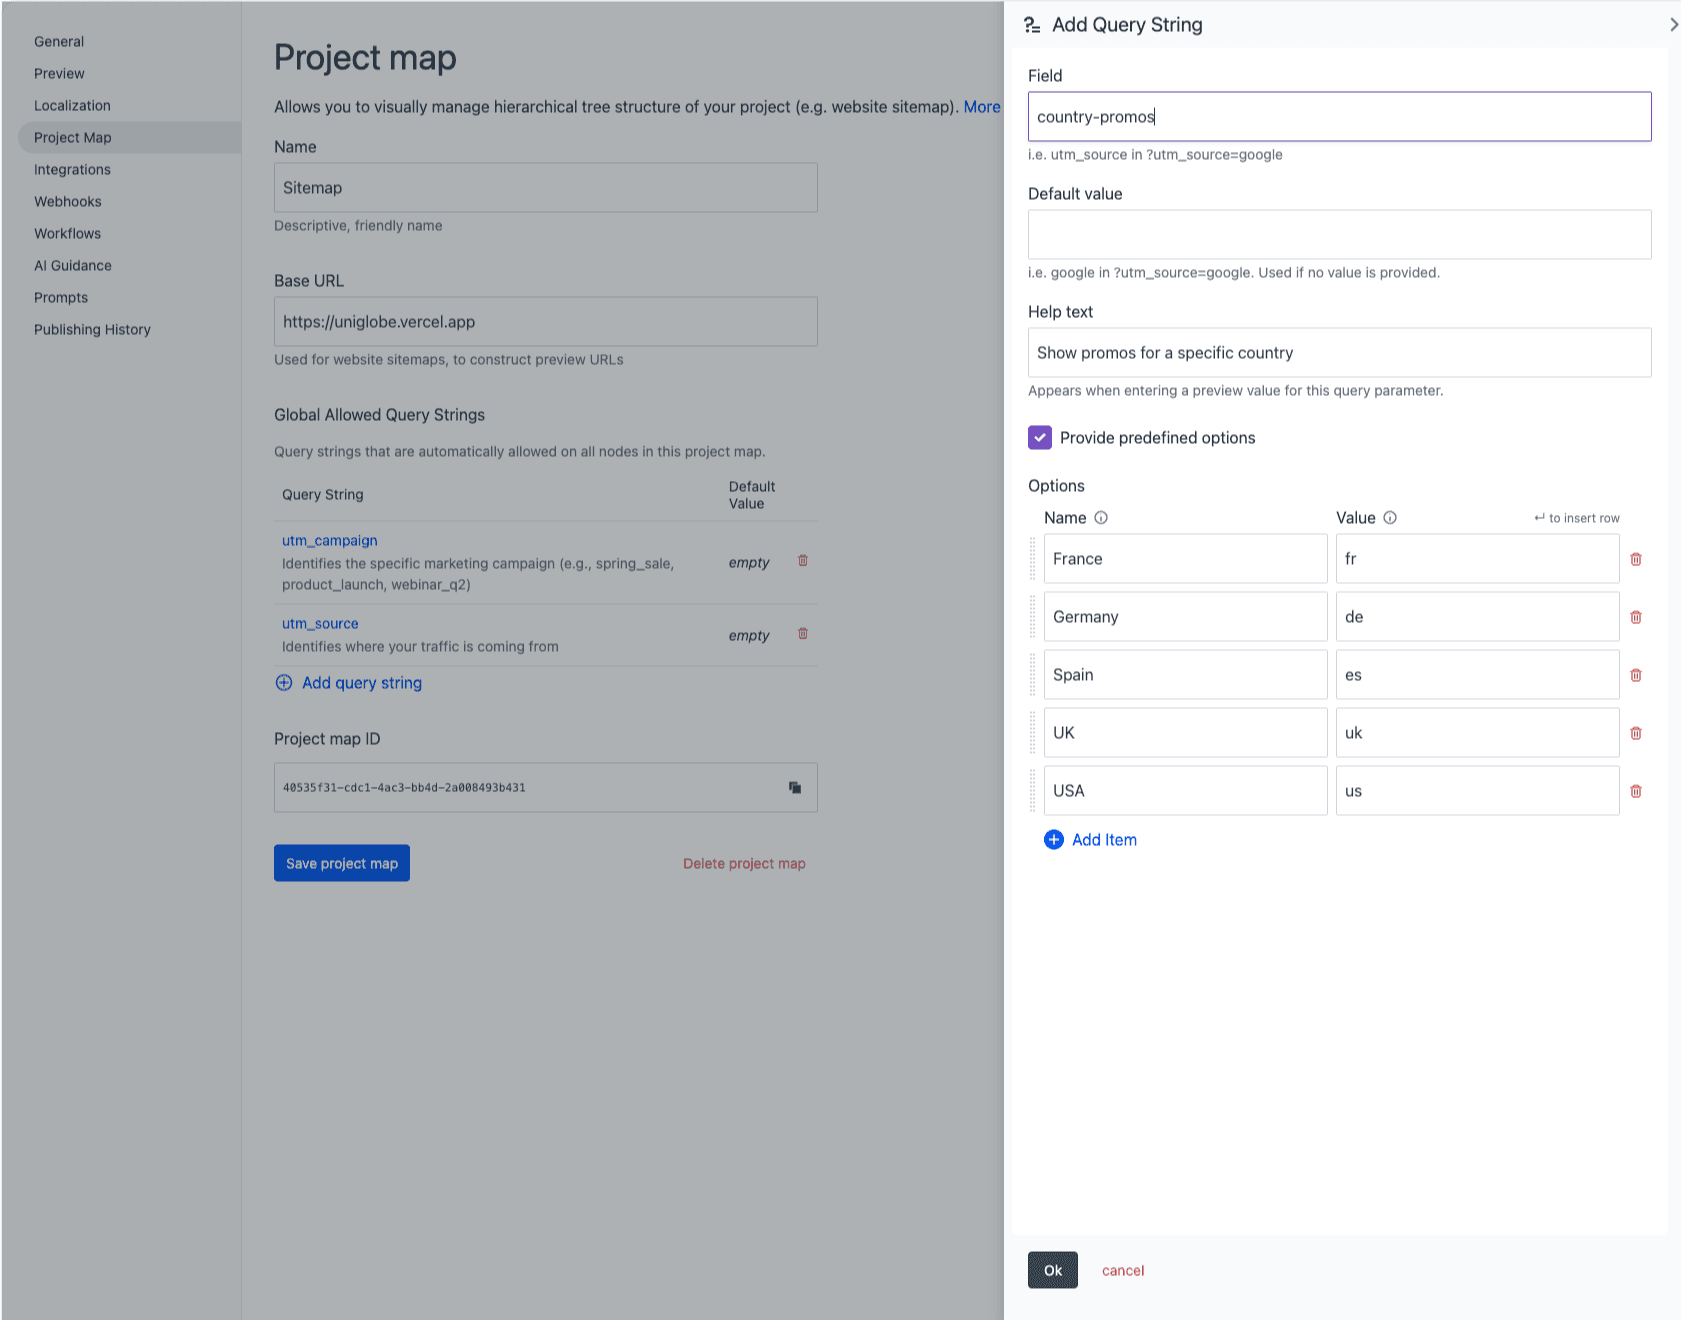
Configure global query strings#
Global query strings are query string parameters that are automatically available to all nodes in your project map.
Learn more about how query strings work as dynamic inputs and how to use them in compositions.
Navigate to Settings > Project map.
In the Global Allowed Query Strings section, click Add query string.
Enter the following values:
Field Value Query String The name of the query string parameter (e.g., utm_campaign,region,customerType)Default Value The default value to use when the query parameter is not present in the URL Help text (optional) Descriptive text to help authors understand what this query string is used for Predefined options (optional) Define key/value pairs to show a dropdown in the visual editor. The key is the internal display name shown to authors, and the value is the actual value used in the URL. Click Save project map.
Manage project map nodes#
Nodes represent a unique URL with exactly one parent (excepting the root node).
Add nodes to a project map#
In Uniform, navigate to Experience > Compositions and click on Project Map in the "Manage in" section of the left sidebar.
Select either the or the . If you selected , select "Add child node." If you selected , a few options will expand. If you're creating a new node from the base URL, select "INTO." If you're creating a new node under the base URL, you can chose either "AFTER" or "INTO."
- If you chose "INTO," a new node will be created as a child of the original node.
- If you chose "AFTER," a new node will be created as a sibling of the original node.
After selecting the node destination, a new panel will open to select the following values:
Field Value Name A human-friendly name for your node. If in the "Node type" settings you specified that a new composition should be created, this value is used as the name of the new composition. This field is required. Path segment Select Static, Dynamic, or Locale. This field is pre-populated from the name field but can be any slug-like string. Dynamic nodes create dynamic path segments that match any value. Locale nodes are a special type of dynamic node tied to locales configured in Settings > Localization. Localizations Click the Edit localizations to localize the node. This is only available if the path segment is set to Static.
Refer to the localized routes guide for more information on how to use and resolve localized routes.Attached composition
Select New, Existing, or None.
New: means a new composition will be created and attached to the new node. By default the new composition will have the same name as the node and its slug is set to the path segment of the node. This can be changed later when editing the composition.
Existing Attach an existing composition to the node. You can either select from the list provided or search for the desired composition.
None: means you don't yet have any composition for your node yet and you are only setting up a project structure, or that you are creating a placeholder node that doesn't have any content and plays role of structural parent in your tree (for example, if you have product page urls like these
/products/t-shirtand/products/jeans, but you don't have an actual/productspage. However, you need a/productsparent node to exist to have a valid site tree). Another use case for a placeholder node is when you want to represent a URL that is managed by a different system but you want to make it available in the project map for linking purposes.Allowed query strings
If the "Attached composition" is set to "New" or "Existing," there is an option to add query strings to your path. Click the Query strings button which opens a drawer that lists all query strings available to this node.
Node-specific query strings can be added for parameters that are only relevant to this specific route. Enter the field name, the default value, and any help text you want to provide authors. You can also define predefined options as key/value pairs to show a dropdown in the visual editor instead of free-text input.
Global query strings are automatically inherited by all nodes and appear in the list. These cannot be edited or removed at the node level.
Learn more about query strings as dynamic inputs.
 Configure a query string.
Location You will choose the location for the node within the tree, whether you create a new composition or placeholder. 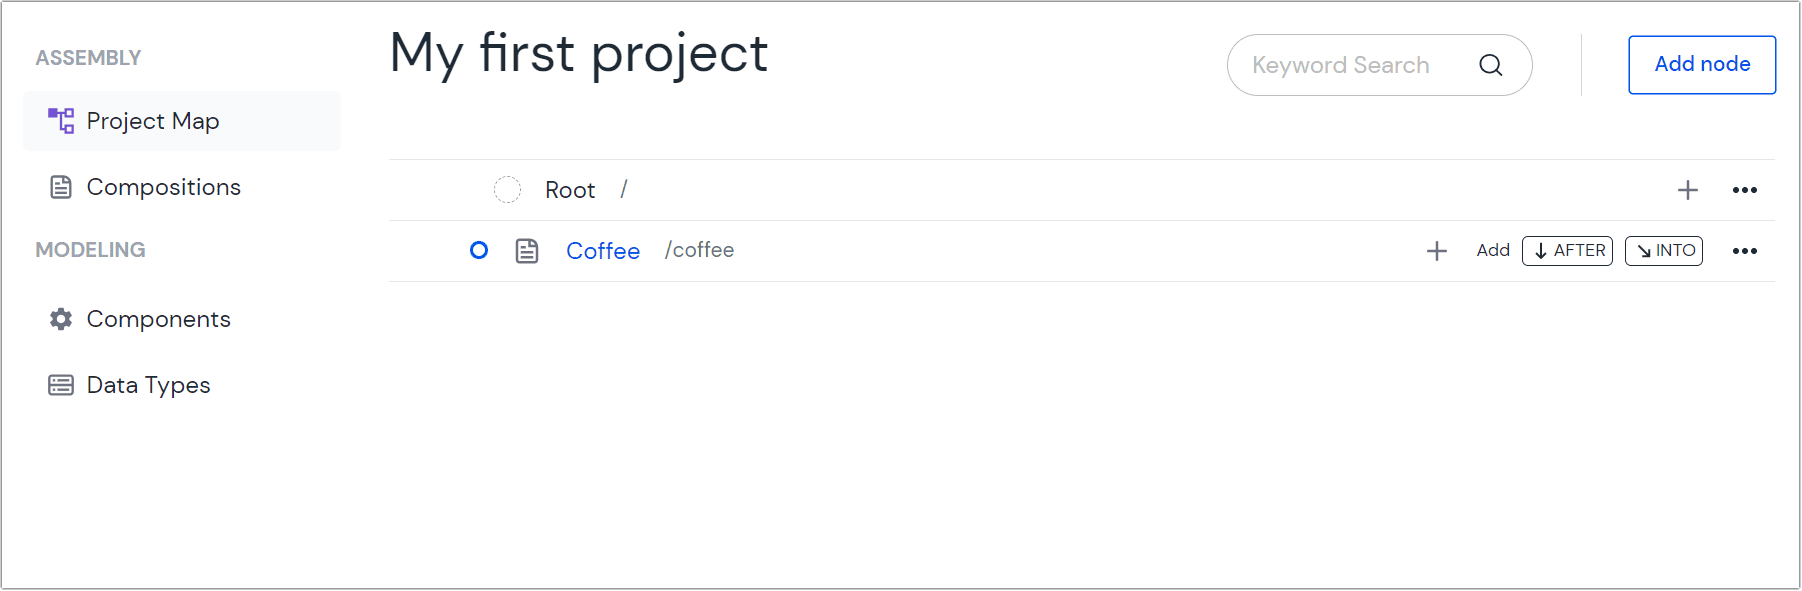 Options for adding new nodes.
How you save the node depends on the "Node type" you specified. Click one of the following options:
- Save & open Canvas: Create a node and composition and redirect to newly created composition page to start creating content there.
- Save & add another: Create a node but keep the "Add node" drawer opened to create a next sibling right away.
- Save & close: Create a node but keep the "Add node" drawer opened to create a next sibling right away.
Attach a composition to a node#
You can attach an existing composition to a project map node directly from the composition editor. This is useful when you have already created a composition and want to make it accessible at a specific URL in your project map.
In Uniform, navigate to Experience > Compositions and open the composition you want to attach to a node.
In the composition editor toolbar, click the Attach... button.
In the Attach a project map node panel, choose one of the following options:
- New node: Create a new project map node and attach the composition to it.
- Existing node: Attach the composition to an existing project map node.
If you selected New node: Follow the steps described in the add nodes to a project map section to create a new node and attach the composition to it.
If you selected Existing node:
- Use the search bar or browse the tree view to find the node you want to attach the composition to.
- Click on the node to select it. The selected node will show a "selected" badge.
- The location path will be displayed at the top of the panel showing the full path to the selected node.
 Attach a composition to an existing project map node
note
A composition can only be attached to one project map node at a time. If you attach a composition that is already linked to another node, it will be automatically detached from its previous node and attached to the new one.
Click Save to attach the composition to the selected node.
Newly attached compositions are immediately available at the updated URL
Once the composition is attached and the node is saved, any newly attached composition that is published will immediately become available at the updated URL.
Update a node#
Click the of the node you wish you edit. You'll see a list of options:
- Edit: This option opens a menu where you can change the node type, name, and segment of the node.
- Duplicate: Selecting this will create a new node in your project map as a sibling to the one duplicated. All attributes match the original except the path segment, which must be unique.
- Add node before: Opens the "create node" menu to create a new node that sits above the original in the project map tree.
- Add node after: Opens the "create node" menu to create a new node that sits below the original in the project map tree.
- Add child node: Opens the "create node" menu to create a new node that's a child of the original.
- Move node to...: Opens a menu that shows the selected node and options for where it should be moved. Select an option by choosing "AFTER" or "INTO" in the preferred node.
- Delete: This deletes the selected node.
Localize a node#
Project maps support the optional localization of nodes to any locale that is configured in the project.
Learn more about localized routes and how the Route API resolves locale-specific paths.
Project maps are not localized
While you can localize the individual nodes of a project map, the project map itself is not localized. This means that the project map always has the same node structure across all locales.
Each project map node initially has a locale agnostic name and path segment. This is used as a fallback when no localized version is available for a specific locale.
To localize a node:
Navigate to Experience > Project Map.
Click the of the node you want to localize and select Edit.
Click Edit localizations button below the "Path Segment" section to open the "Localize" panel. The count of existing localizations is shown in the button. This setting is only available for nodes set to the "Static" path segment type.
 Edit localizations of a project map node
In the "Localize" panel all configured locales are shown. For each locale you can enter a localized name and path segment. The path segment is used to generate the URL for the node in the specific locale.
 Localize a project map node
Click Accept to close the panel.
Click Save to save the node with the localizations.
Back on the project map page you can use the locale selector on the top of the page to switch between the different locales and see the localized nodes.
 Browsing localized nodes in the project map
Like with any path segment in project map nodes, localized project map path segments cascade down the tree to represent the full URL path. This means that if a parent node has a localized path segment, all child nodes will inherit the localized path segment of their parents. If a node in the tree has no localized path segment, it will use the fallback path segment of the node.
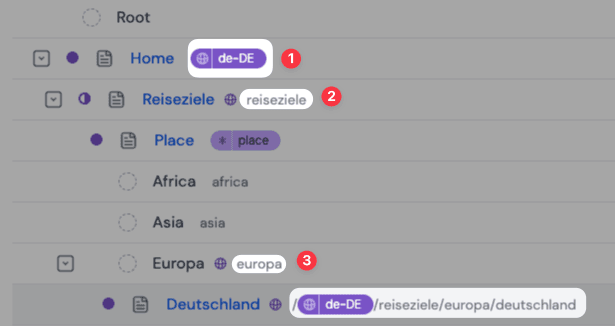
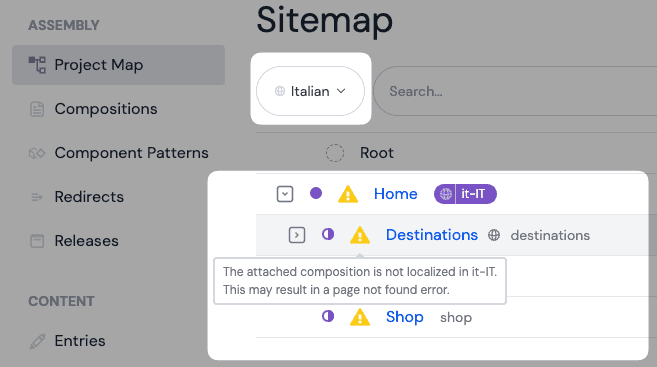
By localizing a node of a project map you only define the localized route for that node. This alone does not make the attached composition available in a specific locale. To make the composition available in a specific locale you need to localize the attached composition itself. If a composition is not localized for the currently selected locale, this will be indicated in the project map.
Link to nodes with the Link parameter#
Add a Link parameter to a component definition#
For managing internal links in Uniform you need to add a link parameter to a component.
Go to the component library in the project and choose the component that should contain the link parameter
Follow the steps described in the parameter guide
Choose a Parameter name (such as "Internal link")
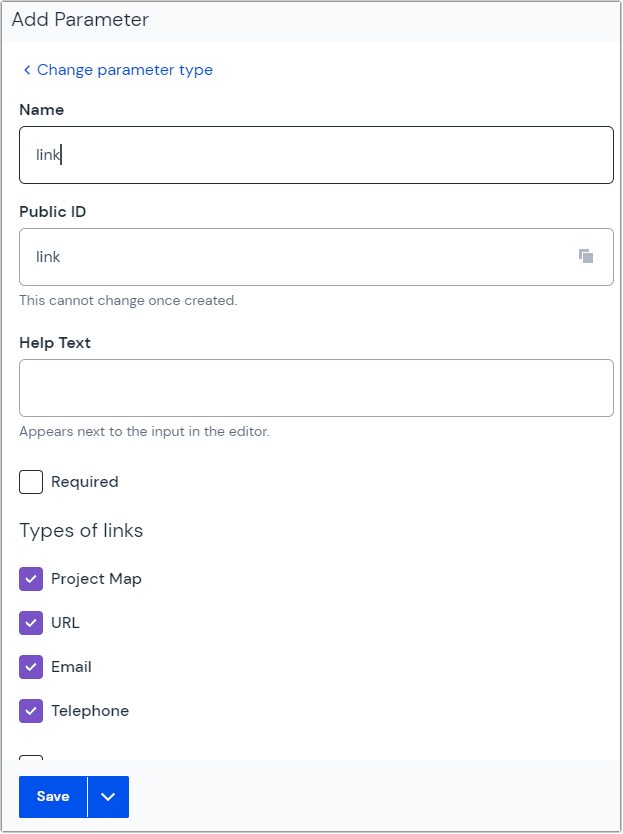
Select the
Linktype as the parameter typeDefine if the link parameter should be required
Select "Ok" to add the parameter to the component definition
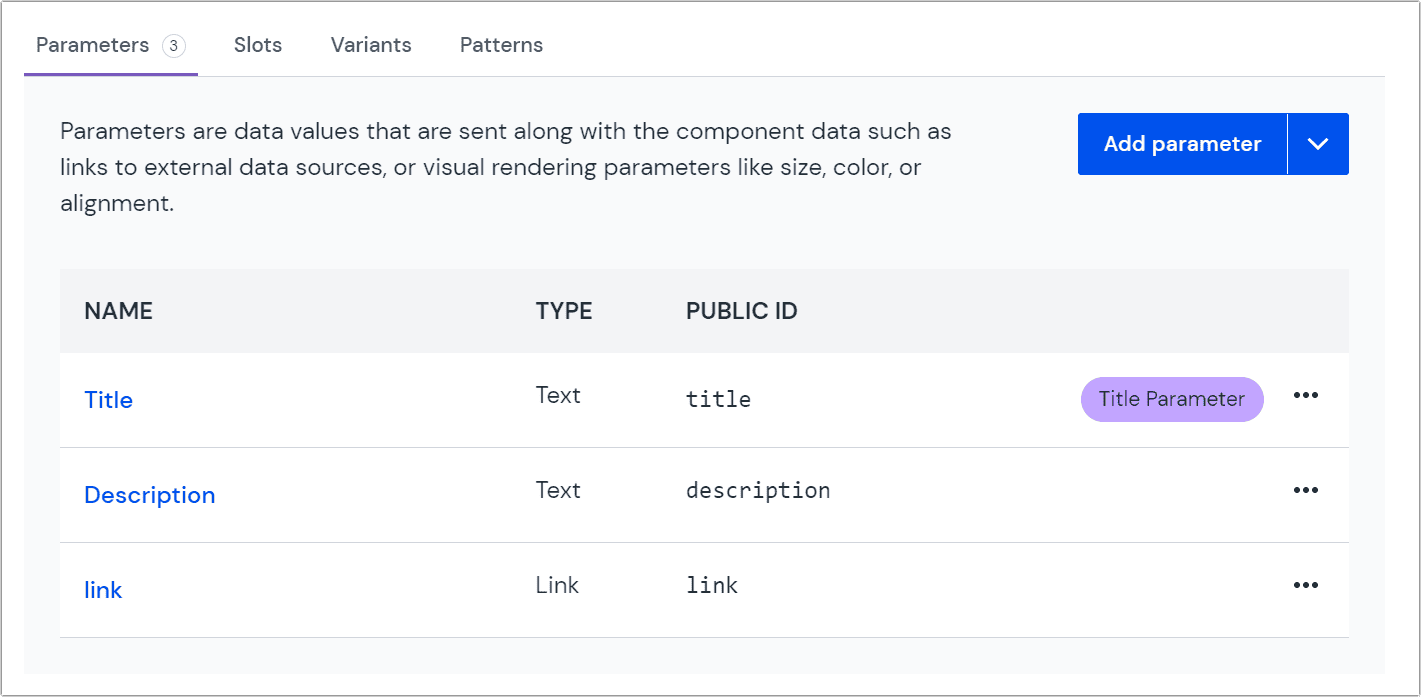 List of parameters of a component
Hit "Save and close" to save the component definition and return to the component list
Create a link#
- Go to the Project Map section of Canvas and open a composition that has component instance with an link parameter.
- Choose Configure link and a panel will appear so you can select the target node from the project map.
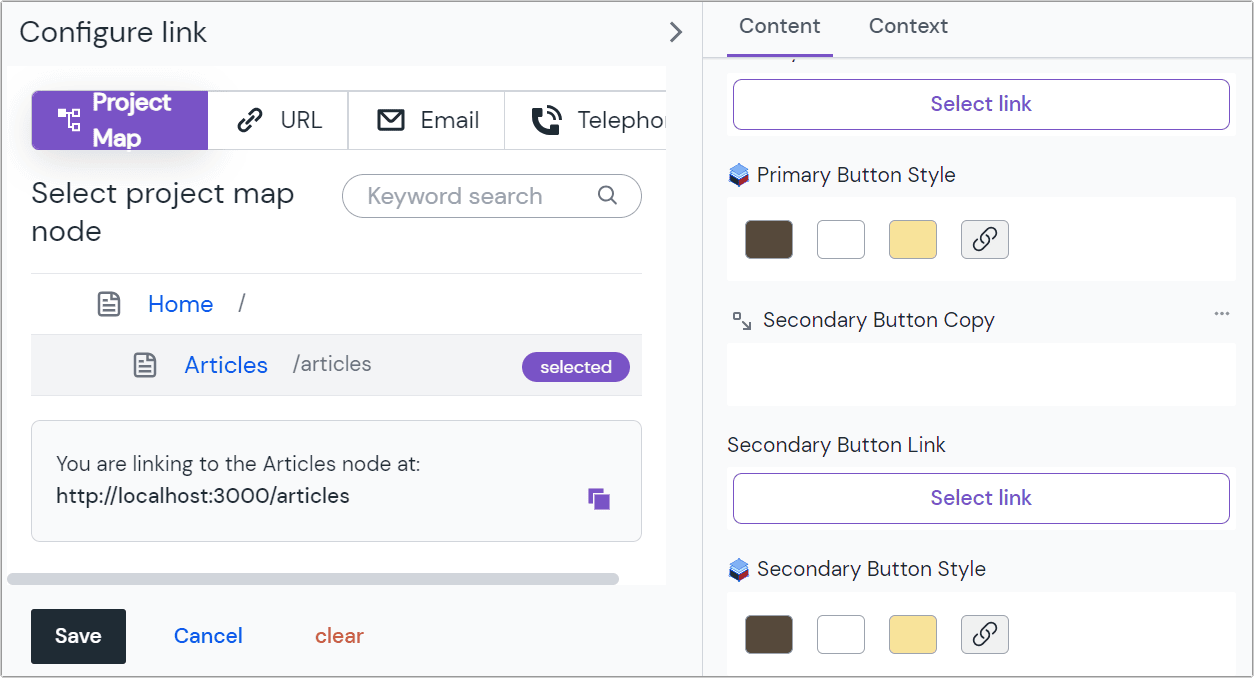 Selection of a node for the link parameter
 - Click on Save and the link parameter is updated.
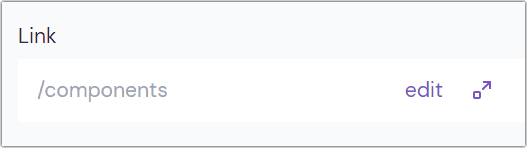 Link parameter with a link added
Update the link#
- Go to the Project Map and open a composition that has component instance with an link parameter.
- On the link parameter click on Edit and a panel will appear so you can select a different target node from the project map
- Click on Save and the link parameter is updated.
Clear the link#
- Go to the Project Map section of Canvas and open a composition that has component instance with an link parameter.
- On the link parameter click on Edit and a panel will appear so you can select a different target node from the project map.
- Click on Clear and the link is removed.
- Click outside the panel to close it.
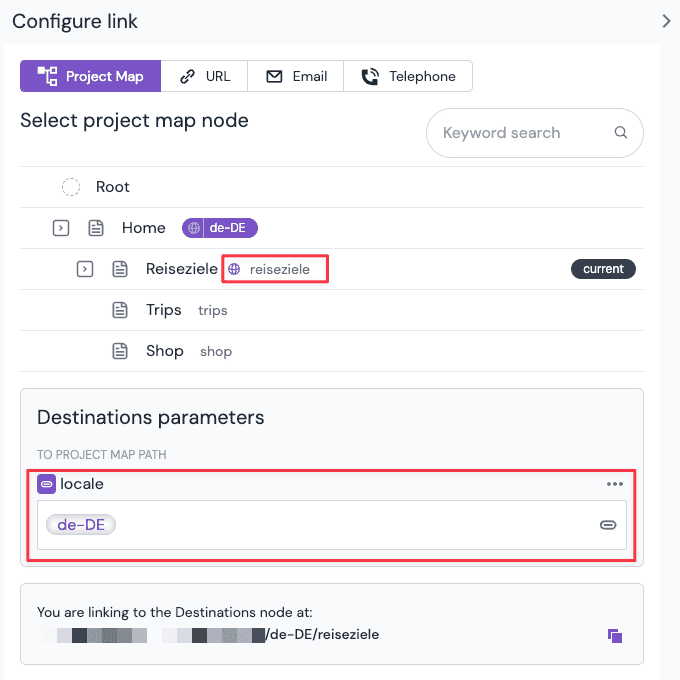
Link to localized nodes#
For projects with configured locales, you can link to localized project map nodes using the link parameter. By default, this parameter links to the node in the currently selected locale. If the target node has a localized path segment for the current locale, this link will use it. If not, the fallback path segment will be used.
Link to dynamic nodes#
Go to the Project Map section of Canvas and open a composition that has component instance with an link parameter.
Choose Configure link and a panel will appear so you can select the target node from the project map which contains a dynamic path segment (the purple chip with a
*) or a node with allowed query strings (the purple chip with a?). Below the project map you can see a form which shows the available dynamic input parameters. Enter the desired values for the dynamic path segments or query parameters.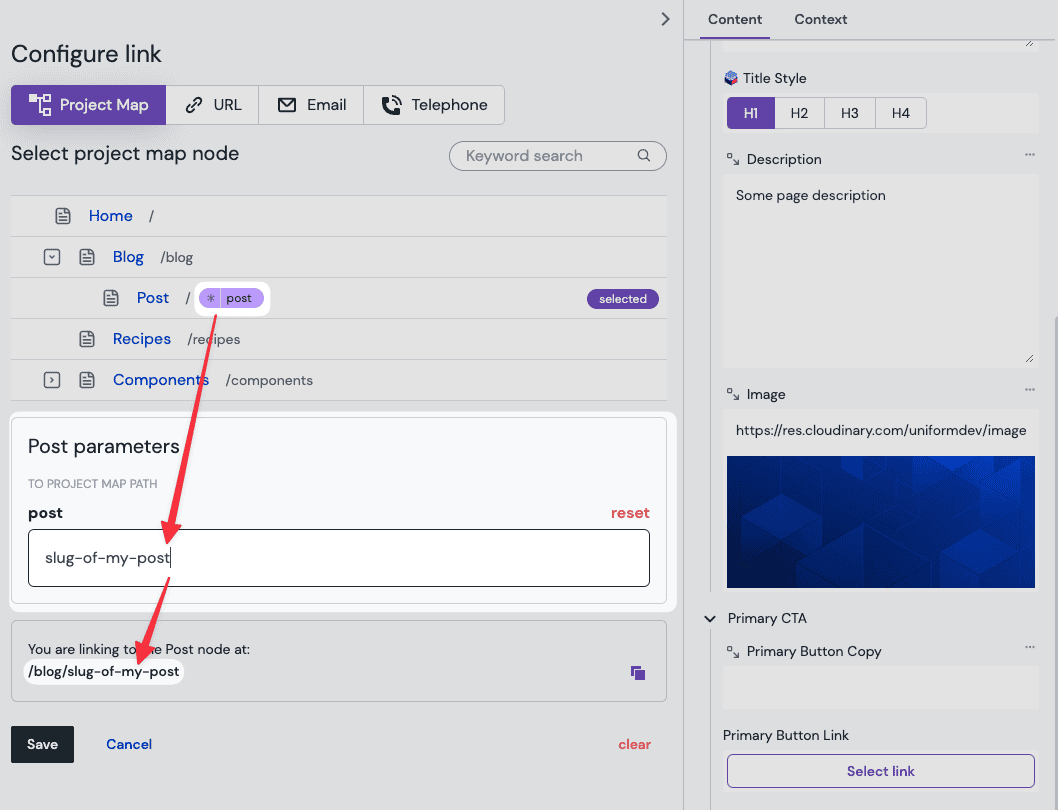 Link parameter with a dynamic input.
Click on Save and the link parameter is updated.
Set link attributes and anchors#
If the link parameter is configured with allowed custom link attributes or has anchors enabled, the link dialog shows additional inputs beneath the node picker or URL field:
- One input per configured attribute. Depending on the configuration, this is either a dropdown of predefined options or a free-text field, along with any label and help text the content modeler provided.
- An Anchor input, when anchors are enabled for the field. Enter a fragment (such as
section-pricing) to make the link jump to a specific element on the linked page. The anchor is appended to the URL preview wherever the link is shown, and it's preserved even if the linked node is later renamed or moved. For URL links, type the fragment directly into the URL instead; email and telephone links don't support anchors.
Inputs that are left empty aren't stored on the link value. The same inputs are available for inline links in rich text parameters when the link element is configured with attributes or anchors.
