How to install Uniform Insights
Uniform Insights is a standalone capability provided by Uniform that is distributed as an official integration on top our platform.
First step is to add this integration to your project, but before we get started, there are two pre-requisites.
Pre-requisites
- You must be an team admin in your Uniform team to install this integration.
- Your Uniform account manager has already enabled this integration for your project.
How to install#
Go to your project and navigate to Settings > Integrations.
Find Uniform Insights in the list of available integrations under the
Analyticscategory. Uniform Insights integration in the list of available integrations
Click on the integration and then click the Add to project button.
Specify your desired
Endpointfrom the dropdown menu and theRead Access Keyprovided by your Uniform account manager and clickSave. Insights integration settings
Congratulations! You've successfully added the Uniform Insights to your project. The last step is to configure the Insights plugin for the Uniform Context tracker.
How to configure the Insights plugin#
Uniform Context tracker has a plugin system that allows you to add custom behavior to the tracker. For example, sending events about A/B testing and Personalization to any destination. Uniform Insights is using the same infrastructure to send event data to the Insights ingestion endpoint.
Once the event data is collected, it is available within your project UI in seconds.
In order to instument your web application to send data to the Insights ingestion endpoint, you need to add a special Insights plugin for the Uniform Context tracker.
This one-time configuration requires a simple code change in your application.
First, you will need the endpoint URL, which you can grab from the integration settings page by copying the value from the
Endpointfield. Copy your endpoint URL from the integration settings page
Next, you will need the
API keyto be able to push events to the Insights ingestion endpoint. This is a different key from the one you need for the Read API. Your Uniform account manager can provide you with the API key.Front-end framework specifics
The example below is for Next.js, but similar apply for other front-end frameworks. If you are using a different framework, and in doubt on how to do this, please reach out to us at support@uniform.dev.
Add the following environment variables to your project:
.env# insert the endpoint URL you just copied into your clipboard from the settings page UNIFORM_INSIGHTS_ENDPOINT = 'your endpoint url' # insert the API key provided by your Uniform account manager UNIFORM_INSIGHTS_KEY = 'your api key'Find the implementation of your
createUniformContextinside your web application. This is where all Uniform Context plugins are registered. Typically, it looks something like this:createUniformContext.ts// existing imports... export default function createUniformContext(manifest, serverContext) { const plugins = [] return new Context({ defaultConsent: true, manifest, transitionStore: new NextCookieTransitionDataStore({ serverContext, }), plugins: plugins, }) }clientContext.tsx// existing imports... export const UniformClientContext: ClientContextComponent = ({ manifest }) => { useInitUniformContext(() => { const plugins: ContextPlugin[] = [] return createClientUniformContext({ manifest, plugins, defaultConsent: true, }) }) return null }Import
enableUniformInsightsfrom the@uniformdev/contextpackage and add it to the list of plugins (ensure that this is activated client-side).createUniformContext.tsimport { enableUniformInsights } from '@uniformdev/context' // existing imports... export default function createUniformContext(manifest, serverContext) { const plugins = [] // adding the insights plugin client-side only if (typeof window !== 'undefined' && window.document) { plugins.push( // running against a local endpoint, will use edge middleware to rewrite to the actual endpoint enableUniformInsights({ endpoint: { type: 'proxy', path: '/api/analytics', }, }) ) } return new Context({ defaultConsent: true, manifest, transitionStore: new NextCookieTransitionDataStore({ serverContext }), plugins: plugins, }) }clientContext.tsx'use client' // existing imports... import { ContextPlugin, enableUniformInsights } from '@uniformdev/context' export const UniformClientContext: ClientContextComponent = ({ manifest }) => { useInitUniformContext(() => { const plugins: ContextPlugin[] = [] plugins.push( // running against a local endpoint, will use edge middleware to rewrite to the actual endpoint enableUniformInsights({ endpoint: { type: 'proxy', path: '/api/analytics', }, }) ) return createClientUniformContext({ manifest, plugins, defaultConsent: true, }) }) return null }Add a proxy route to your Next.js application to rewrite the path to the Insights ingestion endpoint.
/api/analytics.tsimport { NextApiRequest, NextApiResponse } from 'next' export default async function handler(req: NextApiRequest, res: NextApiResponse) { const destination = new URL(process.env.UNIFORM_INSIGHTS_ENDPOINT!) destination.pathname = '/v0/events' destination.searchParams.set('name', 'analytics_events') const response = await fetch(destination.toString(), { method: 'POST', headers: { Authorization: `Bearer ${process.env.UNIFORM_INSIGHTS_KEY}`, }, body: JSON.stringify({ ...req.body, project_id: process.env.UNIFORM_PROJECT_ID }), }) const json = await response.json() res.status(response.status).json(json) }app/api/analytics/route.tsimport { NextRequest, NextResponse } from 'next/server'; export async function POST(req: NextRequest) { if (!process.env.UNIFORM_INSIGHTS_ENDPOINT || !process.env.UNIFORM_INSIGHTS_KEY) { throw Error('Check Uniform Insights connection settings'); } const destination = new URL(process.env.UNIFORM_INSIGHTS_ENDPOINT); destination.pathname = '/v0/events'; destination.searchParams.set('name', 'analytics_events'); const data = await req.json(); const response = await fetch(destination.toString(), { method: 'POST', headers: { Authorization: `Bearer ${process.env.UNIFORM_INSIGHTS_KEY}`, }, body: JSON.stringify({ ...data, project_id: process.env.UNIFORM_PROJECT_ID }), }); const ingestionResponse = await response.json(); return NextResponse.json(ingestionResponse, { status: response.status }); }
Why proxy?
The purpose of not exposing your write API key as well as the ingestion endpoint running on another domain is to prevent ad blockers from blocking the events.
Verify your events are being sent#
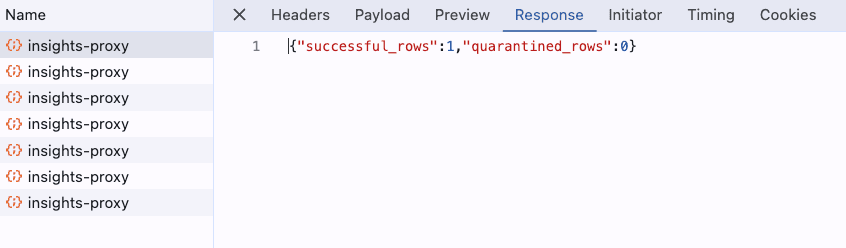
If everything is working, you should see your sent to /api/analytics in the network tab of your favorite browser dev tool. It's expected to see 202 status code for each event sent with the following response body.
Make sure that successful_rows returns 1 and quarantined_rows returns 0: