Content integration tutorial
Uniform enables you to build custom integrations that provide Uniform access to any content source with an available API. This allows you to extend Uniform's no-code data mapping and edge caching capabilities to any content source you like.
Do you need a custom integration?
A custom integration gives you full control over how you interact with an external content source, as well as the UI for visually selecting content from that external source.
In many cases, the HTTP Request data type offers everything you need to integrate external content. We have a knowledge base article on making content from a REST endpoint available to Uniform.
If you've determined that you do, in fact, need a custom integration, this tutorial will guide you through the process of building one.
CMS integration starter kit
We provide a CMS integration starter kit that demonstrates how to build an external CMS integration using a mocked CMS API. This starter kit serves as an excellent foundation for building any content integration, whether for a CMS or other content repository.
About the integration#
This tutorial guides you through the process of building a custom integration for a WordPress site. The reason for building a custom integration is you want to provide a more tailored experience for people using the integration than the HTTP Request data type offers.
A custom integration consists of the following components:
| Component | Description |
|---|---|
| Web application | Provides the UI for configuring the integration and the logic to interact with the data source. In this case, the data source is a WordPress site. During this tutorial, the application will run on |
| Manifest | Tells Uniform how to incorporate the integration into the Uniform UI. The manifest is written using JSON. This manifest should not be confused with the Uniform Context manifest, which is used for visitor classification and testing. |
Create the integration#
You will use a Uniform CLI command to create a new integration. In addition to creating a new integration, it will register the integration in your Uniform team and install the integration in a Uniform project.
Open a terminal and run the following command:
npx @uniformdev/cli@latest new-integrationWhen asked for a team to add the custom integration to, select your team.
About this step
A custom integration must be registered in your Uniform team. This can be done manually, but the
new-integrationcommand does it automatically.When asked for the name of your integration, enter the following value:
WordPress Site IntegrationWhen asked for the project you want to add the integration to, select your project.
About this step
A custom integration can be added to any project in your Uniform team. This can be done manually, but the
new-integrationcommand does it automatically.When the command is finished, a Next.js application will be running on port
9000.About this step
The
new-integrationcommand creates a Next.js application for you, but you can use any technology you want to build the web application.
Configure environment variables#
Environment variables are needed in order to push configuration changes for your custom integration to Uniform.
- Create the following file:
.env
- Set the following values in the file:
| Variable name | Value |
|---|---|
UNIFORM_API_KEY | A Uniform API key with the Team Admin setting enabled. |
UNIFORM_TEAM_ID | The Uniform team ID where the custom integration is defined. |
UNIFORM_PROJECT_ID | The Uniform project ID where the custom integration is installed. |
UNIFORM_CLI_BASE_EDGE_URL | Set to https://eu.uniform.global for EU region teams. |
UNIFORM_CLI_BASE_URL | Set to https://eu.uniform.app for EU region teams. |
Implement helper functions#
A number of helper functions will make it easier for you to build your custom integration. None of these functions contain any Uniform code.
Create a file lib.ts in the root folder of your application:
Implement the settings page#
The settings page allows a user to configure the integration for the specific Uniform project. In this example, there are no integration-wide settings, so this page will just display some basic information to the user.
Access the settings page#
- In Uniform, open the project you added the custom integration to.
- Navigate to Settings > Integrations.
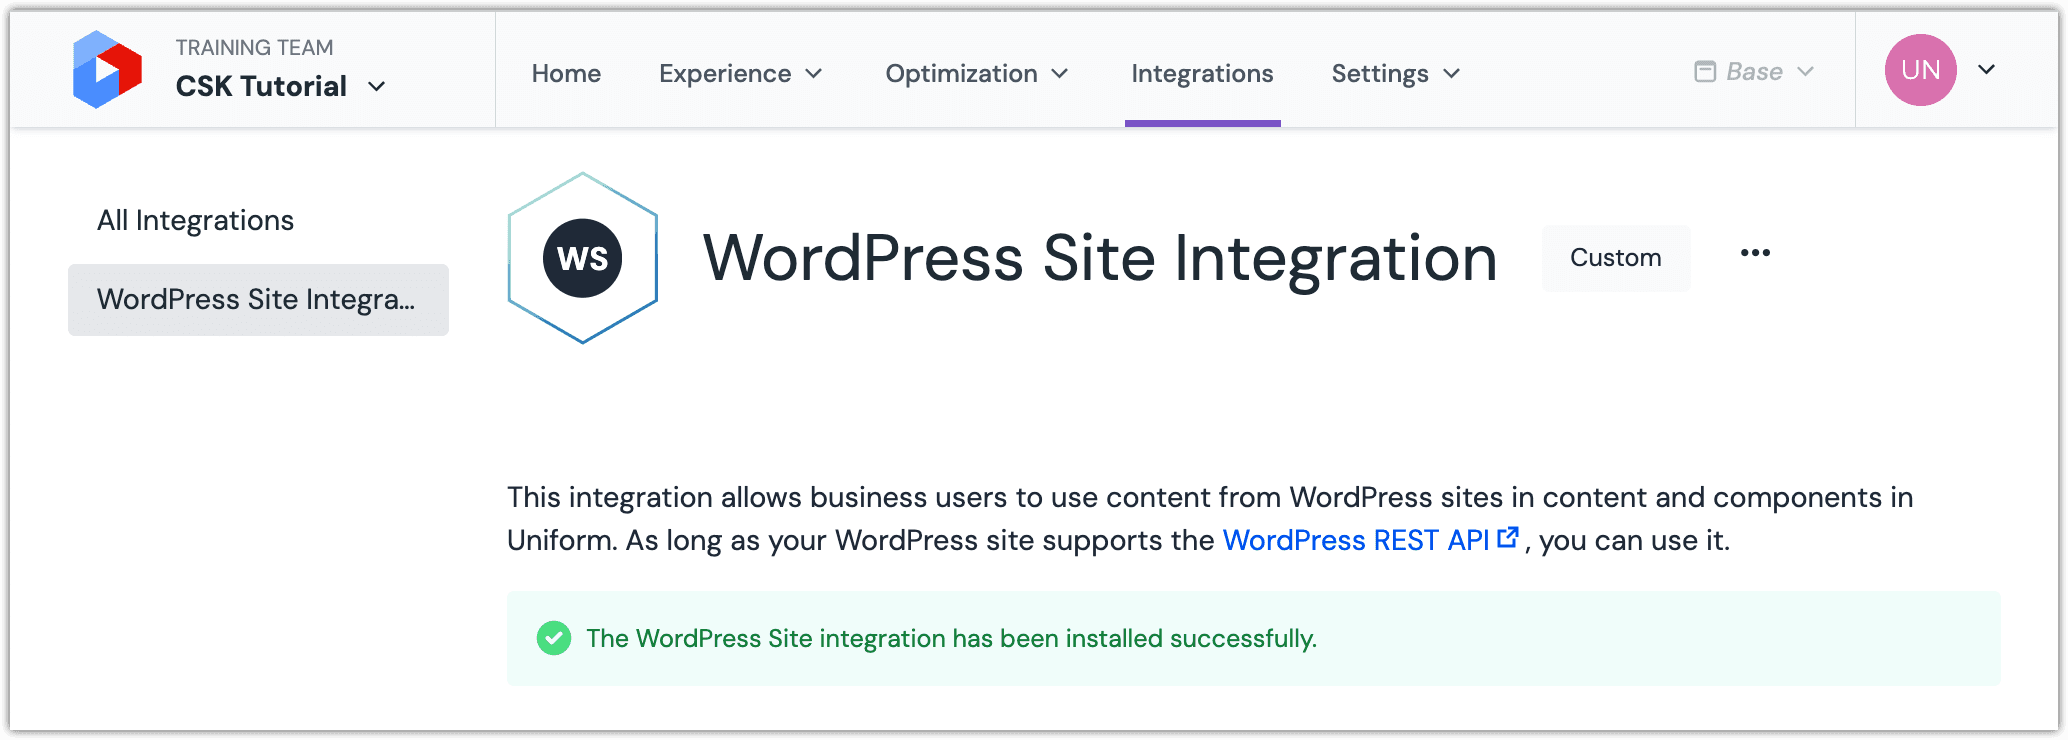
- In the section ADDED INTEGRATIONS find the integration WordPress Site Integration.
- Click Configure.
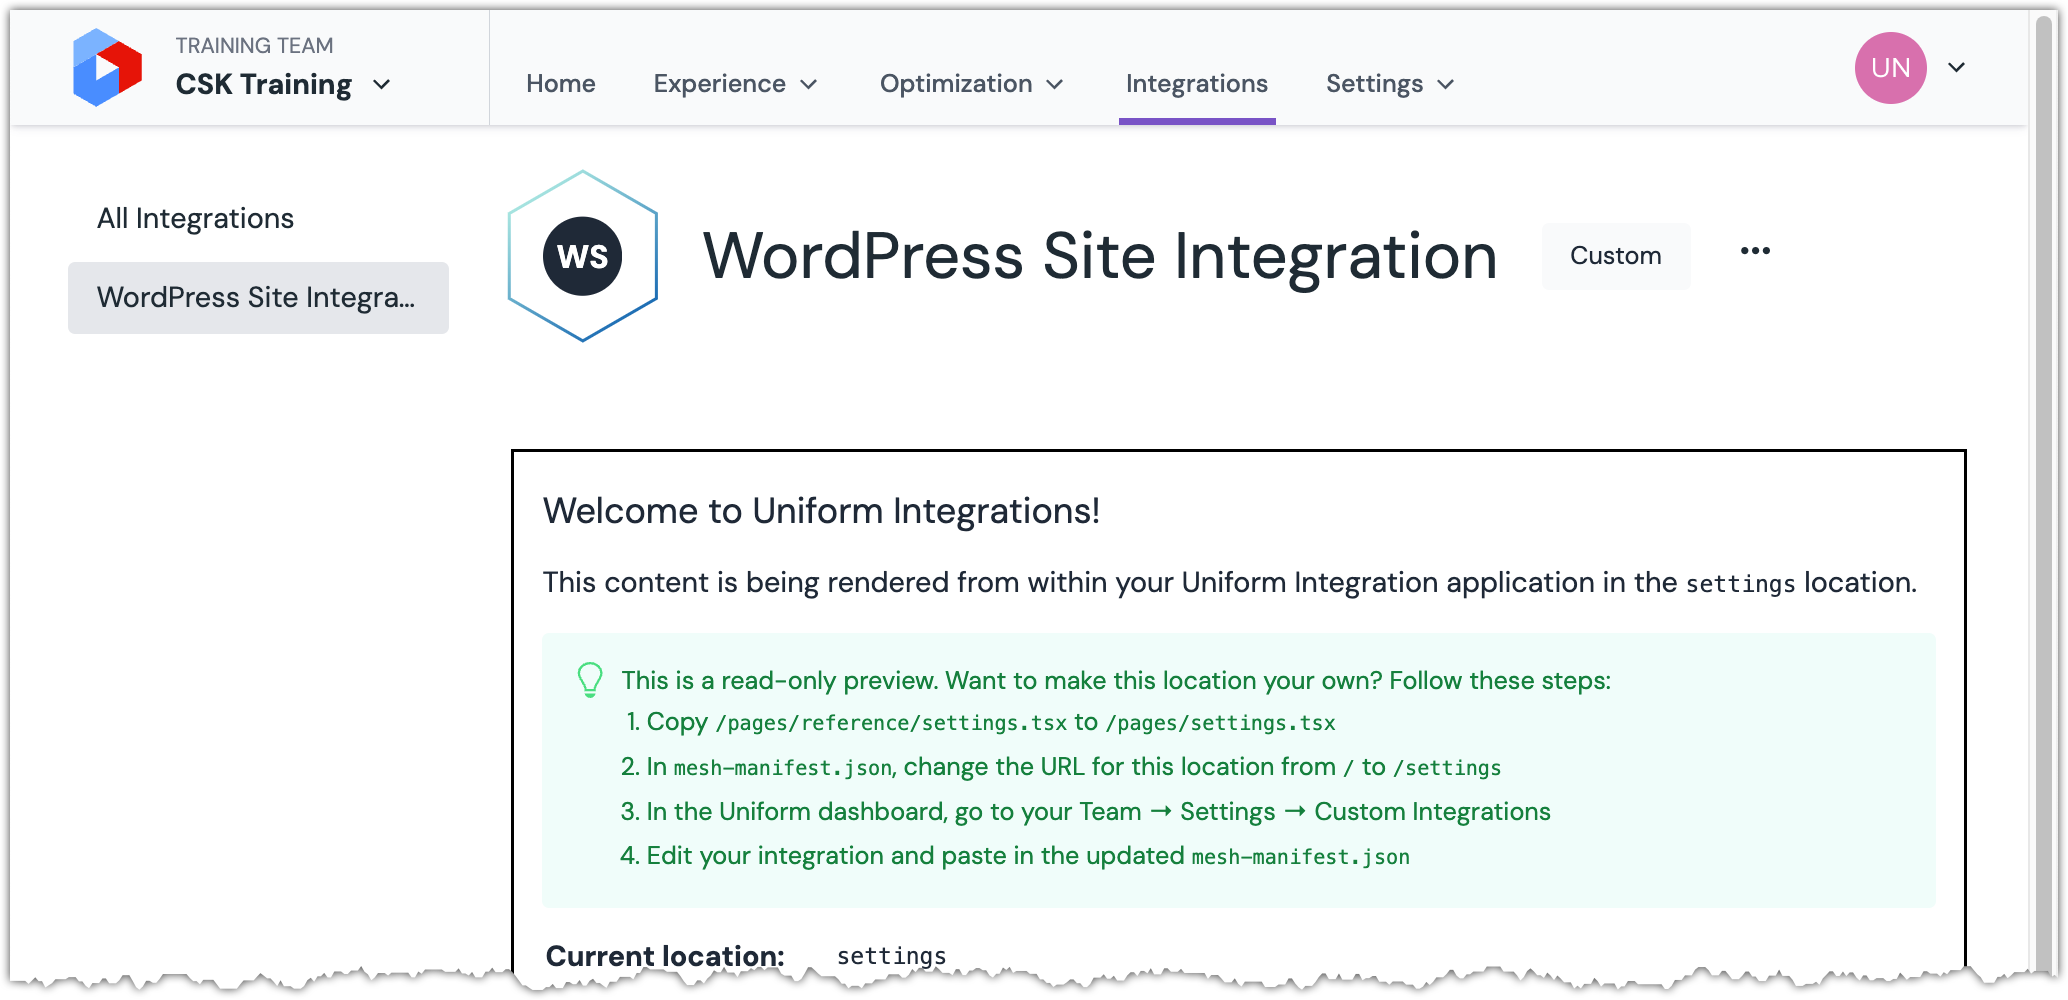 By default, the settings page shows documentation.
About this step
The manifest tells Uniform which URL to load. In this case, it is a page in the Next.js application that is running on port
9000.
Create the settings page#
In the source code for the Next.js application, create the following file:
pages/integration-settings.tsx
import { Callout, Link } from '@uniformdev/design-system' import type { NextPage } from 'next' const Settings: NextPage = () => { const link = ( <Link text="WordPress REST API" external={true} href="https://developer.wordpress.org/rest-api/reference" /> ) return ( <div> <p> This integration allows business users to use content from WordPress sites in content and components in Uniform. As long as your WordPress site supports the {link}, you can use it. </p> <Callout type="success">The WordPress Site integration has been installed successfully.</Callout> </div> ) } export default SettingsAbout this step
This page uses components from the Uniform Design System to achieve a UI that is consistent with the rest of Uniform.
Change the route for the settings page#
- Open the file
mesh-manifest.json. - Replace the contents of the file with the following:
mesh-manifest.json
{ "type": "wordpress-site-integration", "displayName": "WordPress Site Integration", "baseLocationUrl": "http://localhost:9000", "locations": { "settings": { "url": "/integration-settings" } } } - Open a terminal in the root of the app.
- Run the following command:npm run register-to-team
About this step
This pushes the changes in the manifest file to Uniform.
Test the settings page#
In Uniform, refresh the settings page to see your changes.
Implement data connectors#
Data connectors in a custom integration declare the data source and the data archetypes that will be available in a project that uses the integration. It will enable a user to map content from a specific WordPress site to content and components in their Uniform project. There are several parts that need to be created in order to support this:
| Name | Description |
|---|---|
| Data source | Specify the settings required to connect to a WordPress site. |
| Data archetype | Allows a user to select a specific type of content from the data source. This tutorial guides you through creating archetypes that allow a user to select a single post from a WordPress blog. |
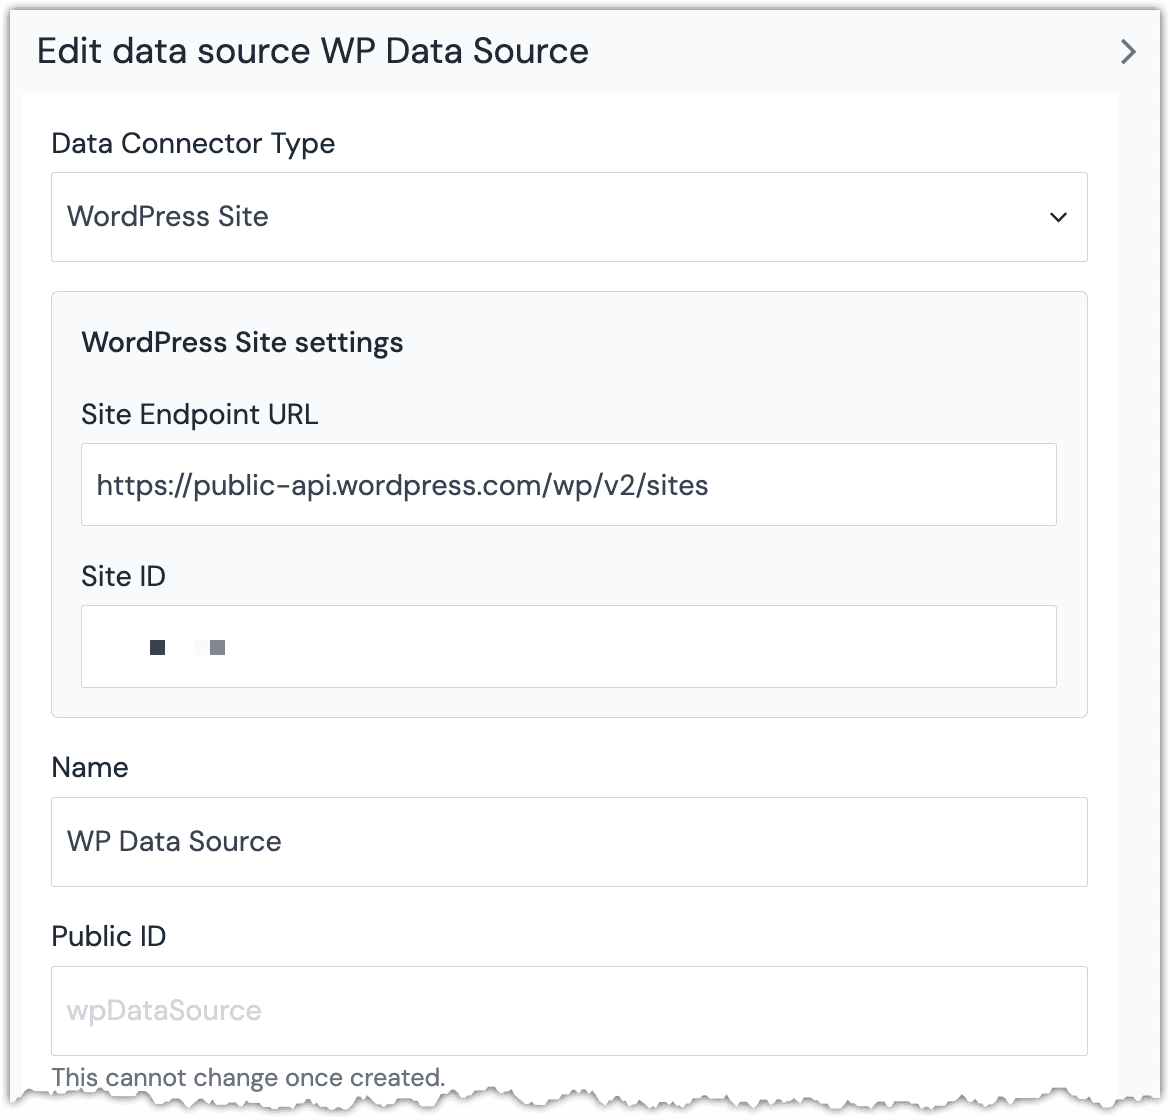
Create the data source editor page#
The data source editor page will enable a user to specify the settings requires to connect to the WordPress site. All of the archetypes you will create will use the settings from this page to retrieve blog posts from WordPress.
Create the following file:
pages/site-data-source-editor.tsx
import { Input, VerticalRhythm } from '@uniformdev/design-system' import { useMeshLocation } from '@uniformdev/mesh-sdk-react' import type { NextPage } from 'next' import { useEffect, useState } from 'react' import { hasValue, join } from '../lib' const DEFAULT_WP_ENDPOINT = 'https://public-api.wordpress.com/wp/v2/sites' /** * This type represents the settings for the data source. * These values are saved to Uniform and are used when * the integration connects to the WordPress API. */ type Settings = { endpointUrl: string siteId: string } const DataSource: NextPage = () => { /** * The Mesh location gives access to the settings * for the settings page that have been saved, and * a function for updating those settings. */ const { setValue, value } = useMeshLocation('dataSource') /** * Custom configuration is used to store the data * source settings that are combined to create the * base URL. Storing these values makes it possible * to display the values to the user so the user * can change these values in the future. */ const settings = value.custom as Settings /** * State variables for storing the values the user * enters. These values are combined to create the * base URL. */ const [endpointUrl, setEndpointUrl] = useState(settings?.endpointUrl ?? DEFAULT_WP_ENDPOINT) const [siteId, setSiteId] = useState(settings?.siteId ?? '') function validate(): [boolean, string] { if (!hasValue(siteId)) { return [false, 'Site ID value is required'] } if (!hasValue(endpointUrl)) { return [false, 'Site Endpoint URL value is required'] } try { const baseUrl = join(endpointUrl.trim(), siteId.trim()) if (!(new URL(baseUrl).protocol === 'https:')) { return [false, 'Https URL is required.'] } } catch { return [false, 'Invalid URL'] } return [true, ''] } /** * When the user changes the endpoint URL or site * ID, the Mesh location value must be updated. */ useEffect(() => { const [isValid, validationMessage] = validate() const newValue = { newValue: { baseUrl: join(endpointUrl, siteId), custom: { endpointUrl: endpointUrl.trim(), siteId: siteId.trim(), }, }, options: { isValid, validationMessage, }, } setValue(() => newValue) }, [endpointUrl, siteId]) return ( <VerticalRhythm style={{ paddingRight: '1px' }}> <Input label="Site Endpoint URL" placeholder="Provide your WordPress v2 endpoint URL here" onChange={(e) => setEndpointUrl(e.currentTarget.value)} value={endpointUrl} /> <Input label="Site ID" placeholder="Provide your WordPress site ID here" onChange={(e) => setSiteId(e.currentTarget.value)} value={siteId} /> </VerticalRhythm> ) } export default DataSourceAdd the following to the manifest:
mesh-manifest.json
{ "type": "wordpress-site-integration", "displayName": "WordPress Site Integration", "baseLocationUrl": "http://localhost:9000", "locations": { "dataConnectors": [ { "type": "wordpress-site-integration-connector", "displayName": "WordPress Site", "dataSourceEditorUrl": "/site-data-source-editor" } ], "settings": { "url": "/integration-settings" } } }Run the following command:
npm run register-to-team
Create the data type editor page#
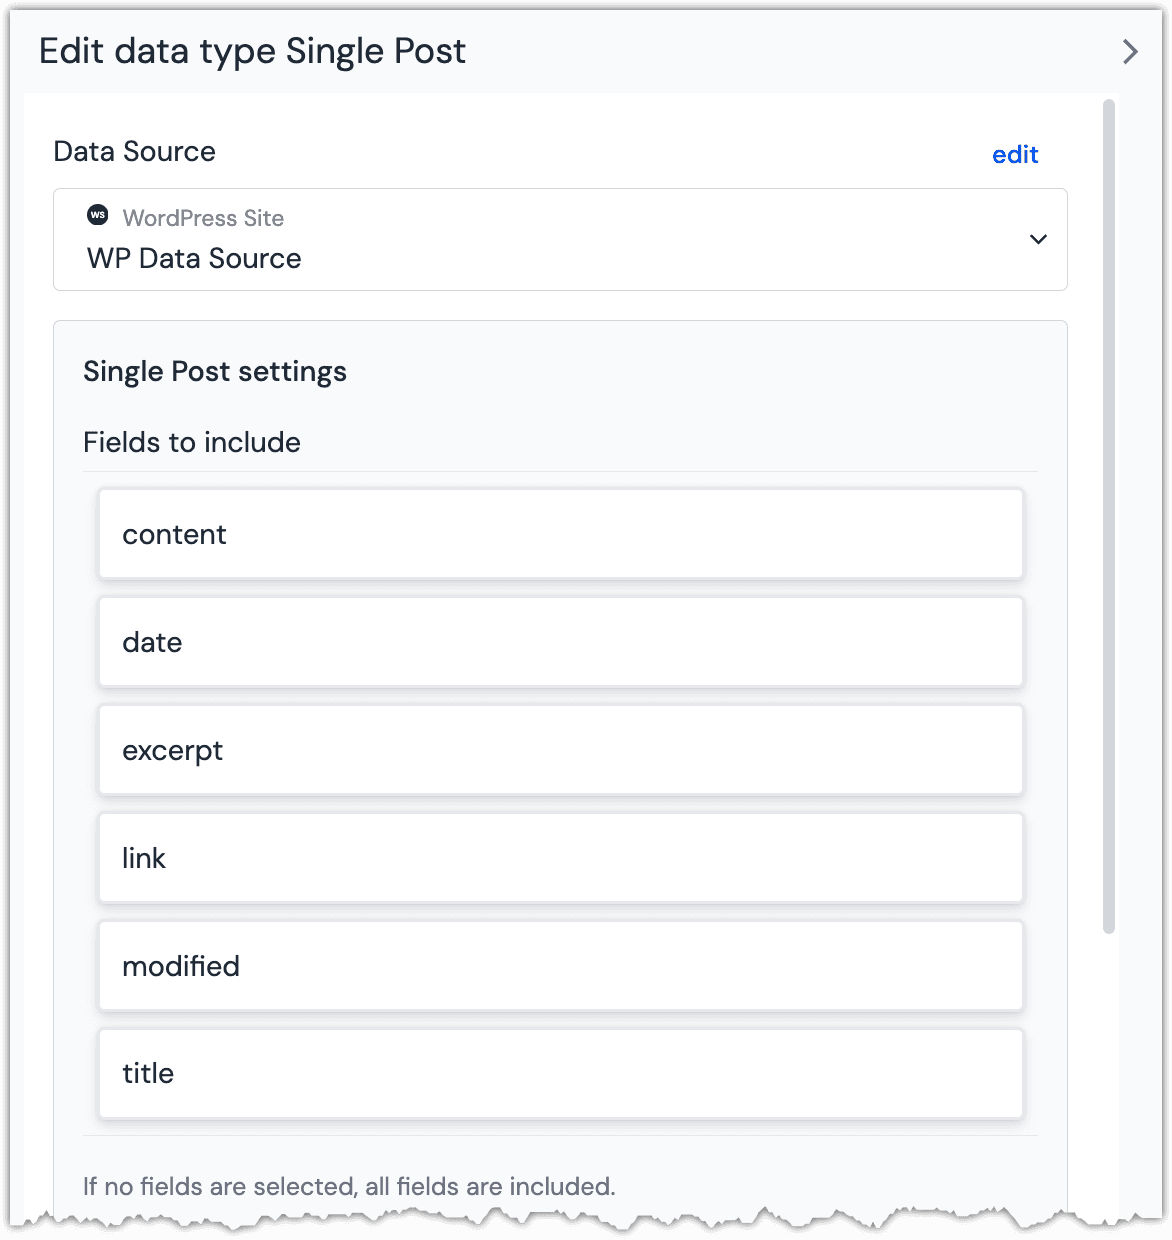
The data type editor page will be used to configure the data type that will be used to retrieve content from the WordPress site. In this tutorial, the data type will configure the fields that will be retrieved from the WordPress site.
Create the following file:
pages/single-post-type-editor.tsx
import { Caption, ScrollableList, ScrollableListItem, VerticalRhythm } from '@uniformdev/design-system' import { DataTypeLocationValue, DispatchResult, useMeshLocation } from '@uniformdev/mesh-sdk-react' import type { NextPage } from 'next' import { useEffect, useState } from 'react' /** * A WordPress post contains a lot of fields. Rather * than return all of those, this integration returns * a small subset of those fields in order to make the * integration more user-friendly. */ const POST_FIELD_NAMES = ['content', 'date', 'excerpt', 'link', 'modified', 'title'] const DataType: NextPage = () => { /** * The Mesh location gives access to the settings * for the data type page that have been saved, * and a function for updating those settings. */ const { setValue, value } = useMeshLocation('dataType') /** * State variables for storing the values the user * selects. These values are combined and passed * as parmaeters to the endpoint. */ const [selectedFields, setSelectedFields] = useState((value?.custom?.fields ?? []) as string[]) /** * This function is called when the data type editor * is updated. The value that is returned describes * how Uniform should construct the request that is * sent to the endpoint to retrieve posts. */ function onUpdate(prev: DataTypeLocationValue): DispatchResult<DataTypeLocationValue> { return { newValue: { ...prev, /** * The postId variable value is set when the * user selected a value using the single post * data editor. */ path: '/posts/${postId}', parameters: [ { key: '_fields', value: getSelectedFieldsAsParameter(), omitIfEmpty: true, }, ], custom: { ...prev.custom, fields: selectedFields }, }, } } /** * When the user changes the list of fields to include, * the Mesh location value must be updated. */ useEffect(() => { setValue(onUpdate) }, [selectedFields]) /** * This function returns a new array of selected fields. * If the specified name is already in the array, the * new array includes all fields except that one. If * the specified name is not in the array, the new * array includes that one. */ function getUpdatedSelectedFields(selectedName: string): string[] { const updatedFields = selectedFields.slice() const position = updatedFields.indexOf(selectedName) if (position === -1) { updatedFields.push(selectedName) } else { updatedFields.splice(position, 1) } return updatedFields } /** * This function converts the selected fields into * the proper format for the endpoint. If no fields * are selected, an empty string is returned, which * results in all fields being returned. The slug * field should always be included, even if it is * not explicitly selected. */ function getSelectedFieldsAsParameter(): string { const fields = selectedFields.slice() if (fields.length === 0) { return '' } if (fields.indexOf('slug') === -1) { fields.push('slug') } return fields.join(',') } return ( <VerticalRhythm> <ScrollableList label="Fields to include"> {POST_FIELD_NAMES.sort(Intl.Collator().compare).map((name) => ( <ScrollableListItem key={name} buttonText={name} active={selectedFields.includes(name)} onClick={() => { const updatedFields = getUpdatedSelectedFields(name) setSelectedFields(updatedFields) }} /> ))} </ScrollableList> <Caption>If no fields are selected, all fields are included.</Caption> </VerticalRhythm> ) } export default DataTypeAdd the following to the manifest:
mesh-manifest.json
{ "type": "wordpress-site-integration", "displayName": "WordPress Site Integration", "baseLocationUrl": "http://localhost:9000", "locations": { "dataConnectors": [ { "type": "wordpress-site-integration-connector", "displayName": "WordPress Site", "dataArchetypes": { "default": { "displayName": "Single Post", "typeEditorUrl": "/single-post-type-editor" } }, "dataSourceEditorUrl": "/site-data-source-editor" } ], "settings": { "url": "/integration-settings" } } }Run the following command:
npm run register-to-team
Create the data resource editor page#
The data resource editor page will be used to configure the data resource of the "Single Post" data type. It will display posts from the WordPress endpoint and allow the user to select a specific post from a list.
Create the following file:
components/PopoverData.tsx
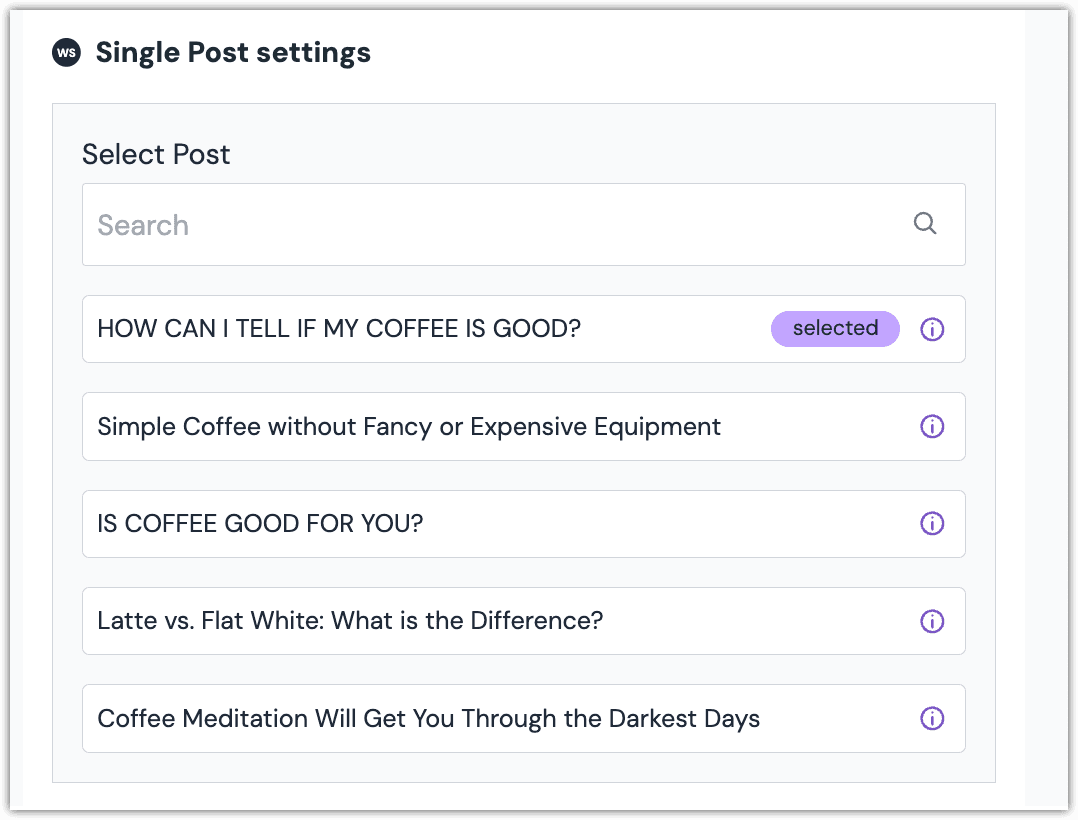
/** * The values that are displayed in the popup. */ type PopupDataProps = { id: number date: string modified: string slug: string } /** * In the list of posts that are displayed, each post * has an "i" icon that, when clicked, this component * is displayed. */ export const PopoverData = (props: PopupDataProps) => { const { id, date, modified, slug } = props return ( <div> <ul key={id}> <li>ID: {id}</li> <li>Date: {new Date(date).toLocaleString()}</li> <li>Modified: {new Date(modified).toLocaleString()}</li> <li> Slug: <code>{slug}</code> </li> </ul> </div> ) }About this step
The data resource editor displays a list of WordPress blog posts. Next to each post is a icon. Clicking this link displays more information about the post. You will configure the data editor to display this component when the icon is clicked.
Create the following file:
components/PostSelector.tsx
import { DataResourceDynamicInputProvider, InputKeywordSearch, ObjectSearchContainer, ObjectSearchListItem, ObjectSearchProvider, ObjectSearchResultItem, ObjectSearchResultList, useMeshLocation, useObjectSearchContext, } from '@uniformdev/mesh-sdk-react' import { PopoverData } from './PopoverData' import { convert } from 'html-to-text' import { FC, useEffect, useState } from 'react' /** * The information collected by this data editor. */ export interface PostSelectorDataEditor { postId?: string } interface PostSelectorTemplateProps { onValueSet: (newValue: PostSelectorDataEditor) => void } interface SelectedPost { id: string } const PostSelectorTemplate: FC<PostSelectorTemplateProps> = (props) => { const { onValueSet } = props const { selectedListItems, onRemoveAllSelectedItems, onSetQuery, query } = useObjectSearchContext< PostSelectorTemplateProps, SelectedPost >() const { metadata, getDataResource, value } = useMeshLocation<'dataResource'>() const { dataType } = metadata const [posts, setPosts] = useState([]) /** * The selected item changed. */ useEffect(() => { const selectedPost = selectedListItems.find(({ id }) => id) onValueSet({ postId: selectedPost?.id, }) }, [selectedListItems]) /** * The query changed. */ useEffect(() => { /** * Construct the path for the call to the endpoint. * This path includes the search text if it was * specified. */ let path = dataType.path if (query?.keyword) { path = `${path}?search=${query.keyword}` } /** * Get the list of posts the user can select from. * The fields are hard-coded because these are the * only values that are needed to display the list * of posts in this specific context. */ getDataResource({ method: dataType.method, path, parameters: [{ key: '_fields', value: 'id, title, date, modified, slug' }], }).then((posts: any) => { setPosts(posts as []) }) }, [query]) return ( <ObjectSearchContainer label="Select Post" searchFilters={ <InputKeywordSearch placeholder="Search" onSearchTextChanged={(searchText) => { onSetQuery({ ...query, keyword: searchText }) }} /> } resultList={posts.map((post: any) => { return ( <ObjectSearchListItem key={post.id} id={post.id.toString()} title={convert(post.title.rendered)} popoverData={<PopoverData {...post} />} ></ObjectSearchListItem> ) })} > <ObjectSearchResultList whenNothingSelected="Nothing selected yet" hideRemoveButton={true} renderResultComponent={(value) => { return ( <ObjectSearchResultItem id={value.id} title={value.title} onRemove={onRemoveAllSelectedItems} disableDnD={true} /> ) }} ></ObjectSearchResultList> </ObjectSearchContainer> ) } interface PostSelectorProps { onValueSet: (newValue: PostSelectorDataEditor) => void } export const PostSelector: FC<PostSelectorProps> = (props) => { const { onValueSet } = props return ( <DataResourceDynamicInputProvider> <ObjectSearchProvider> <PostSelectorTemplate onValueSet={onValueSet} /> </ObjectSearchProvider> </DataResourceDynamicInputProvider> ) }About this step
This component represents the list of WordPress blog posts that are displayed to the user.
Create the following file:
components/index.ts
export * from './PopoverData' export * from './PostSelector'Create the following file:
pages/single-post-data-editor.tsx
import { useMeshLocation } from '@uniformdev/mesh-sdk-react' import type { NextPage } from 'next' import { PostSelector, PostSelectorDataEditor } from '../components' const SinglePostDataEditorPage: NextPage = () => { const { setValue } = useMeshLocation<'dataResource'>() const onValueSet = (newValue: PostSelectorDataEditor) => { const { postId = '' } = newValue || {} /** * Set the postId value that is used in the * API call to retrieve the selected post. */ setValue(() => ({ newValue: { postId, }, })) } return ( <div> <PostSelector onValueSet={onValueSet} /> </div> ) } export default SinglePostDataEditorPageAdd the following to the manifest:
mesh-manifest.json
{ "type": "wordpress-site-integration", "displayName": "WordPress Site Integration", "baseLocationUrl": "http://localhost:9000", "locations": { "dataConnectors": [ { "type": "wordpress-site-integration-connector", "displayName": "WordPress Site", "dataArchetypes": { "default": { "displayName": "Single Post", "dataEditorUrl": "/single-post-data-editor", "typeEditorUrl": "/single-post-type-editor" } }, "dataSourceEditorUrl": "/site-data-source-editor" } ], "settings": { "url": "/integration-settings" } } }Run the following command:
npm run register-to-team
Test the data type#
In your Uniform project, navigate to Experience > Data Types.
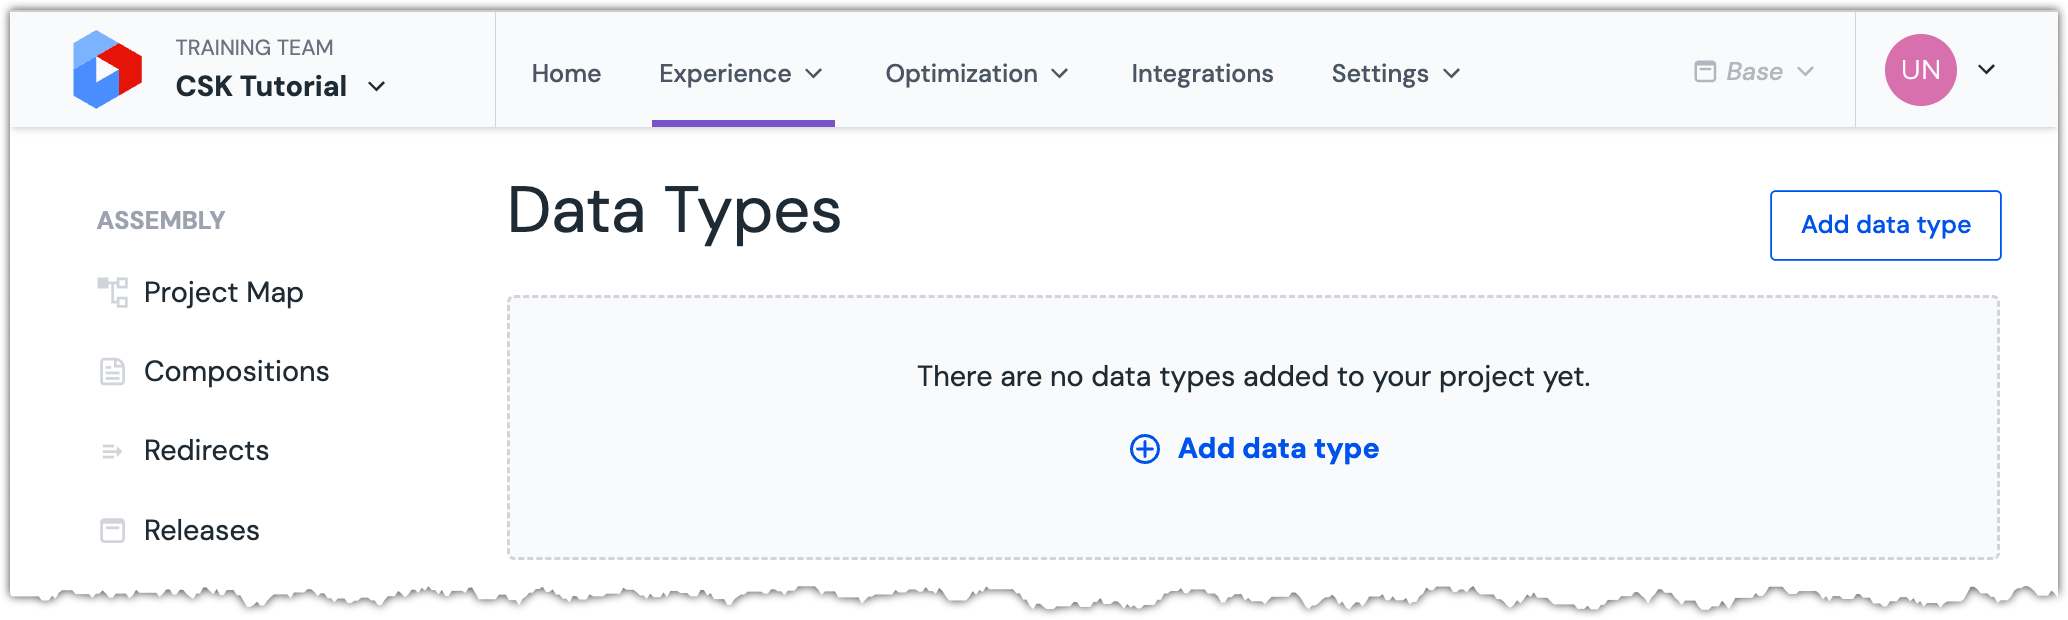 Any data types already defined are displayed. This project does not yet have any.
Click the button Add data type.
 The "Create data type" drawer is opened.
From the dropdown Data Source, select WordPress Site > Create new...
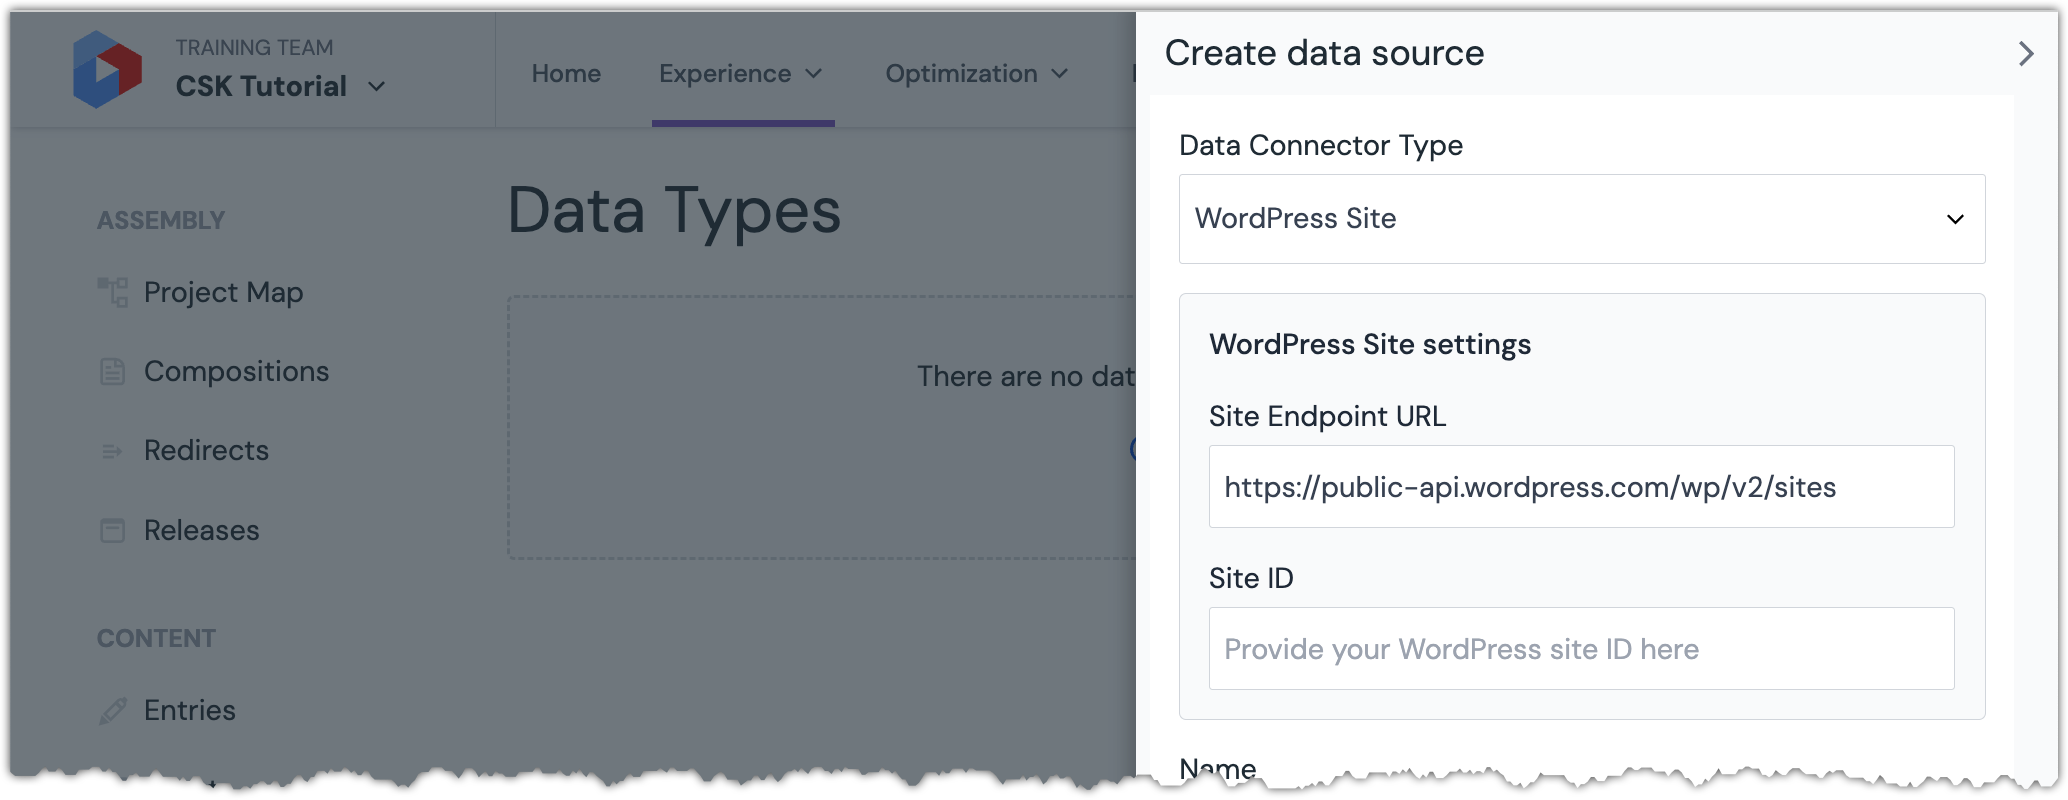 The site data source page is displayed.
Enter the following values:
Field Value Notes Site Endpoint URL https://public-api.wordpress.com/wp/v2/sitesThis is the value to use if your WordPress site is hosted on wordpress.com. If you site is hosted elsewhere, use the appropriate value. Site ID 227813160This is the site ID for a sample blog hosted on wordpress.com. If you have your own WordPress site, you can use your own site ID. Name My WordPress BlogPublic ID
myWordpressBlog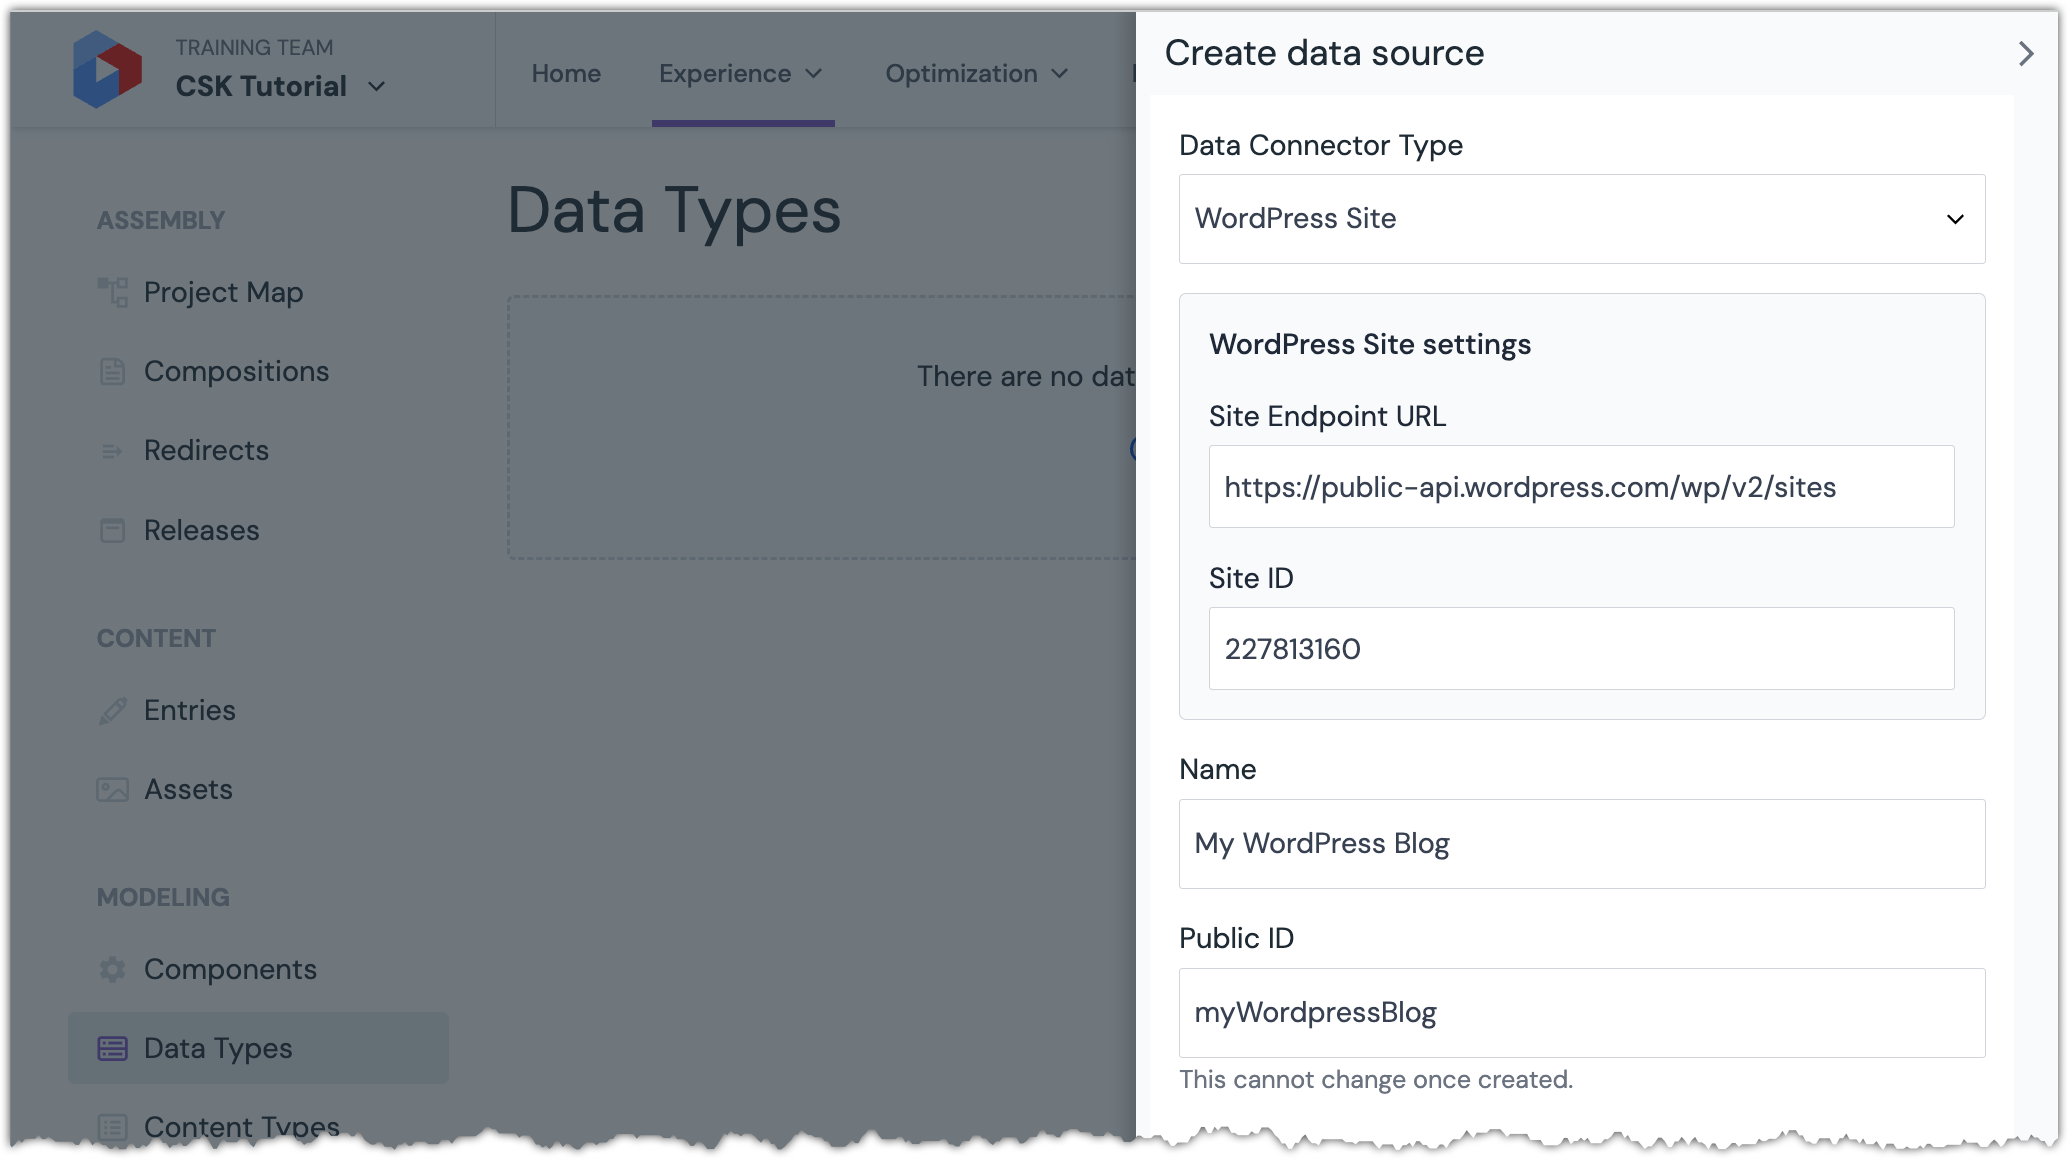 Field values are specified.