Contentstack Next.js tutorial
This tutorial guides you through the process of adding personalization to the Contentstack Next.js starter app. By the end of this tutorial you will have a personalized Next.js application with content and personalization configured by content authors in Contentstack using the Uniform app from the Contentstack marketplace:
- Content author can classify a blog post entry to describe what a visitor reading the post is likely to be interested in.
- When a visitor views certain blog pages, the visitor's interests are identified.
- Content author can create content for the hero component that targets visitor interests.
- Content author can define the conditions that must be met in order for each hero component to be displayed.
- When the visitor's interests are identified, the home page displays personalized content.
Prerequisites#
Prerequisites
You must have access to a Uniform team with the ability to create new projects. If you are an active customer or a partner, please get in touch with your Uniform team administrator colleague and ask for an invite.
If you are not sure or your company does not have a Uniform team, you can request a sandbox here.
Before you get started, be sure you have the following:
- Administrator access to Contentstack - to add the Uniform app to your Contentstack organization.
- Vercel account - to deploy the Contentstack Next.js starter. You can get a free account here. You should also have a connection configured to a Git provider (GitHub, GitLab or Bitbucket). If you don't, you will be prompted to configure it during the setup process.
- Administrator access to Uniform - to configure the personalization settings that are available in Contentstack.
- Node.js (version 14 or greater) - installed on your machine to work with the Next.js app.
- Uniform Context browser extension - to facilitate development and testing personalization on the Next.js app. You can get the extension here. This isn't required to use Uniform Context, but it makes development and testing much easier.
Install starter app#
This tutorial uses the NextJs Starter that's available on the Contentstack Marketplace. This starter provides everything you need to have a fully functional demo site built with Next.js:
- Contentstack stack populated with content
- Next.js application with components that use content from Contentstack
- Source code repository to store the Next.js application
- Vercel project that builds and deploys the Next.js application
tip
If you know how to install a starter from the Contentstack Marketplace, you can skip this section. Just be sure to add the NextJs Starter to your organization.
Log into Contentstack.
Navigate to Marketplace > Starters.
Install the starter NextJs Starter.
Authorize the starter to have access to your Contentstack organization.
Enter the following value for the stack name:
NextJs StarterClick Import Starter.
About this step
As the import process runs, you will see a log of its activity.
Click Deploy to Vercel.
A popup window appears. Click Create to create the repository.
About this step
This creates a repository with the source code for the starter application in your preferred Git provider.
On the Add Integrations screen, click Add.
About this step
This adds the Contentstack integration to your Vercel project. Then Vercel starts to deploy the Next.js application. This can take a minute or two. The popup window will close when the deploy process is finished.
Summary details are displayed that describe the results of adding the starter. You can find the following links:
- Stack URL - Stack in Contentstack
- Deployment URL - Deployed Next.js application
- Repository URL - Source code repository for the Next.js application
Click the Deployment URL.
About this step
This will open a new tab with the deployed Next.js application, populated with content from the Contentstack stack.
Click the Repository URL.
About this step
This will open a new tab with the source code repository for the Next.js application. Later in this tutorial you will add Uniform Context to this application.
Back in Contentstack, click Open Stack.
Configure Uniform#
In this example, personalization is based on the visitor's interests. Those interests are:
- Defined in Uniform
- Assigned in Contentstack
- Used in the Next.js application to power personalization
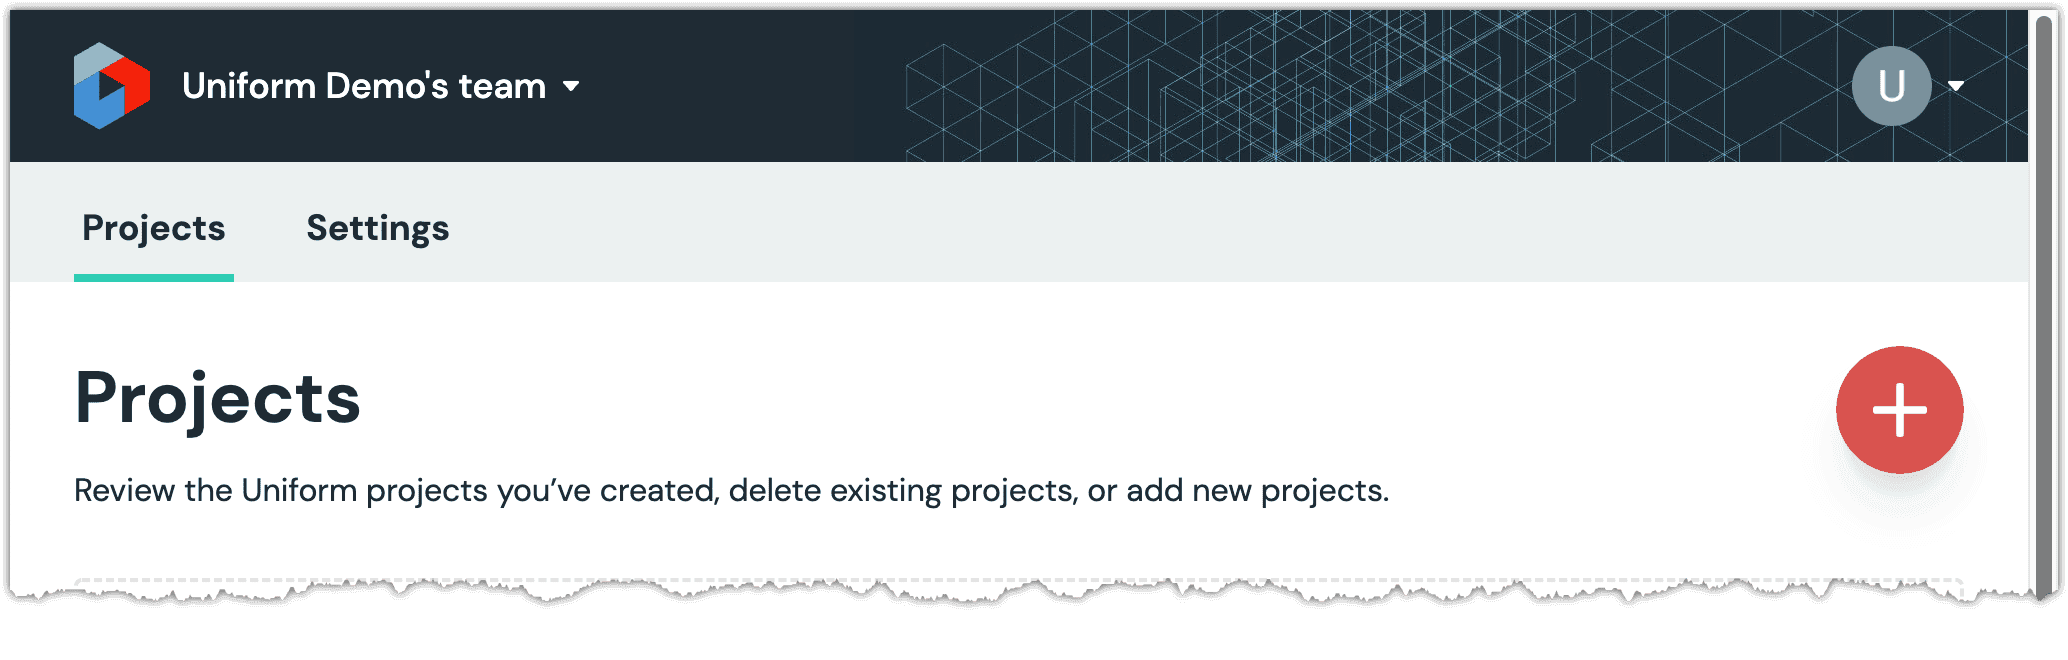
Create project#
In Uniform, a project is the basic unit of organization. A project is where you will define the criteria you want to use to configure personalization.
Log into Uniform.
On the Projects page, click (+) to create a new project.
Enter the following for the project name:
NextJs Starter for ContentstackScroll down and click Empty project.
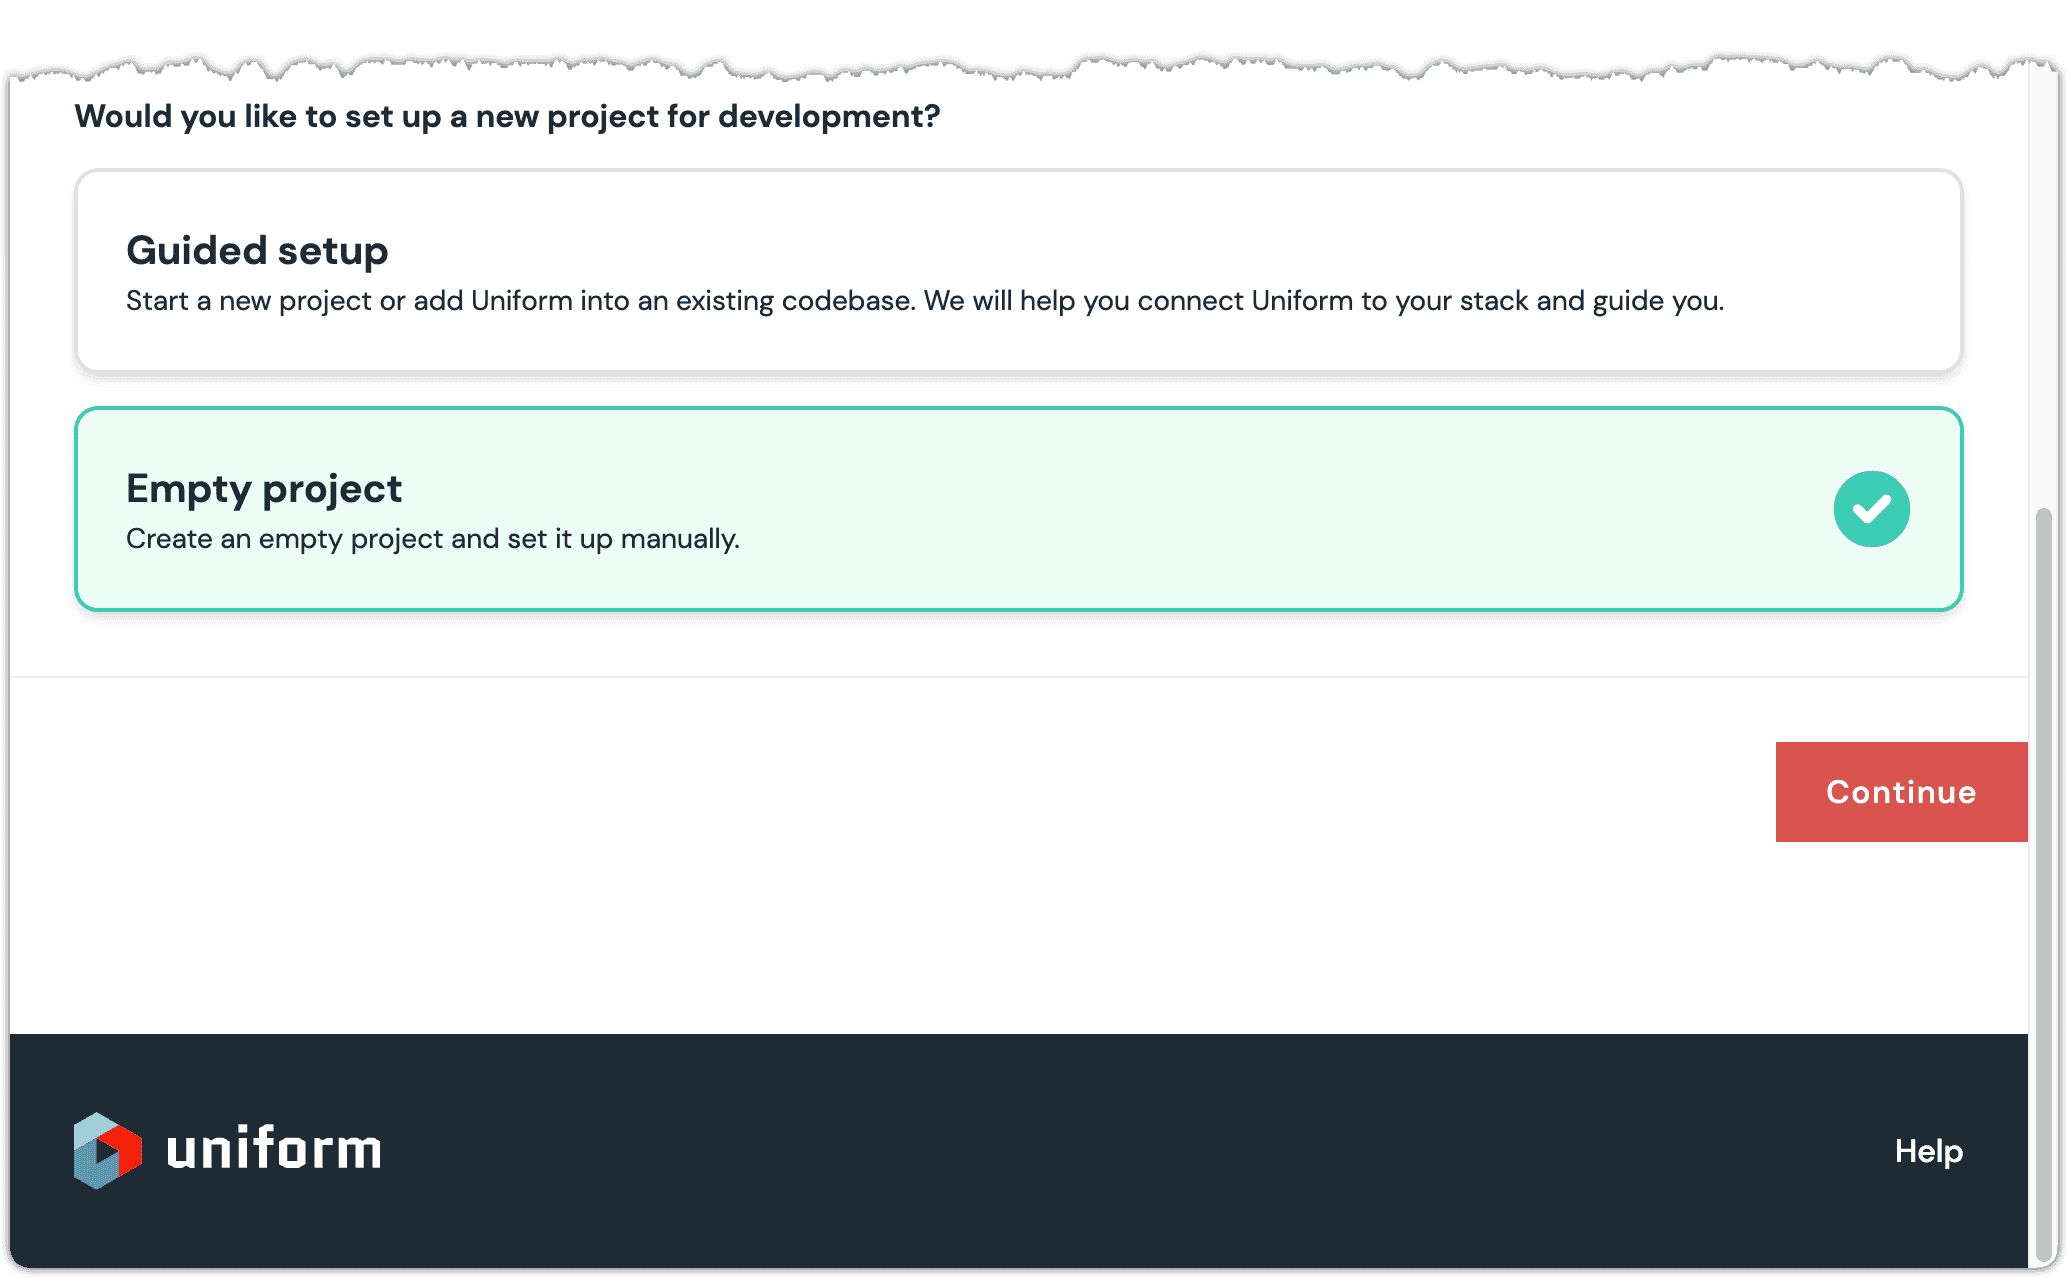
Click Continue.
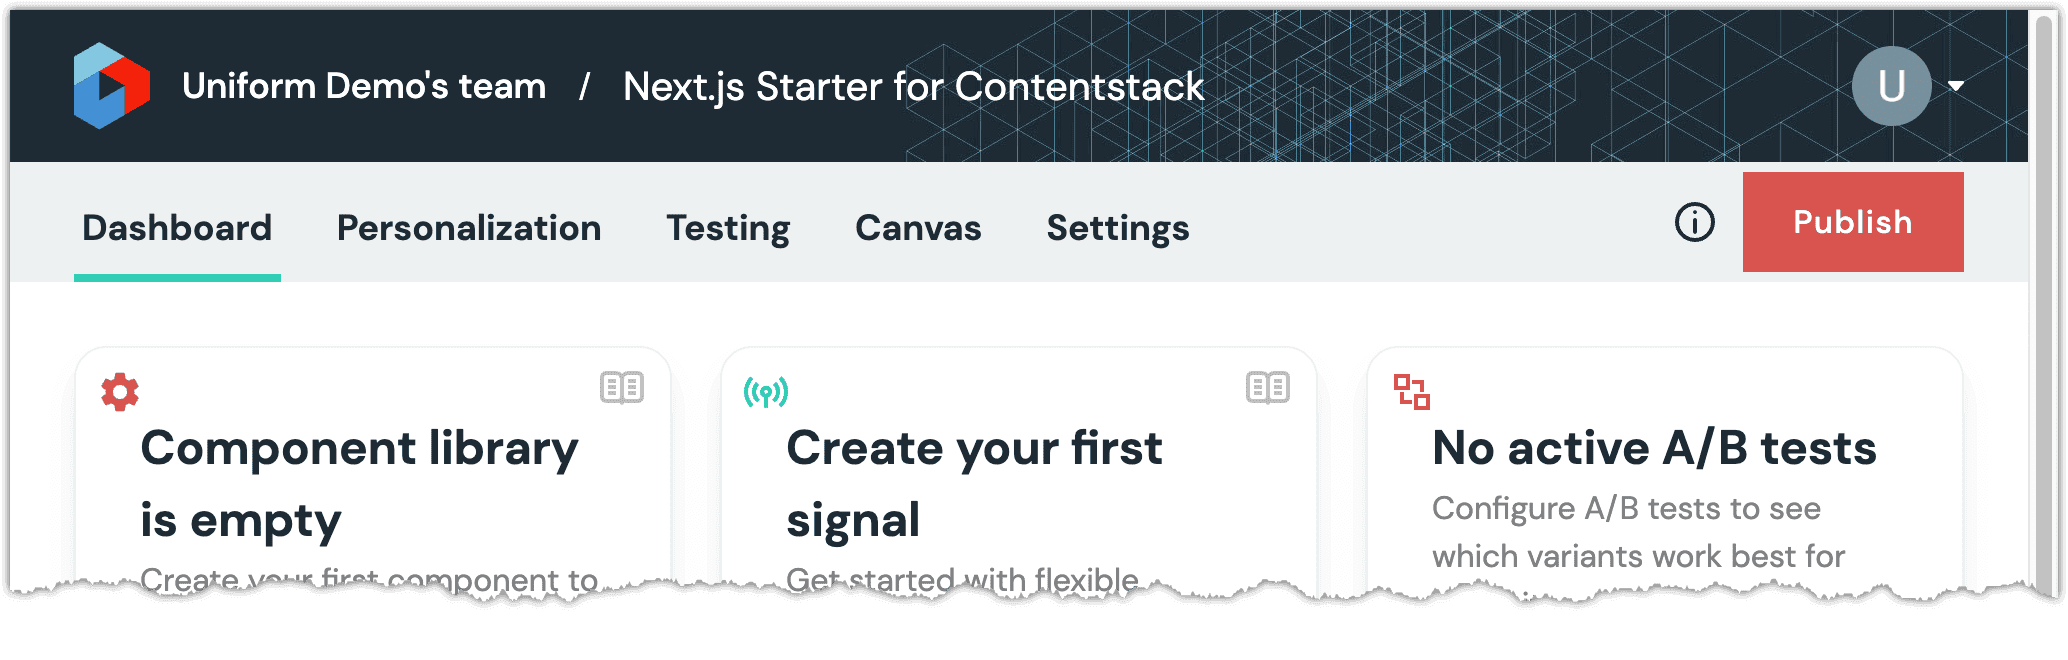
Your project is created and you are taken to the project home page.
Add Marketplace app#
You must add the Uniform app from the Contentstack Marketplace to your stack.
tip
For instructions, see the guide on how to configure the Marketplace app.
info
Be sure to note the Uniform API key you create. You will need this value in a later step.
Update content types#
You must make some changes to the content types in your stack in order to allow content editors to add and configure personalization.
Blog Entry#
When a visitor views a blog entry, you have the opportunity to learn a little about what the visitor is interested in. In the NextJs Starter, the blog entries can be categorized by topic:
- Architecture
- Data
- Futuristic
You must add a field to the content type Blog Entry to store the topic that's most relevant for each blog entry. The value for the topic will come from Uniform.
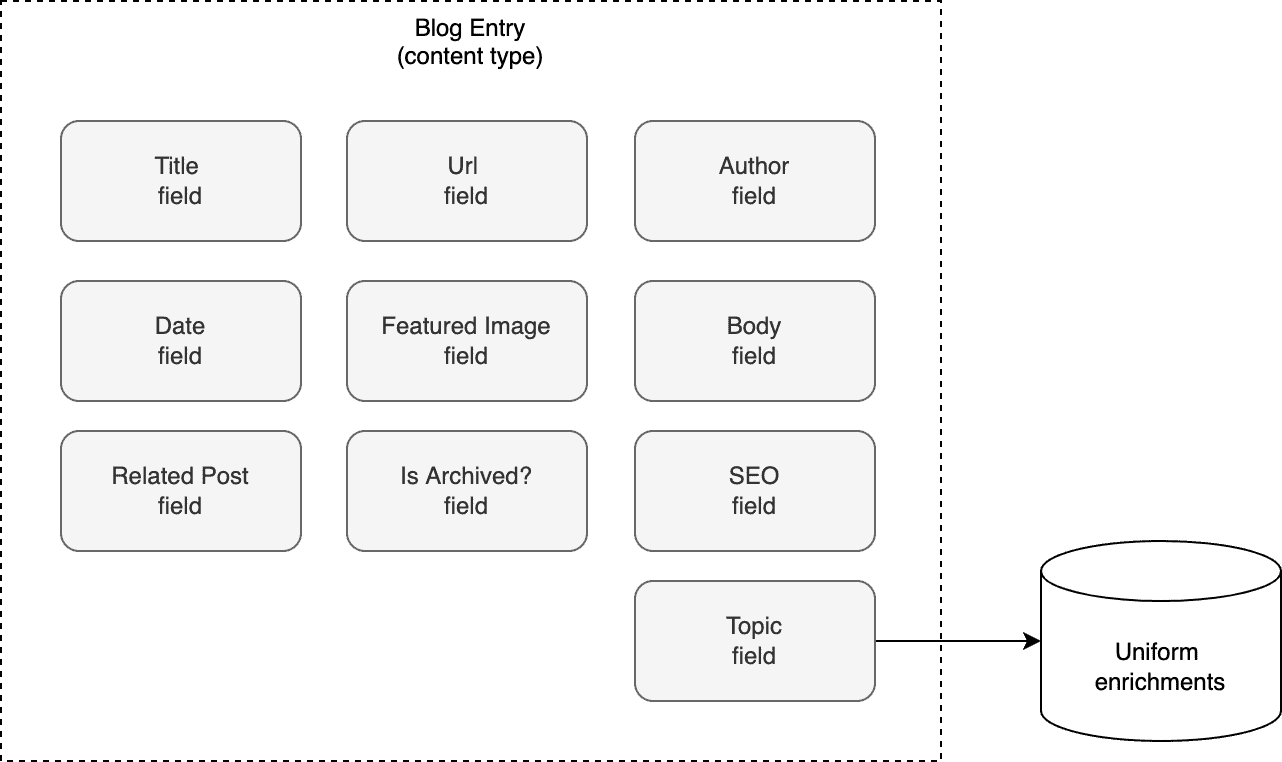
In Contentstack, open the content type Blog Entry.
Add a Custom field.
Enter the following values:
- Display Name:
Topic - Unique ID:
topic
- Display Name:
Click the dropdown Select Extension/App.
Select Uniform Enrichment Tag.
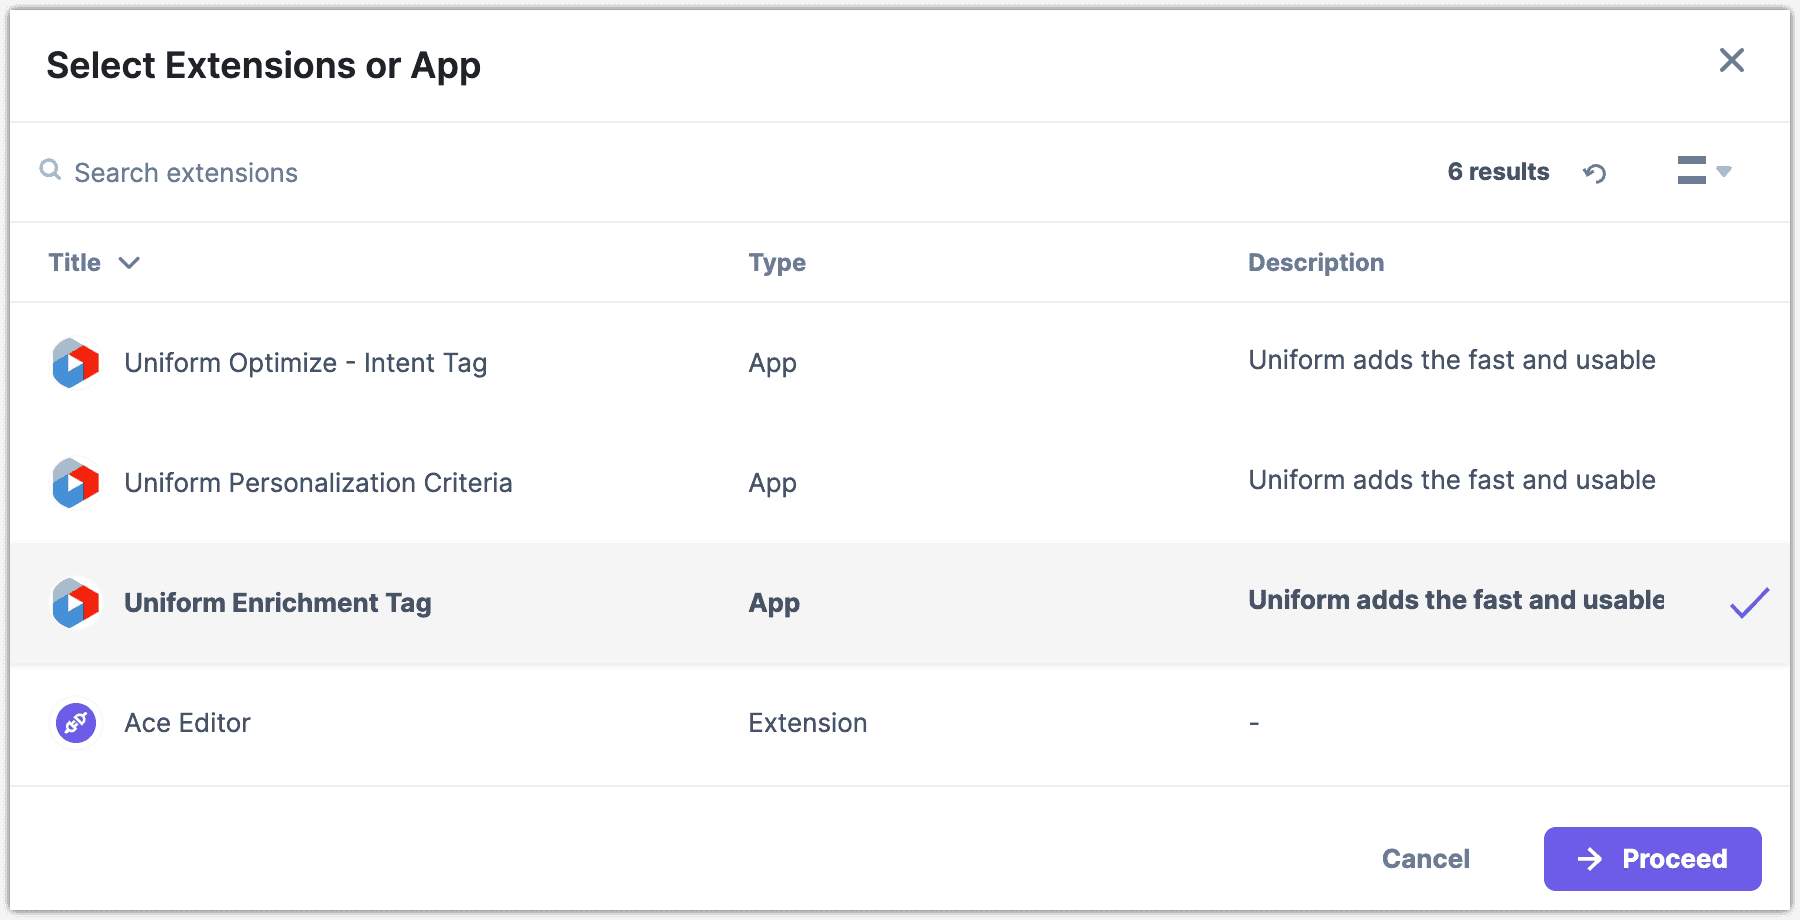
Click Proceed.
Enter the following for the field Help Text:
The enrichments you select will help to identify the visitor's interests, which are used to create a personalized experience for the visitor.Click Save and Close.
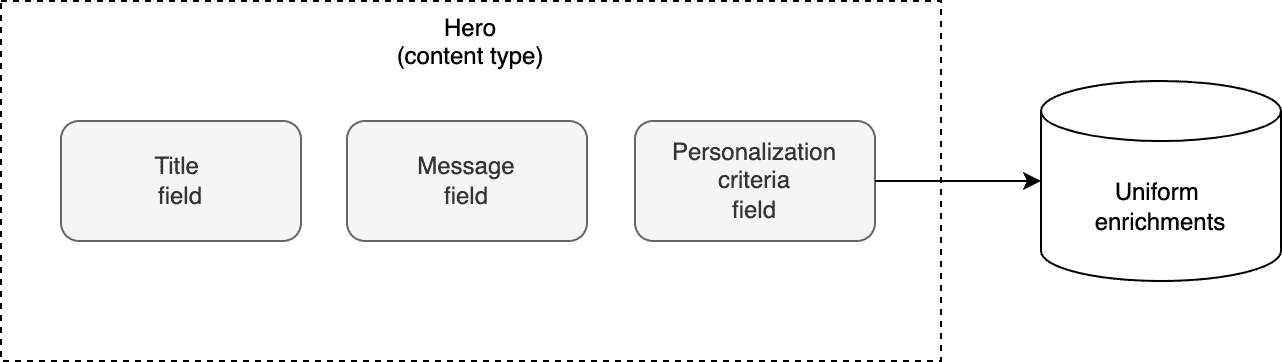
Hero#
Content authors need the ability to create entries for a hero banner that can be displayed to visitors who match certain criteria. A content type Hero is needed for these entries.
In Contentstack, create a new content type:
- Name:
Hero - UID:
hero - Description:
Content used in a banner that appears at the top of a landing page - Type: Multiple
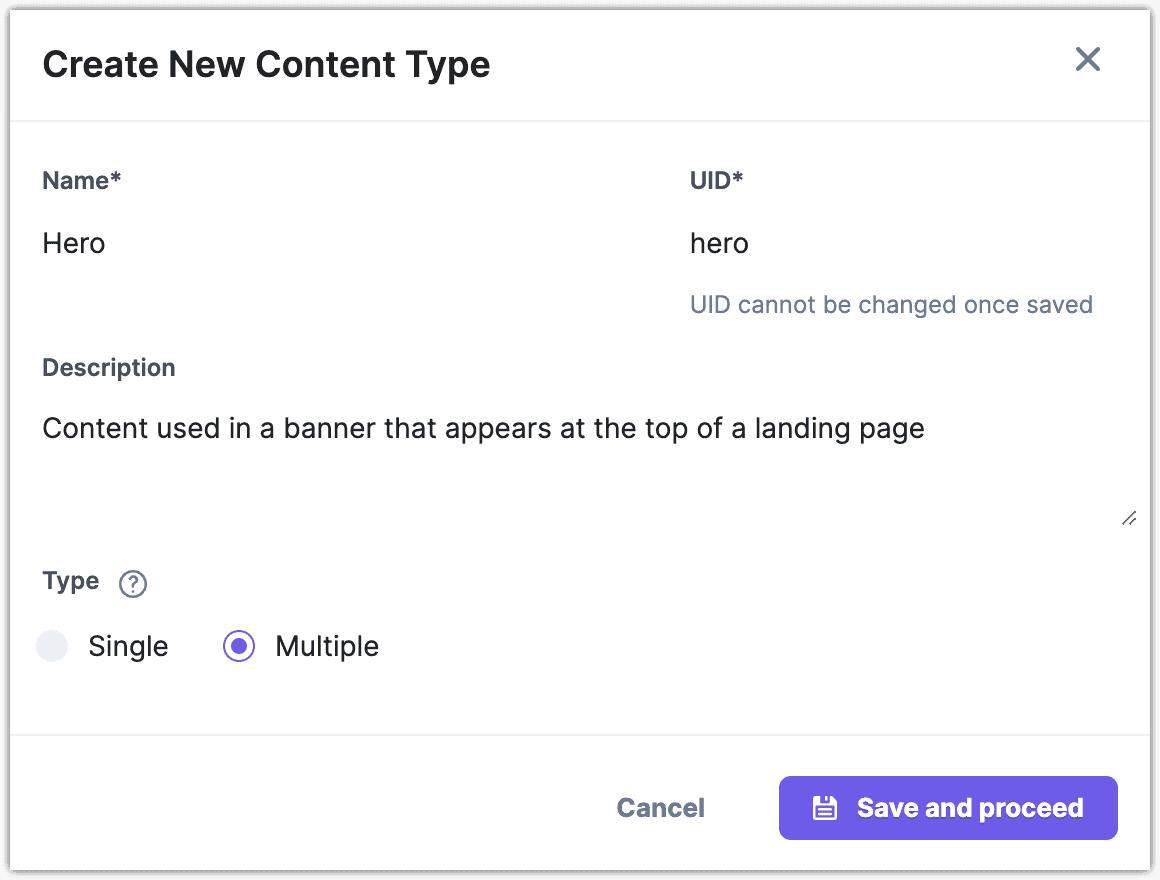
- Name:
Click Save and proceed.
Add a Single Line Text box field.
Enter the following values:
- Display Name:
Message - Unique ID:
message
- Display Name:
Click Save.
Add a Custom field.
Enter the following values:
- Display Name:
Personalization criteria - Unique ID:
personalization_criteria
- Display Name:
Click the dropdown Select Extension/App.
Select Uniform Personalization Criteria.
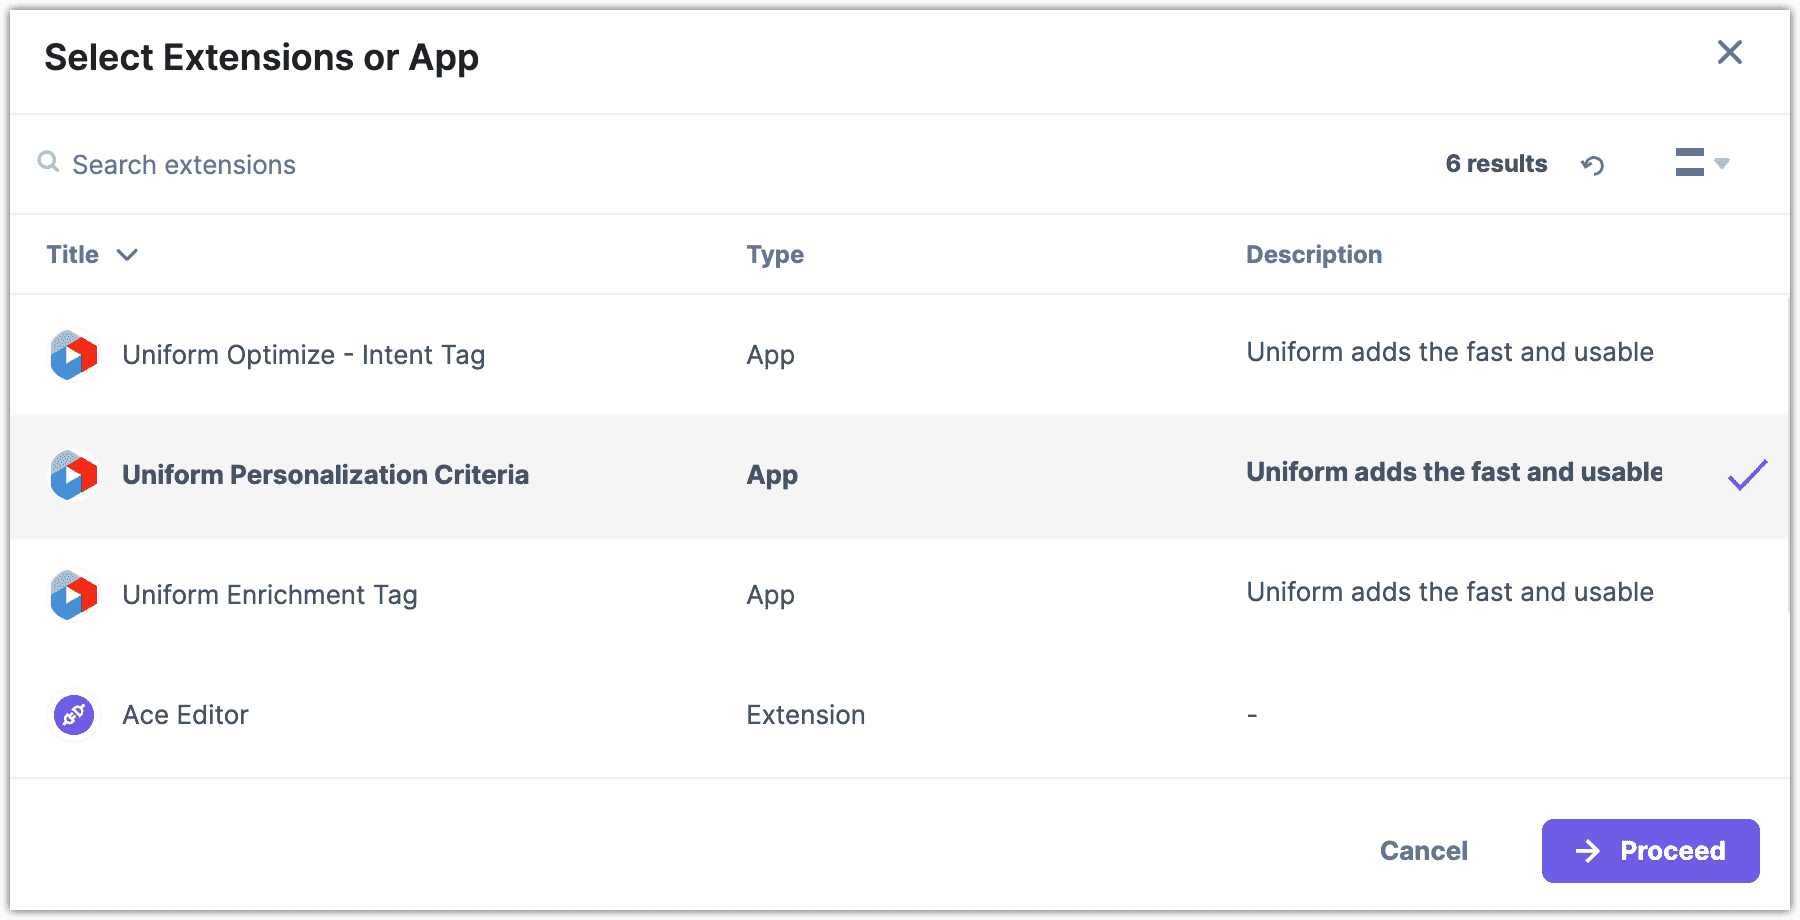
Click Proceed.
Enter the following for the field Help Text:
When these conditions are met, this content will be used on the home page.Click Save and Close.
Page#
Content authors will have the ability to associate hero entries to a page entry. The content type Page must be updated to support this.
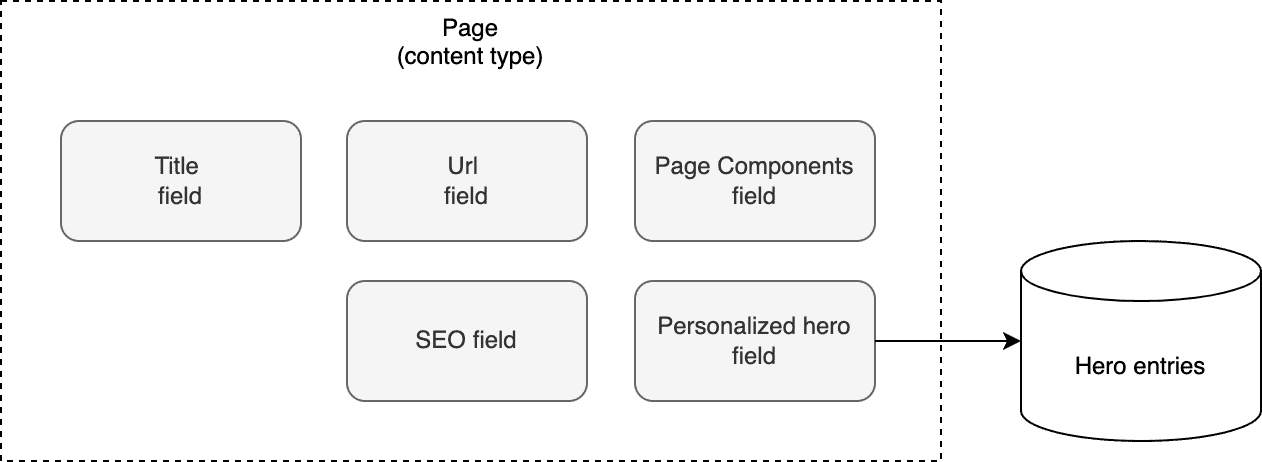
In Contentstack, open the content type Page.
Add a Reference field.
In Basic settings, enter the following values:
- Display Name:
Personalized hero - Unique ID:
personalized_hero - Referenced Content Type: Hero
- Display Name:
In Advanced settings, enter the following values:
- Options: Multiple
Click Save and Close.
Update entries#
You must update the following entries:
- Blog Entry - Associate each entry with a topic.
- Hero - Create the entries that will power the personalized banner on the home page.
- Page - Associate the hero entries with the home page.
Blog Entries#
Uniform personalization depends on the Uniform tracker. This is a client-side component that captures visitor activity. When the visitor views a blog entry, you want the Uniform tracker to keep track of the topic associated with the blog entry. This enables you to understand the topics the visitor is interested in.
When you set the Topic field on a blog entry, you are setting instructions for the Uniform tracker.
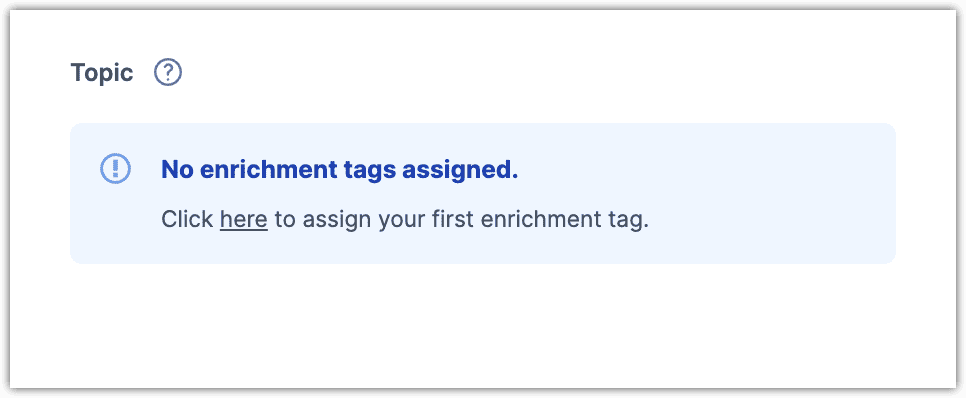
In Contentstack, open the entry Robotics - Changing Our Lives and Future.
Scroll down to the field Topic.
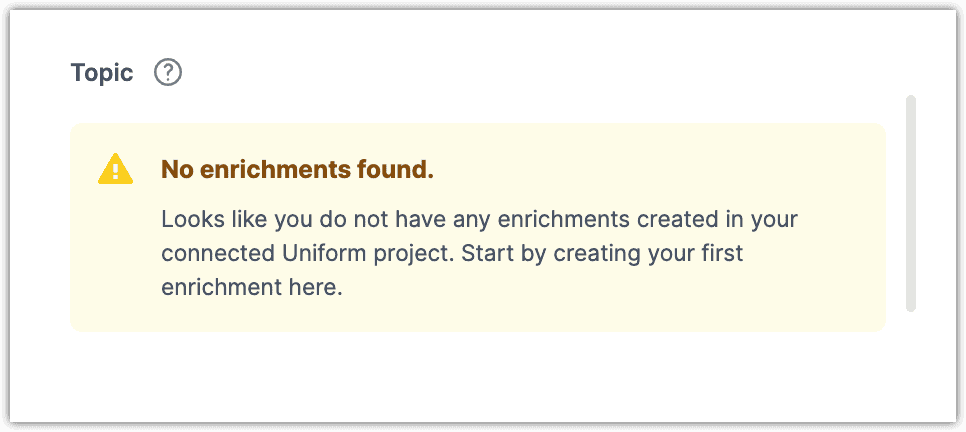
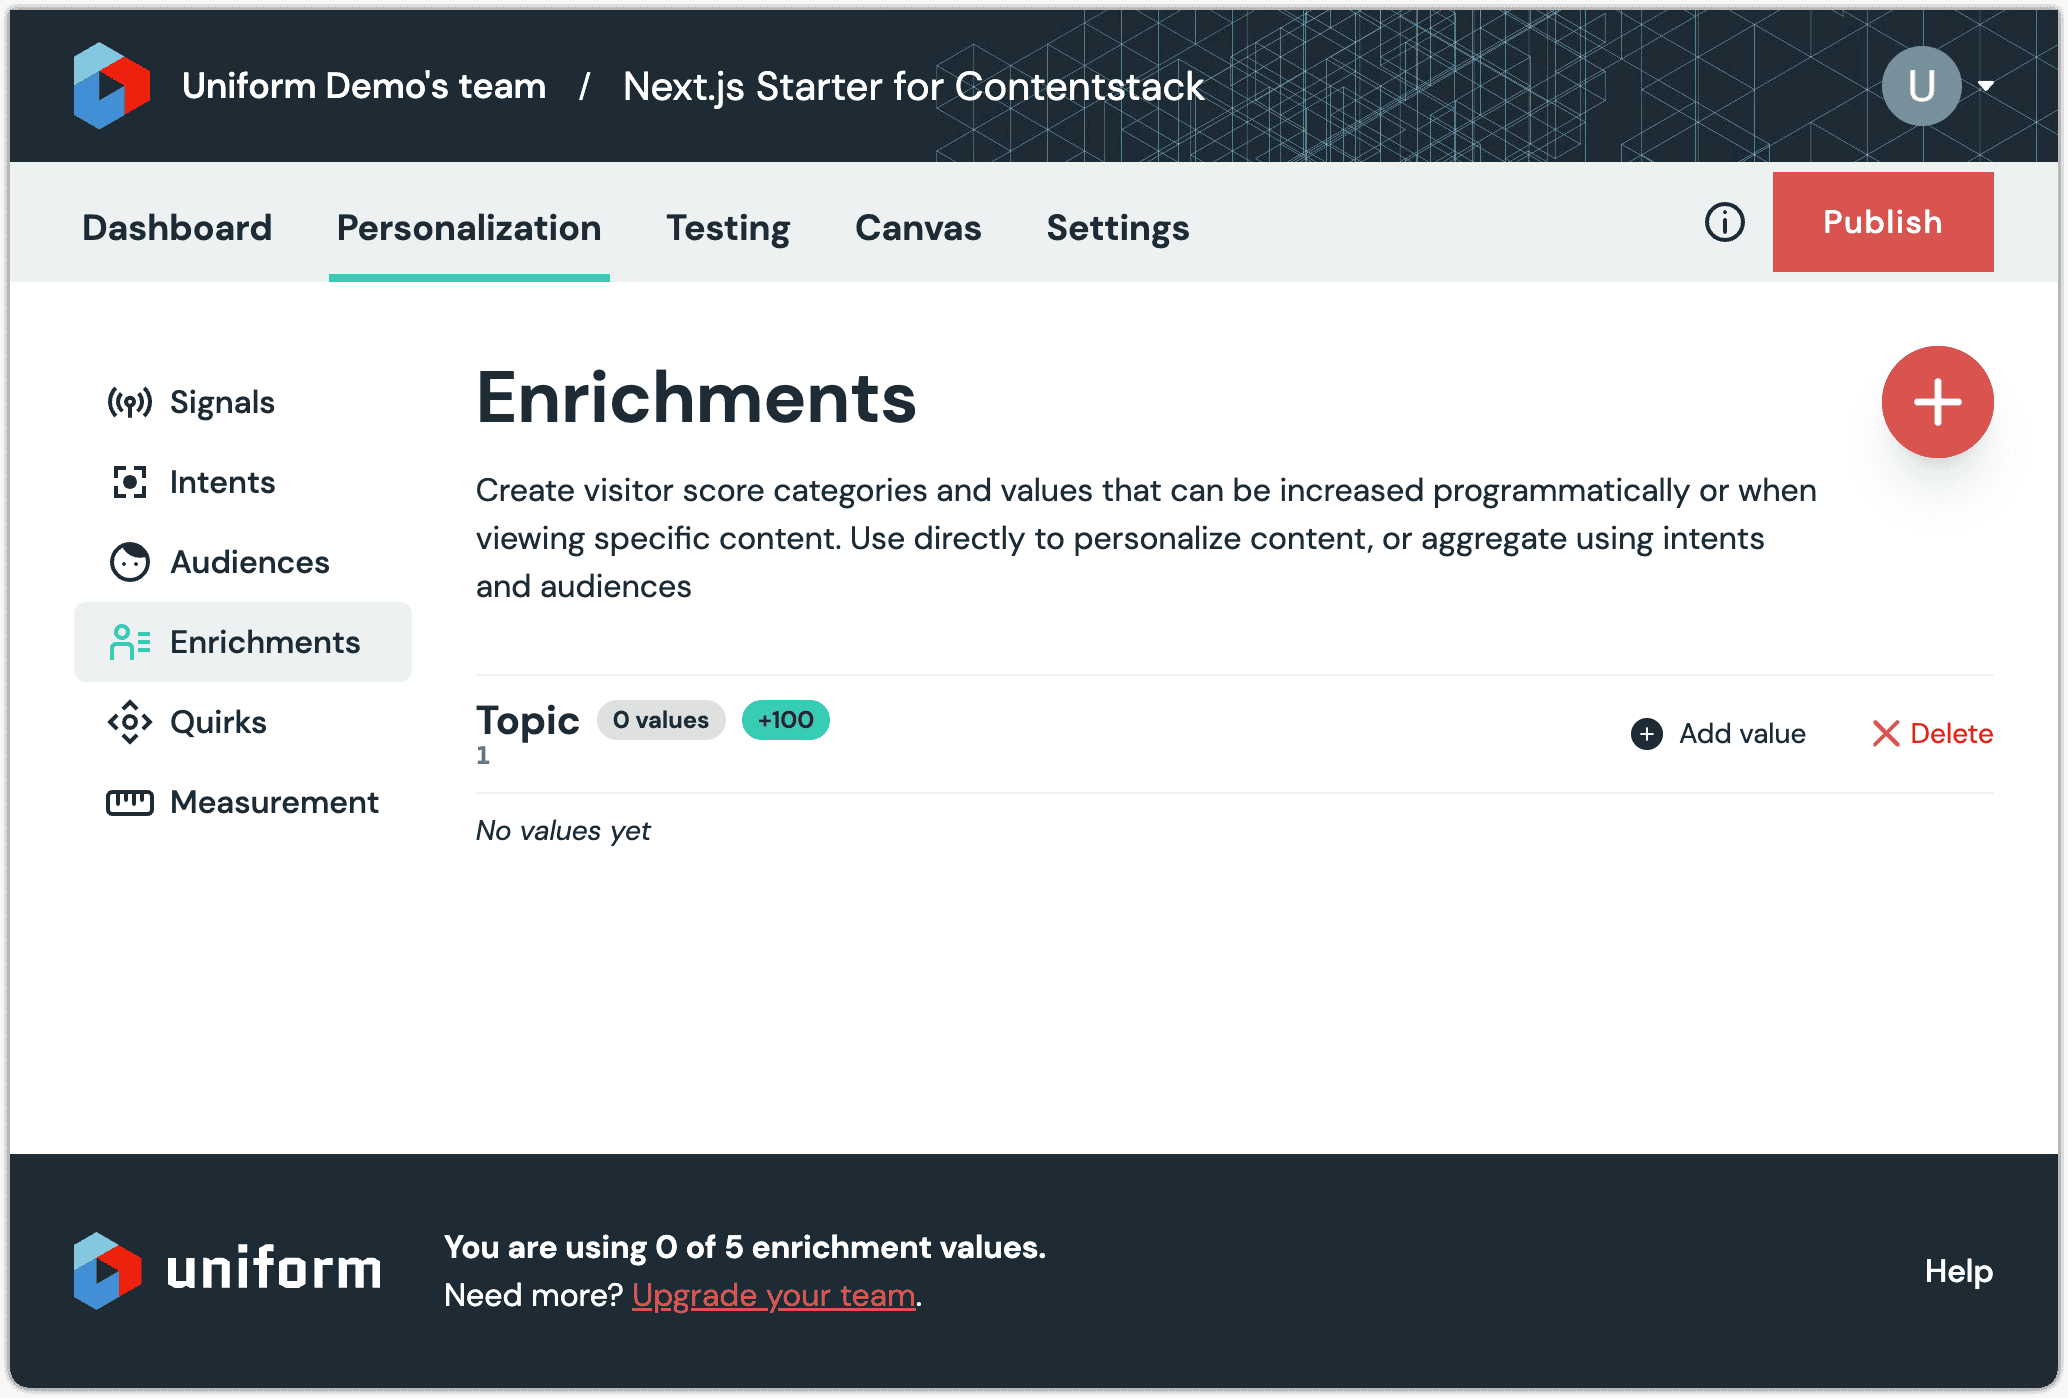
Click on the word here to open a new tab with the Uniform Enrichments page.

Click (+) to create a new enrichment.
Enter the following values:
- Name:
Topic - Public ID:
1
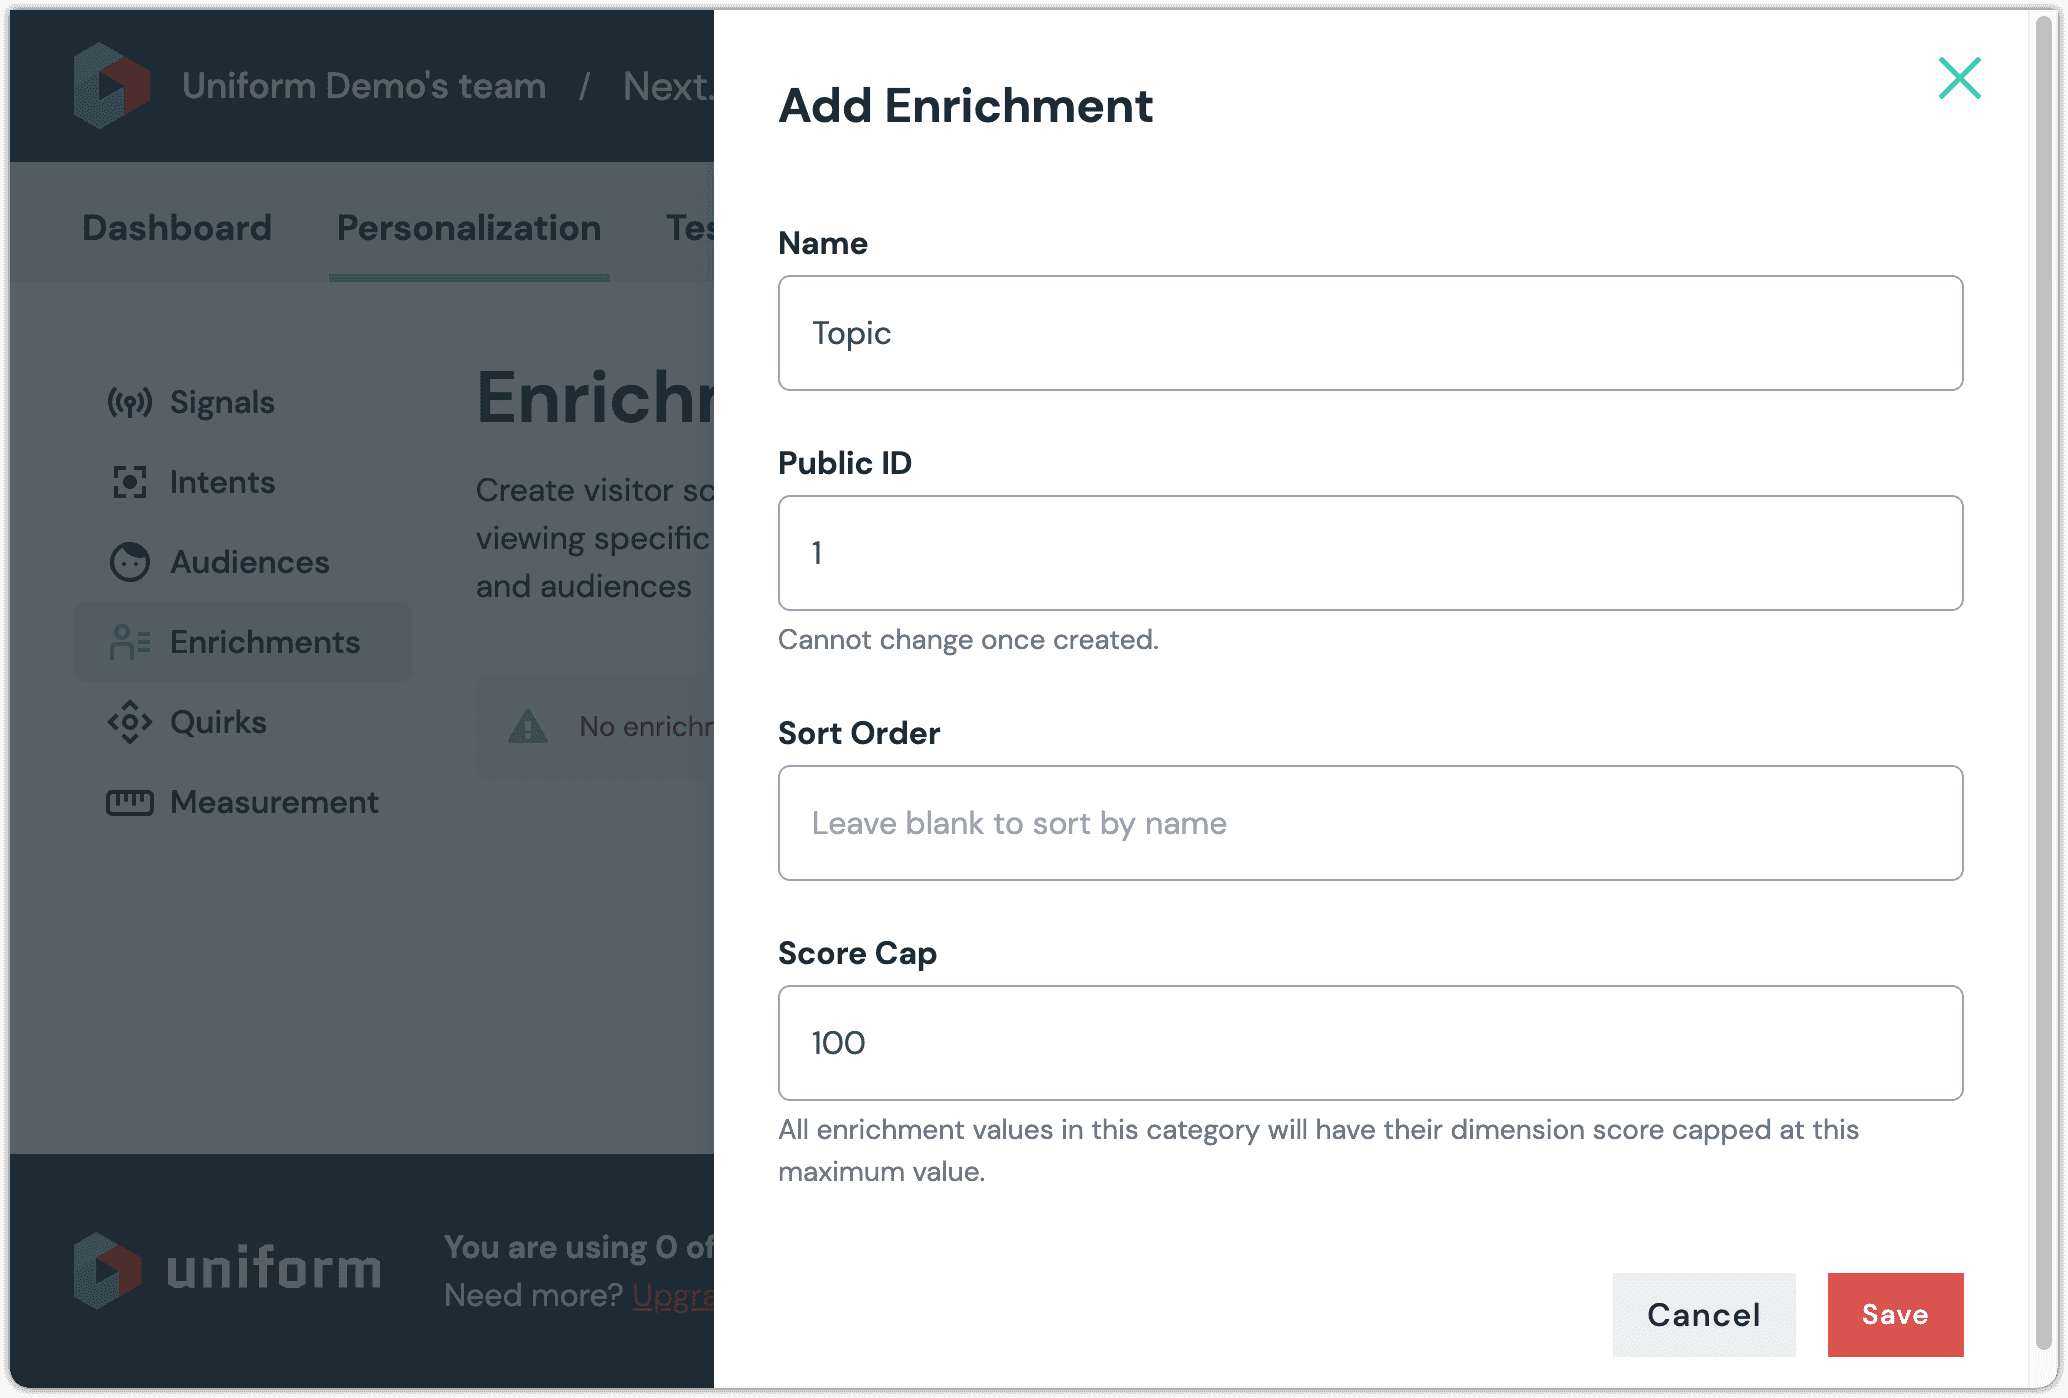
- Name:
Click Save.
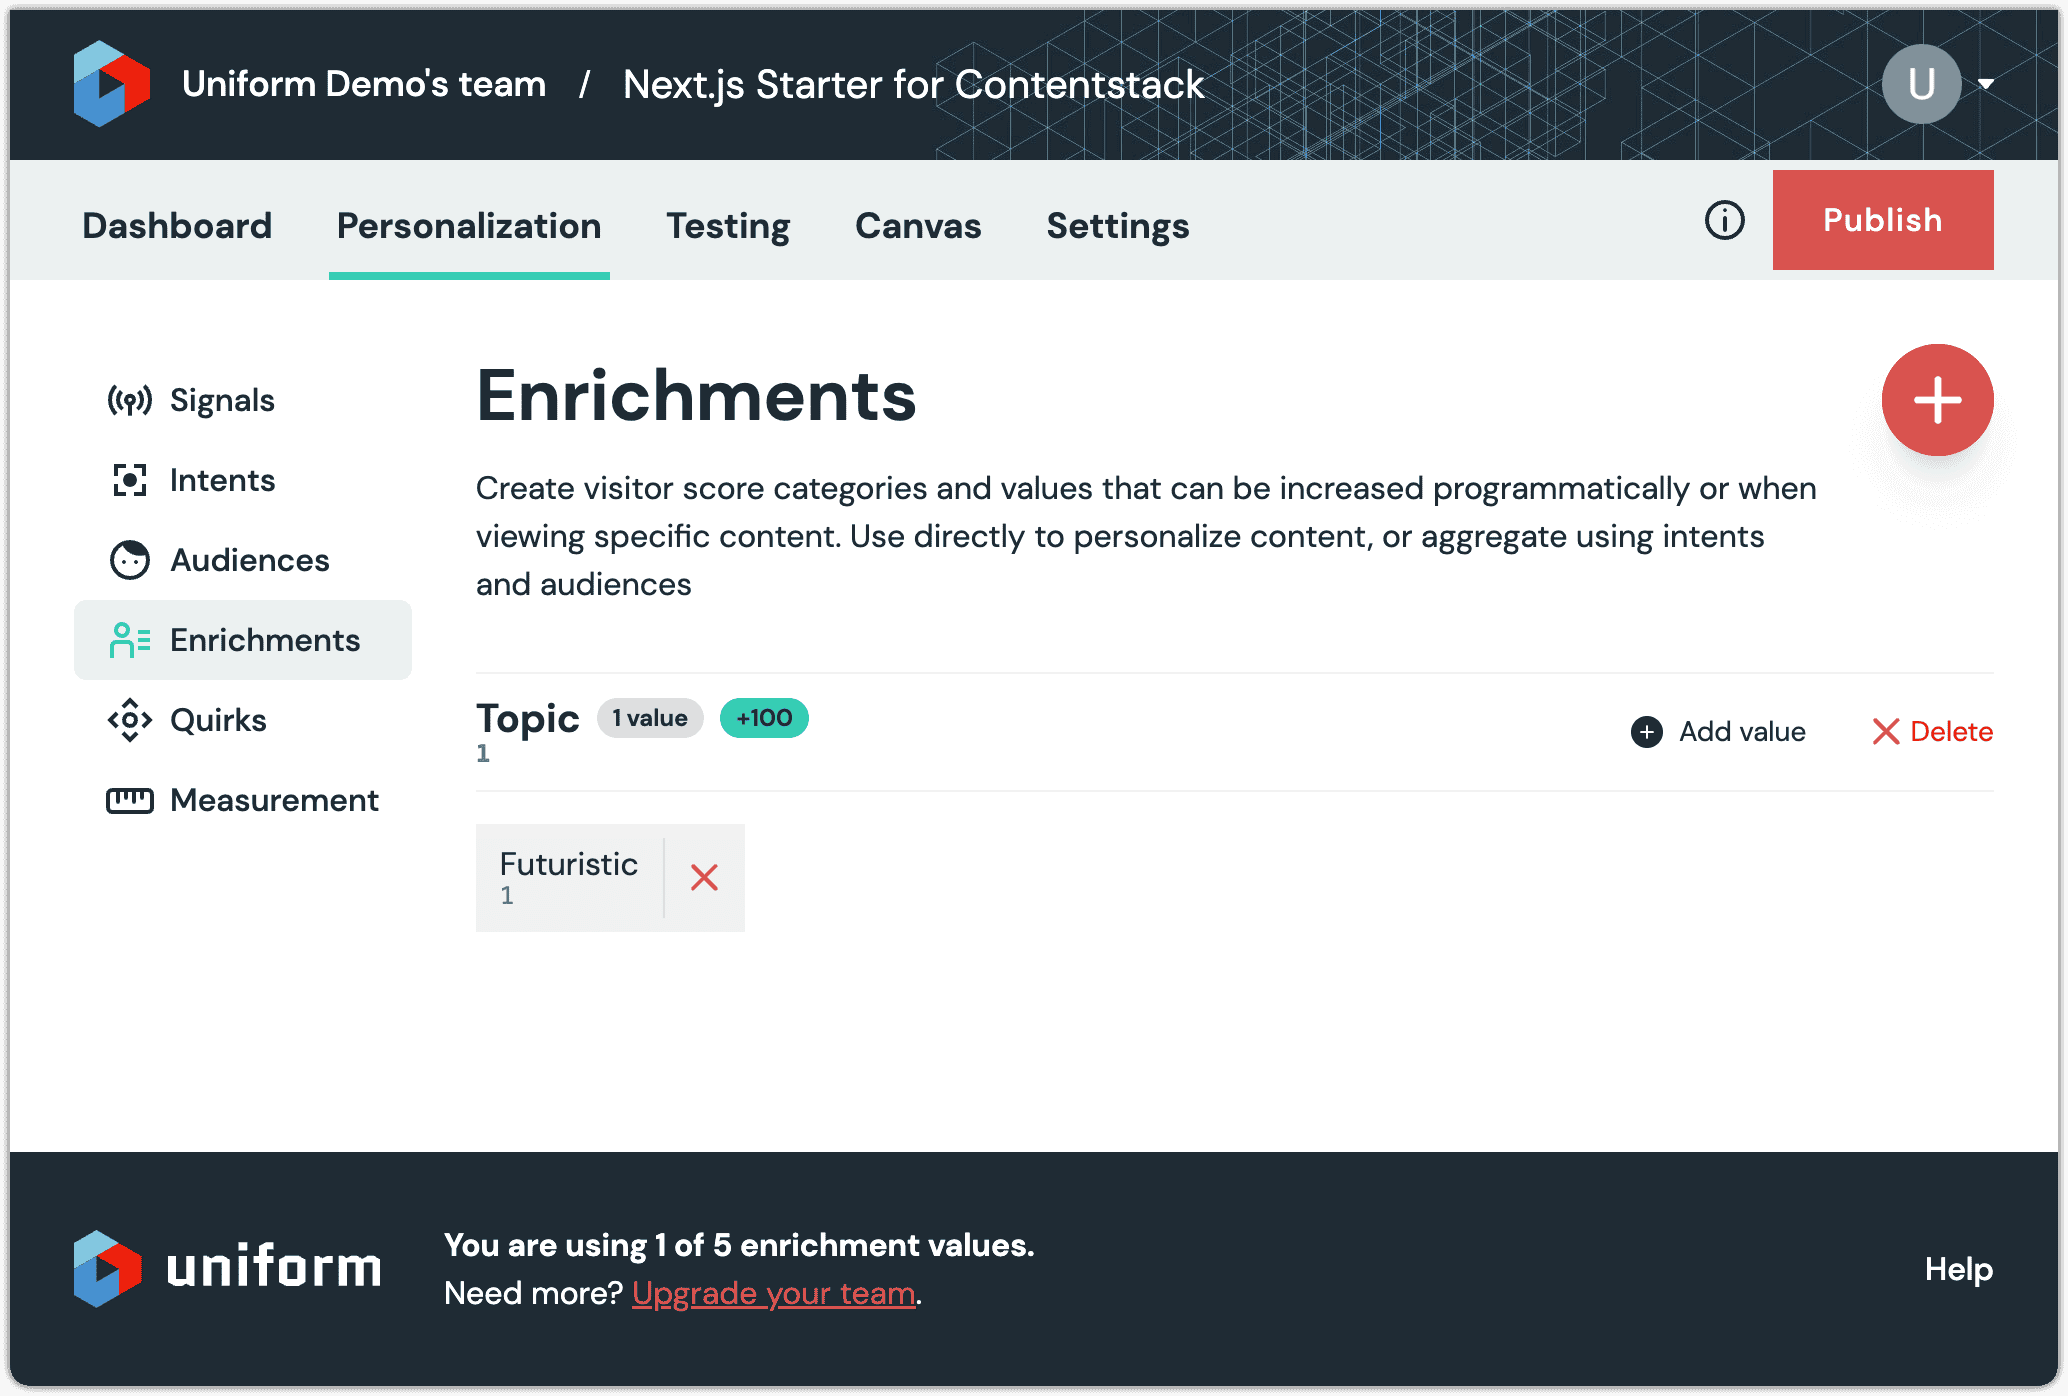
Click Add value.
Enter the following values:
- Name:
Futuristic - Public ID:
1

- Name:
Click Save.
In Contentstack, refresh the entry page.
Click on the word here.
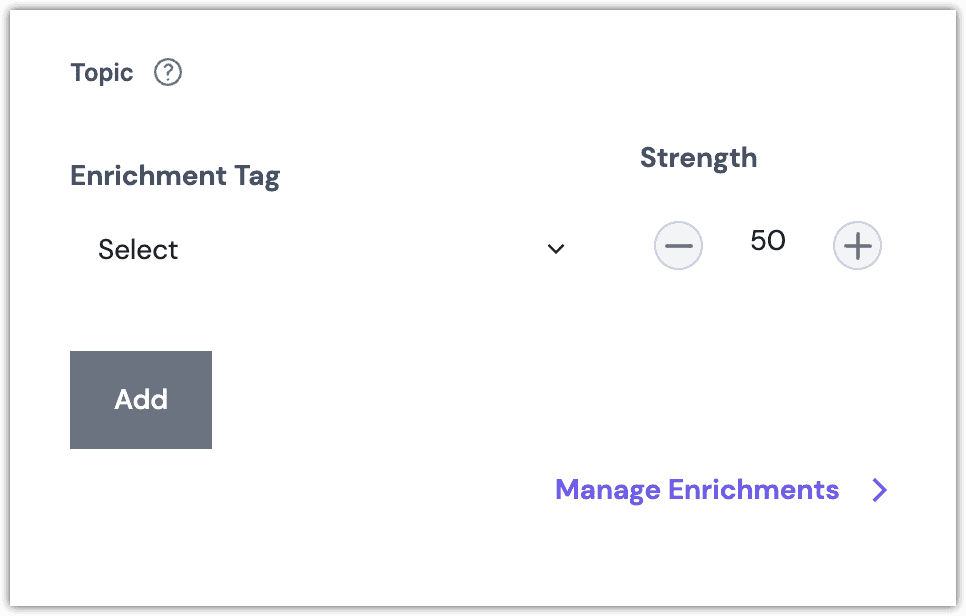
Click Select > Enrichment: Futuristic.

Click Add.
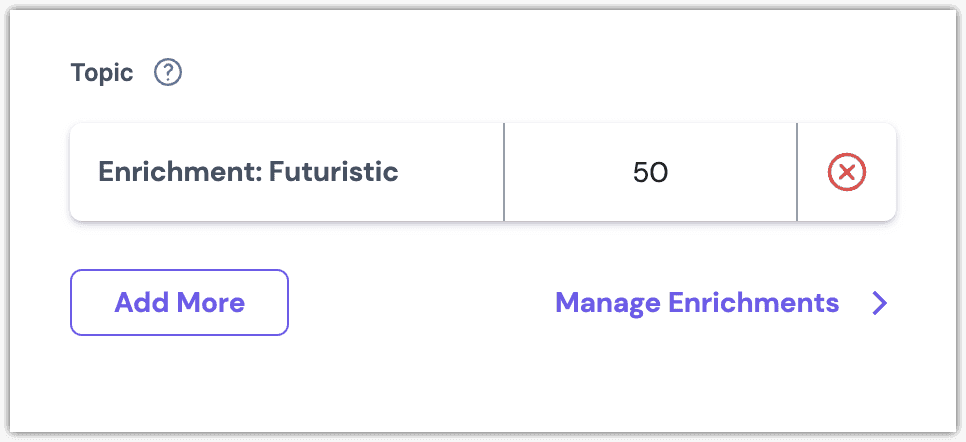
Click Save.
In Uniform, add another value to the enrichment Topic:
- Name:
Architecture - Public ID:
2
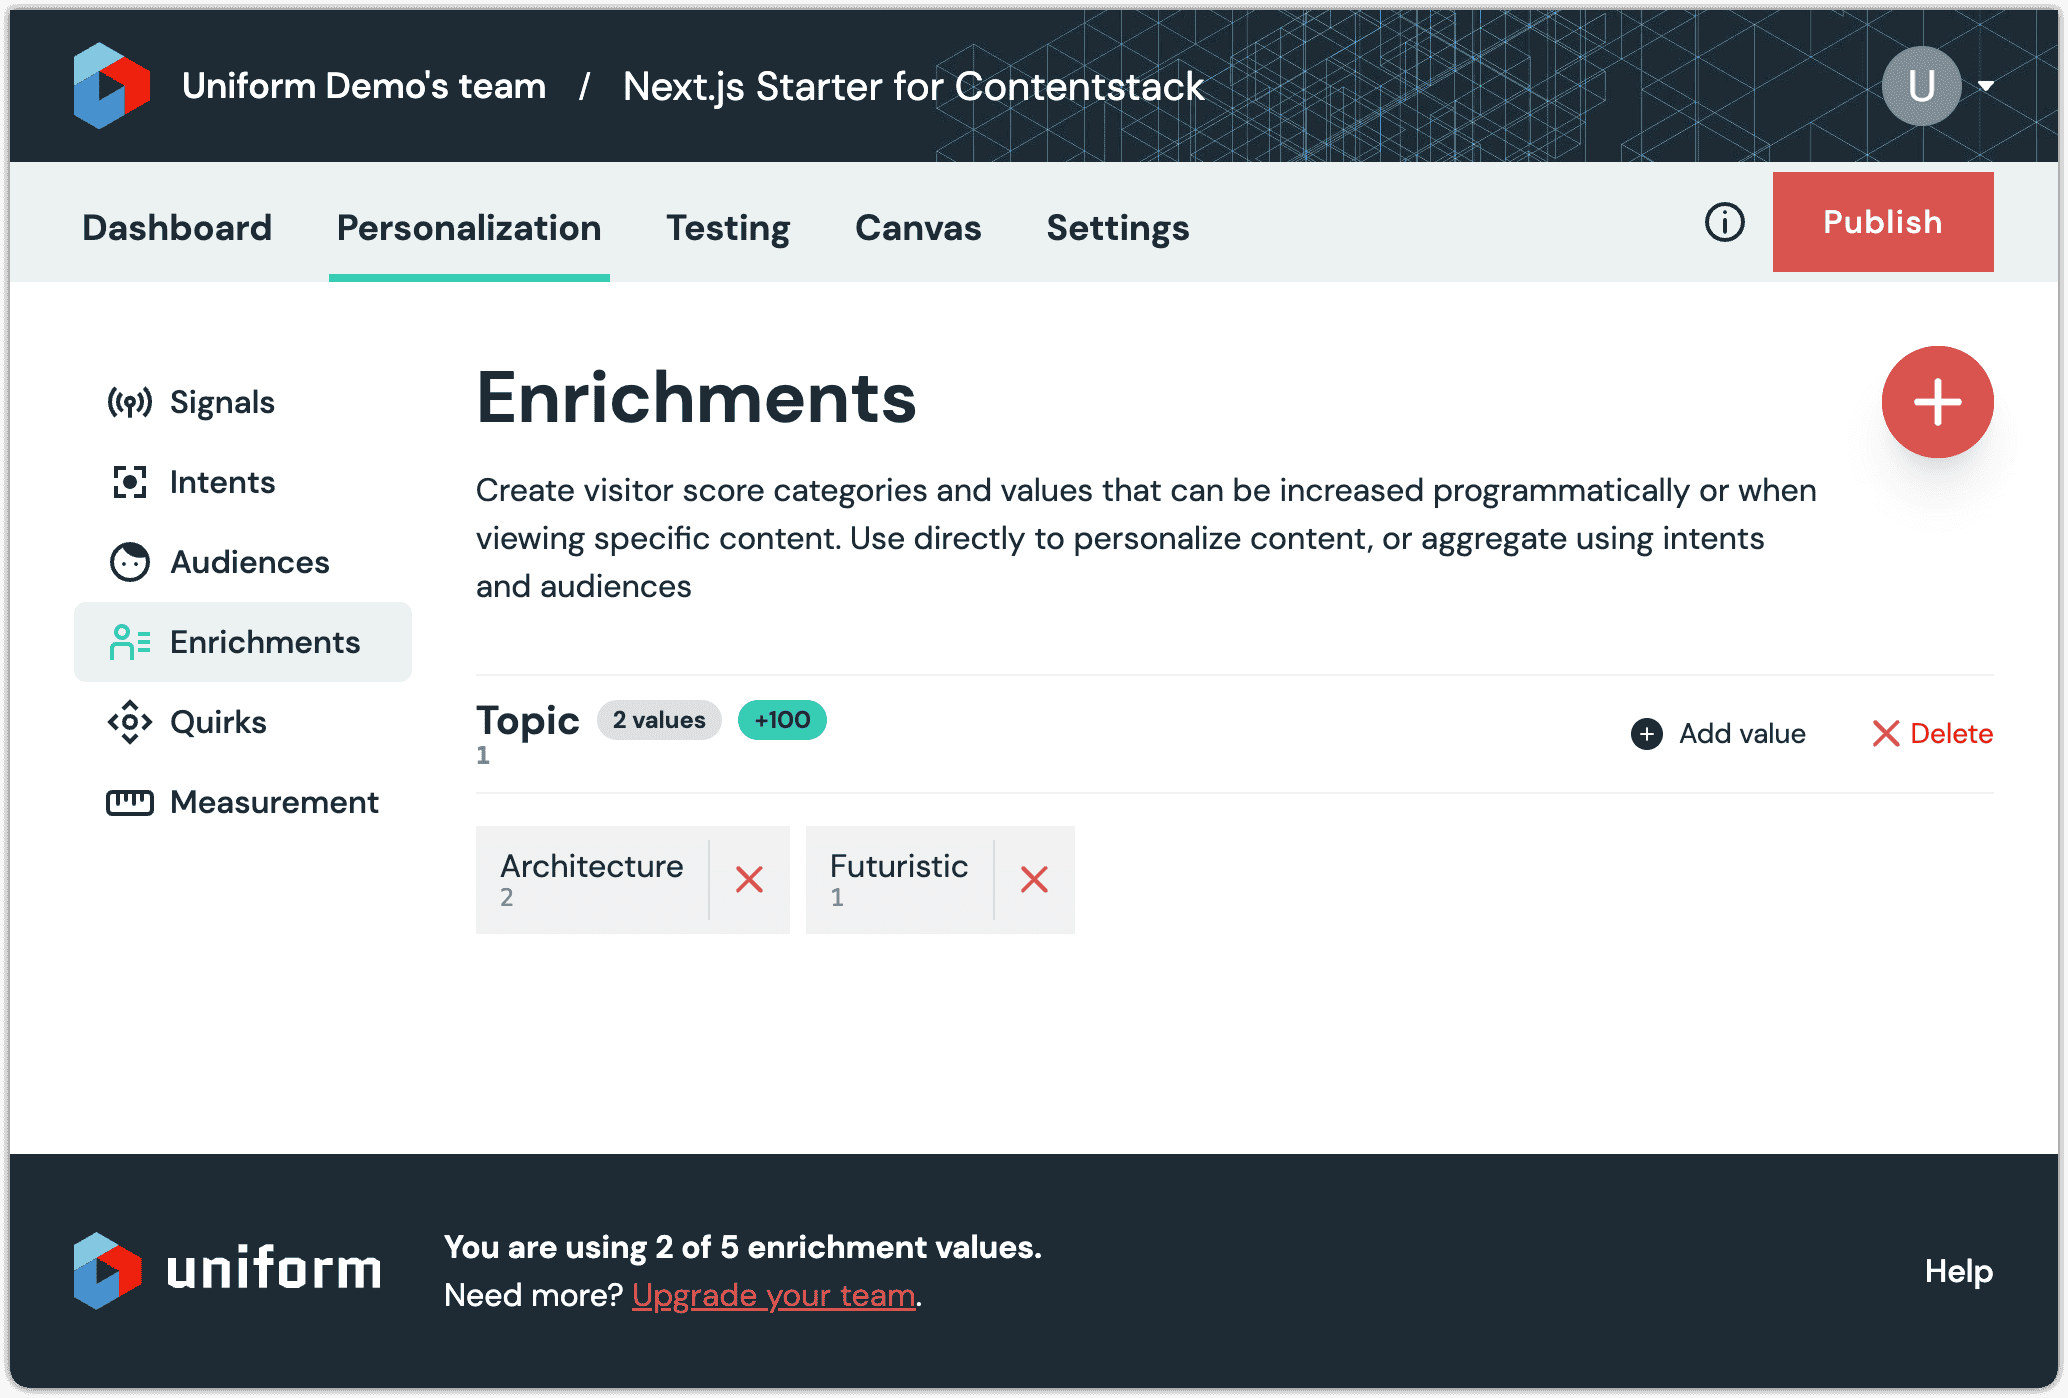
- Name:
In Uniform, add another value to the enrichment Topic:
- Name:
Data - Public ID:
3
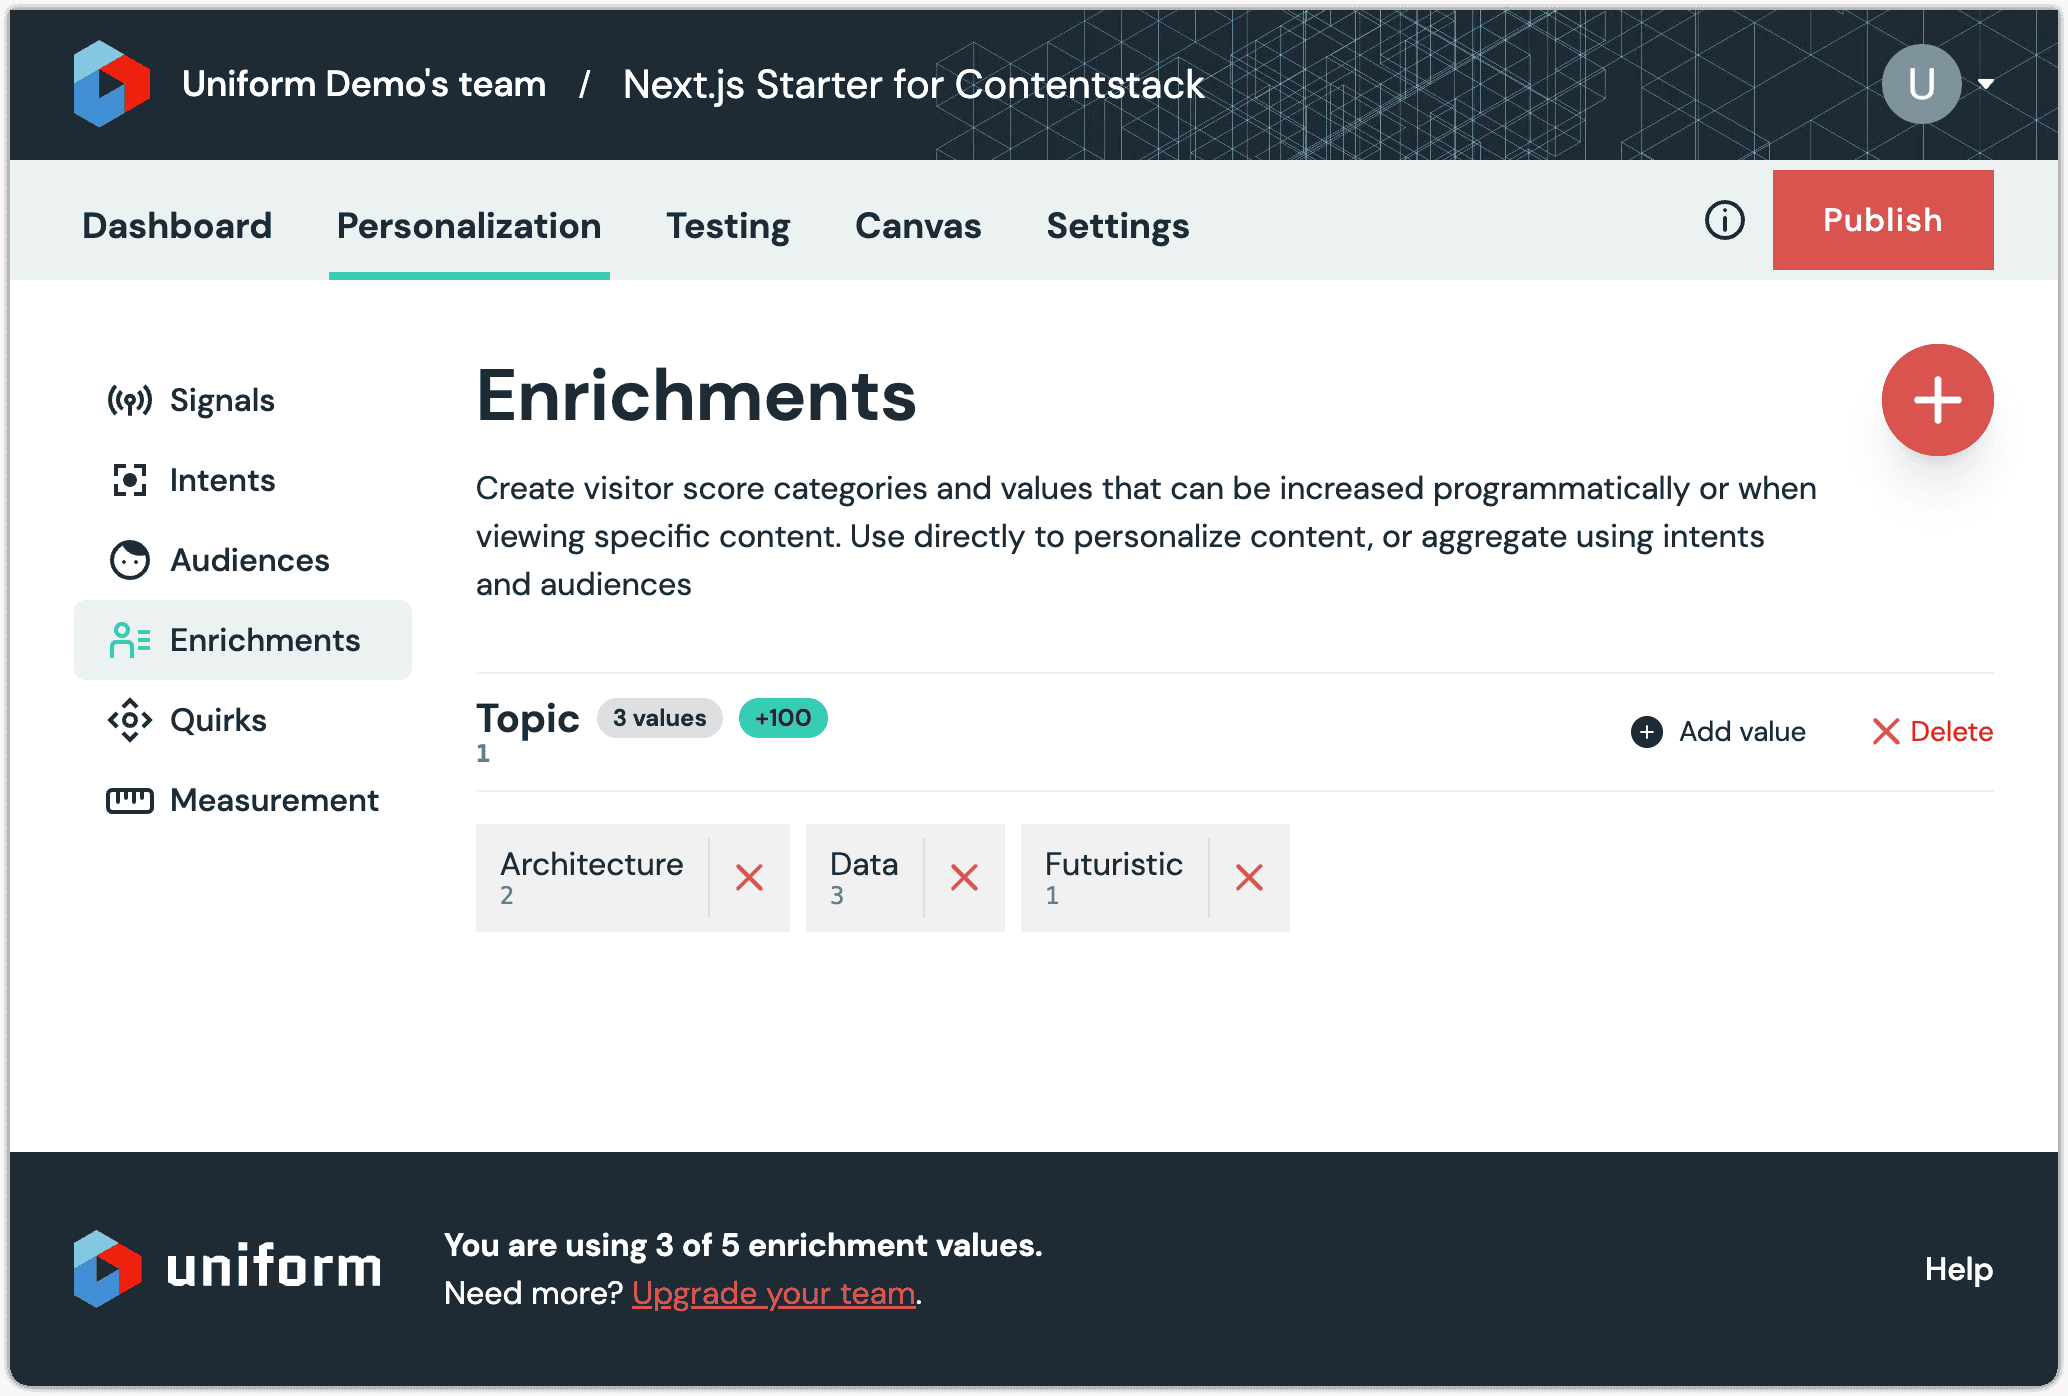
- Name:
In Contentstack, set the value on the field Topic on the other Blog Entry entries:
Title Topic The future of business with AI Futuristic Traditional vs. Decoupled vs. Headless CMS - Know the Difference Architecture The modern Cloud Ecosystem Architecture Data Mining and its significance in Business Analytics Data Headless CMS: The Solution to Top Challenges in Ecommerce Architecture Publish the entries to the environment development.
Hero entries#
Hero entries provide the personalized content that will be displayed on the home page. The specific entry that's used when a visitor views the home page depends on the visitor's activity.
In Contentstack, create a new entry using the content type Hero.
Enter the following value for the field Title:
Architecture HeroEnter the following value for the field Message:
You like architecture!In the field Personalization criteria, click Add Criteria.
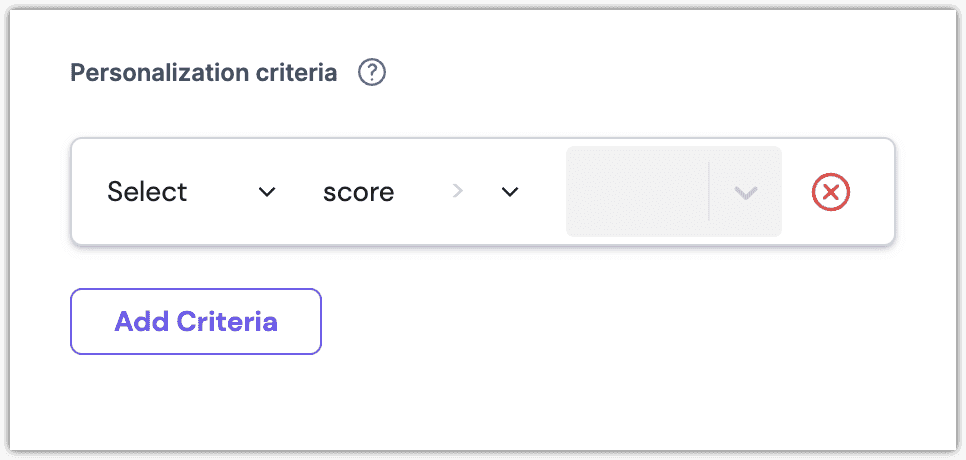
Click Select > Enrichment: Architecture.
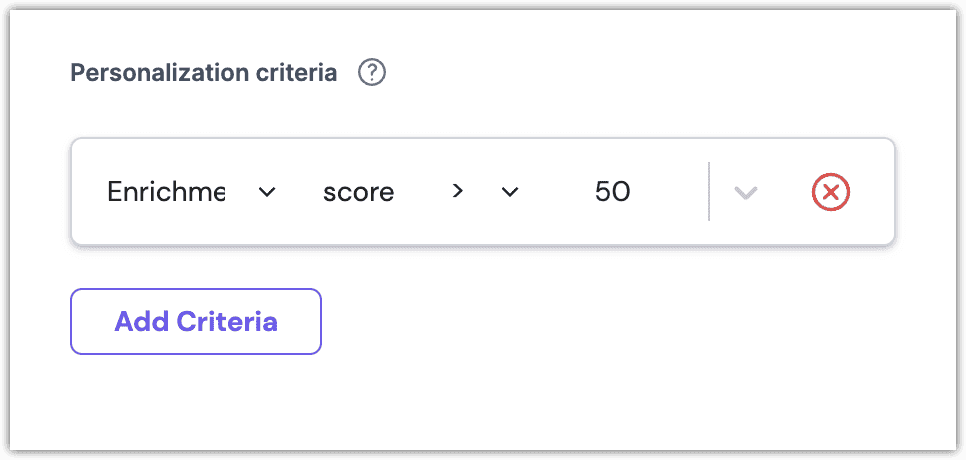
About this step
By default, the criteria is set to match when the enrichment score is greater than 50. The enrichment score is set to 50 when a blog entry page is viewed. This means the criteria will only match if a blog entry the architecture enrichment is viewed more than one time:
- With the first view, the score will be 50. This isn't greater than 50.
- With the second view, the score will be 100. This is greater than 50.
Click Save.
Publish the entry to the environment development.
Create the following entries using the content type Hero:
Title Message Personalization criteria Data Hero You like data! Enrichment: Data Futuristic Hero You like emerging technology! Enrichment: Futuristic Default Hero View some blog posts so we can learn about your interests. About this step
The Default Hero entry doesn't have any personalization criteria assigned. This means that this entry will always match. This is why it's called the default hero.
Publish the entries to the environment development.
Home#
The home page will display a hero banner that matches the topic the visitor is most interested in. The connection between the home entry and the hero entries must be created.
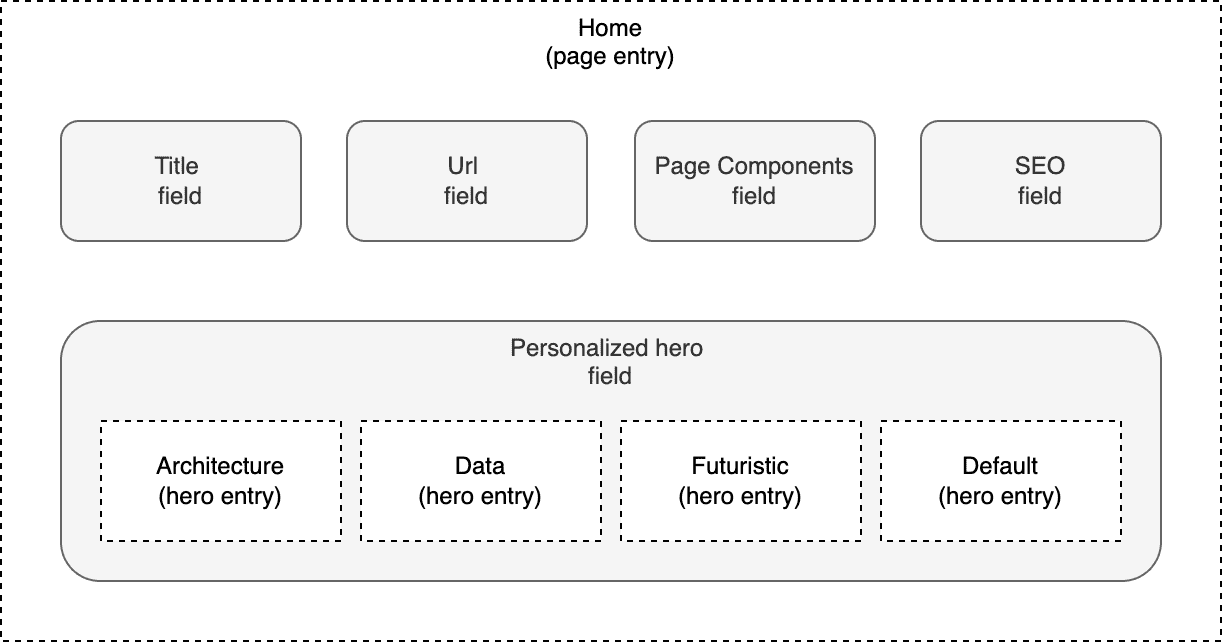
In Contentstack, open the entry Home.
For the field Personalized hero, choose all 4 of the Hero entries you created earlier.
Set the order for the selected entries to the following:
- Architecture Hero
- Data Hero
- Futuristic Hero
- Default Hero
About this step
When Uniform evaluates the personalization criteria assigned to each hero, the first criteria that matches determines which hero will be used.
Since the default hero has no criteria assigned, it will always match (it's the default hero, after all!). So it's important that the default hero be the last entry in the list.
The order of the other heroes isn't important since of the them has a unique criteria. However, if there were overlapping criteria (for example, one hero matches on an interest in architecture and data, then that hero would need to be above the hero that matches only on architecture and the hero that matches only on data).
Click Save.
Publish the entry to the environment development.
Update Next.js app#
Uniform is designed to require minimal Uniform-specific product knowledge so developers can incorporate it into their apps as easily as possible. This section guides you through the process of adding personalization to the Next.js app.
tip
If you learn better by studying a fully implemented, working example, see the finished code section.
Clone repository#
On your local machine, clone the repository that was created when you installed the NextJs Starter in your Contentstack organization.
tip
The URL for this repository is the Repository URL that was displayed after you added the NextJs Starter to your stack.
Set environment variables#
The .env file sets environment variables that the Next.js app uses to connect to external system (such as Contentstack and Uniform).
Create a file
.envin the root of the repository:CONTENTSTACK_API_KEY= CONTENTSTACK_DELIVERY_TOKEN= CONTENTSTACK_ENVIRONMENT=developmentIn Contentstack, open your stack.
Navigate to Settings > Tokens > Delivery Tokens.
Click the Edit link for the delivery token.
Copy the values to the
.envfile:Contentstack value Environment variable Stack API Key CONTENTSTACK_API_KEYDelivery Token CONTENTSTACK_DELIVERY_TOKENAbout this step
These environment variables are needed in order for the Next.js app to be able to read content from the appropriate Contentstack environment.
Add the following values to your
.envfile. You collected these values when you created the Uniform API key:Uniform value Environment variable API Key UNIFORM_API_KEYProject ID UNIFORM_PROJECT_IDAbout this step
These environment variables are needed in order for the npm build script to communicate with Uniform.
Save the file.
Download manifest#
The Next.js application needs to have access to the personalization settings from Uniform. Uniform can generate a manifest that contains this information so you can use the settings in your application.
tip
Often, when using Uniform in an application that uses static site generation, you should generate the manifest before building the application. This ensures the latest manifest is available to the application.
In Uniform, navigate to Optimization > Enrichments.
Click Publish.
About this step
When settings are configured under personalization, they're not available to be used in an application until they're published.
Open a terminal in the root of the repository.
Enter the following commands:
npm install -D @uniformdev/cli npm install @uniformdev/contextAbout this step
This adds a reference to the package with the Uniform CLI, which is a tool that enables you to interact with Uniform from a command-line interface. It also adds a reference to the package that includes a Uniform CLI extension for interacting with Uniform Context from a CLI.
Add the following to
package.json:{ "name": "contentstack-nextjs-starter-app", "description": "A starter app for Contentstack and Nextjs", "version": "1.2.0", "private": true, "author": "Contentstack", "scripts": { "dev": "npm run download:manifest && next dev", "build": "npm run download:manifest && next build", "download:manifest": "mkdir lib && uniform context manifest download --output ./contextManifest.json", "start": "next start", "lint": "eslint pages/**/*.js templates/**/*.js" }, ...About this step
This adds a new script that downloads the manifest from Uniform, saves it to a file named
contextManifest.json, and incorporates it into the scripts that start and build the application.Add the following to your
.gitignorefile:# uniform contextManifest.jsonAbout this step
This ensures the manifest file doesn't get added to your source code repository.
Add Context to app#
Adding Uniform Context to your application involves two primary tasks. One is making the manifest available to the application. This is required because it establishes the parameters for tracking and personalization. Two is creating a "context" object that's maintains state for Uniform Context within the app.
Open a terminal in the root of the repository.
Enter the following command:
npm install @uniformdev/context-reactAbout this step
This adds a reference to the package that enables you to add Uniform Context into applications build using React.
Open the file
./pages/_app.jsin your text editor.Add the following code:
/* eslint-disable react/prop-types */ /* eslint-disable react/react-in-jsx-scope */ import Router from "next/router"; import NProgress from "nprogress"; import "nprogress/nprogress.css"; import "../styles/third-party.css"; import "../styles/style.css"; import { UniformContext } from "@uniformdev/context-react"; import { Context } from "@uniformdev/context"; import manifest from "../contextManifest.json"; Router.events.on("routeChangeStart", () => NProgress.start()); Router.events.on("routeChangeComplete", () => NProgress.done()); Router.events.on("routeChangeError", () => NProgress.done()); function MyApp({ Component, pageProps }) { return <Component {...pageProps} />; } export default MyApp;Add the following code:
/* eslint-disable react/prop-types */ /* eslint-disable react/react-in-jsx-scope */ import Router from "next/router"; import NProgress from "nprogress"; import "nprogress/nprogress.css"; import "../styles/third-party.css"; import "../styles/style.css"; import { UniformContext } from "@uniformdev/context-react"; import { Context } from "@uniformdev/context"; import manifest from "../contextManifest.json"; Router.events.on("routeChangeStart", () => NProgress.start()); Router.events.on("routeChangeComplete", () => NProgress.done()); Router.events.on("routeChangeError", () => NProgress.done()); const context = new Context({ manifest, defaultConsent: true, }); function MyApp({ Component, pageProps }) { return <Component {...pageProps} />; } export default MyApp;Add the following code:
/* eslint-disable react/prop-types */ /* eslint-disable react/react-in-jsx-scope */ import Router from "next/router"; import NProgress from "nprogress"; import "nprogress/nprogress.css"; import "../styles/third-party.css"; import "../styles/style.css"; import { UniformContext } from "@uniformdev/context-react"; import { Context } from "@uniformdev/context"; import manifest from "../contextManifest.json"; Router.events.on("routeChangeStart", () => NProgress.start()); Router.events.on("routeChangeComplete", () => NProgress.done()); Router.events.on("routeChangeError", () => NProgress.done()); const context = new Context({ manifest, defaultConsent: true, }); function MyApp({ Component, pageProps }) { return ( <UniformContext context={context}> <Component {...pageProps} /> </UniformContext> ); } export default MyApp;Add the following code:
/* eslint-disable react/prop-types */ /* eslint-disable react/react-in-jsx-scope */ import Router from "next/router"; import NProgress from "nprogress"; import "nprogress/nprogress.css"; import "../styles/third-party.css"; import "../styles/style.css"; import { UniformContext } from "@uniformdev/context-react"; import { Context, enableContextDevTools } from "@uniformdev/context"; import manifest from "../contextManifest.json"; Router.events.on("routeChangeStart", () => NProgress.start()); Router.events.on("routeChangeComplete", () => NProgress.done()); Router.events.on("routeChangeError", () => NProgress.done()); const context = new Context({ manifest, defaultConsent: true, plugins: [ enableContextDevTools(), ], }); function MyApp({ Component, pageProps }) { return ( <UniformContext context={context}> <Component {...pageProps} /> </UniformContext> ); } export default MyApp;About this step
This enables the Uniform browser extension. Production sites usually don't have this enabled, but it can be helpful during development and testing.
Start app#
In the terminal, enter the following command:
npm run devOpen a browser window to
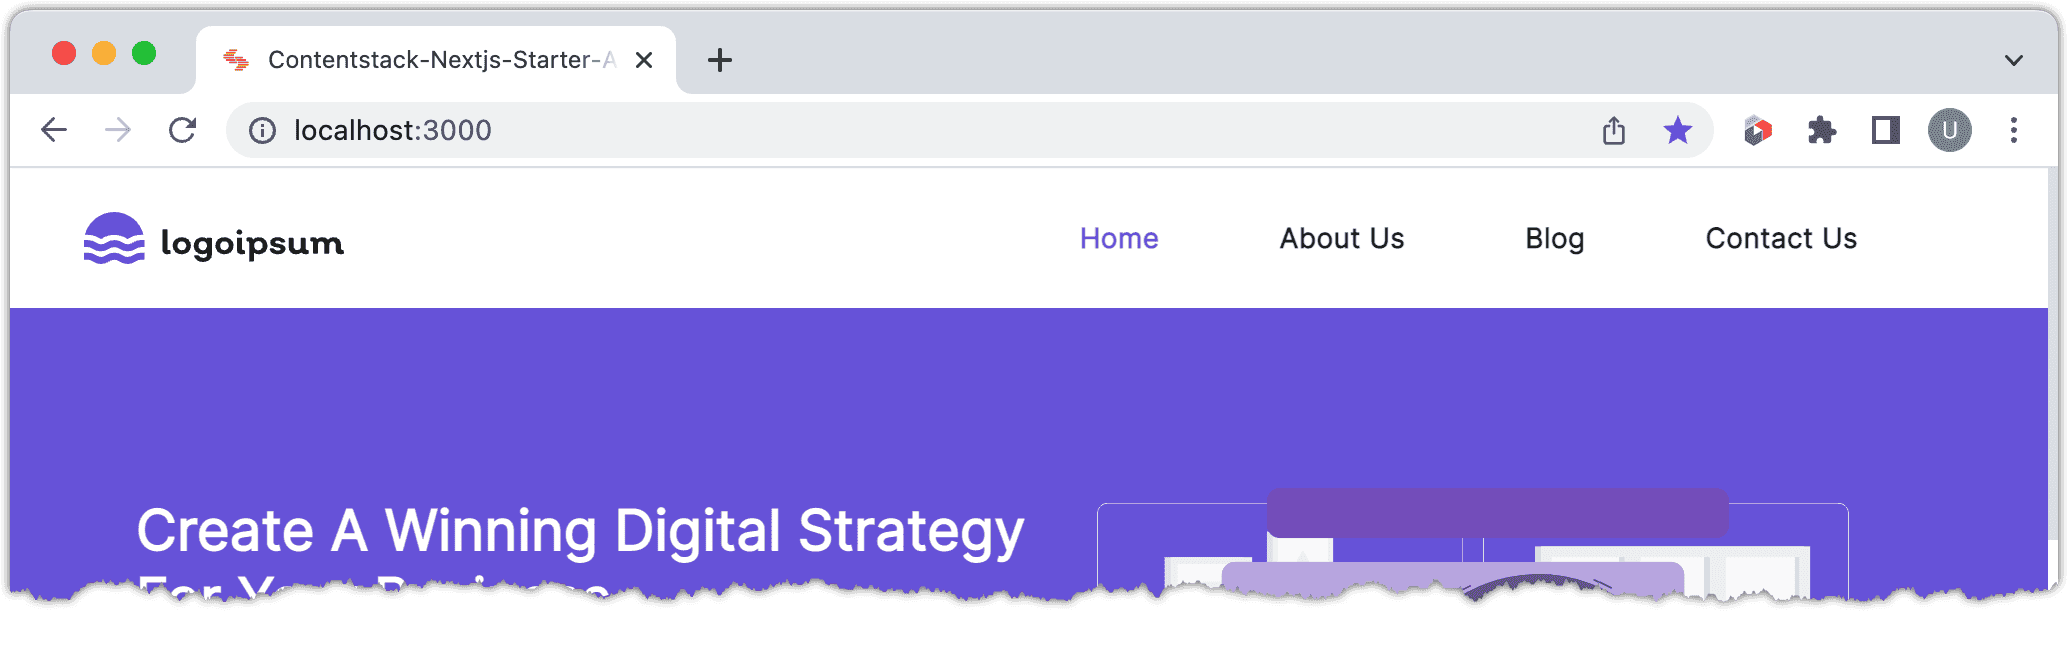
http://localhost:3000to view the NextJs Starter application.
If you have the Chrome extension installed, you should see that the Uniform logo is now in full color (previously it was black and white). This means that Uniform Context was detected on the site.
Add tracking to blog pages#
When you added the field Topic to the Blog Entry content type, you made it possible for content authors to assign a topic to a blog post entry. You must update the Next.js application to track the visitor using this field value.
Open the file
./pages/blog/[...post].jsxin your text editor.Add the following import statement to the file:
import { Track } from "@uniformdev/context-react";About this step
This React component handles tracking, which is the process of capturing visitor activity so it can be used later (in this case, to power personalization).
Add the following code:
export default function BlogPost(props) { const { header, banner, footer, result } = props; const behavior = result?.topic?.name; return ( <Layout header={header} footer={footer} page={banner} blogpost={result}> {banner.page_components && ( <RenderComponents pageComponents={banner.page_components} ...About this step
When you see the value of the field Topic in Contentstack, it's well formatted. Behind that formatting, however, is a JSON data structure that describes the behavior the Uniform tracker should take when the visitor views the content. In the case of the topic, that behavior is "add a certain number of points to a specific enrichment".
This behavior will be passed to the Uniform tracker.
Add the following code:
export default function BlogPost(props) { const { header, banner, footer, result } = props; const behavior = result?.topic?.name; return ( <Layout header={header} footer={footer} page={banner} blogpost={result}> {behavior && <Track behavior={behavior} />} {banner.page_components && ( <RenderComponents pageComponents={banner.page_components}About this step
If a topic is set on the blog post entry, the Track component is displayed. The behavior is passed to the component as a prop. The component tracks visitor activity based on the instructions in the behavior object.
Open a browser window to
http://localhost:3000/blog/the-future-of-business-with-aIto view a blog entry page with a topic assigned.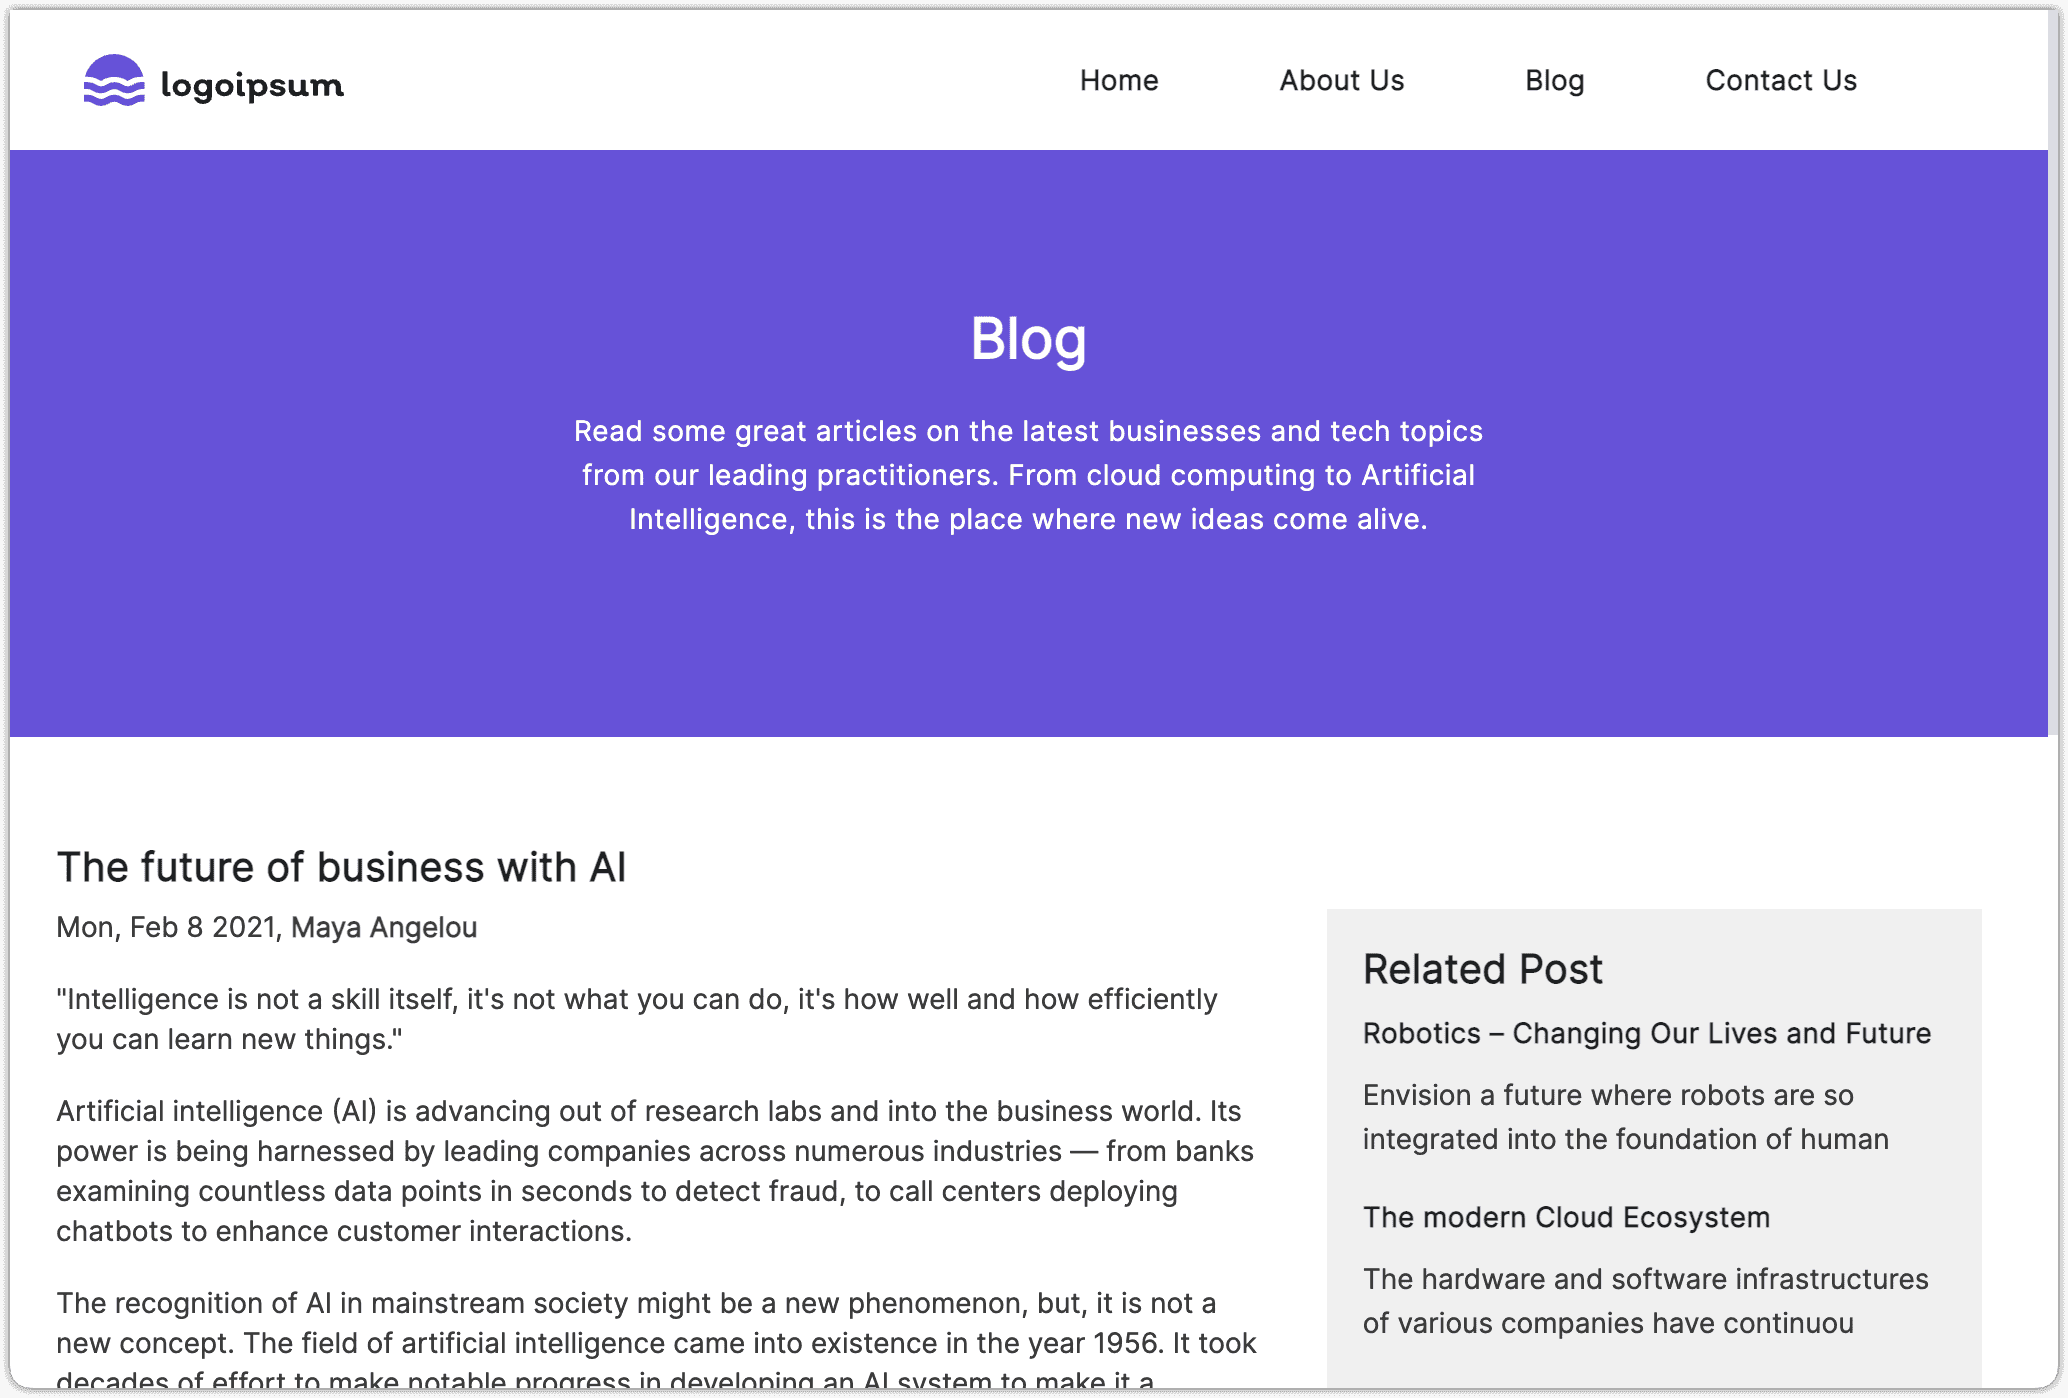
Open the browser extension and navigate to Dimensions.
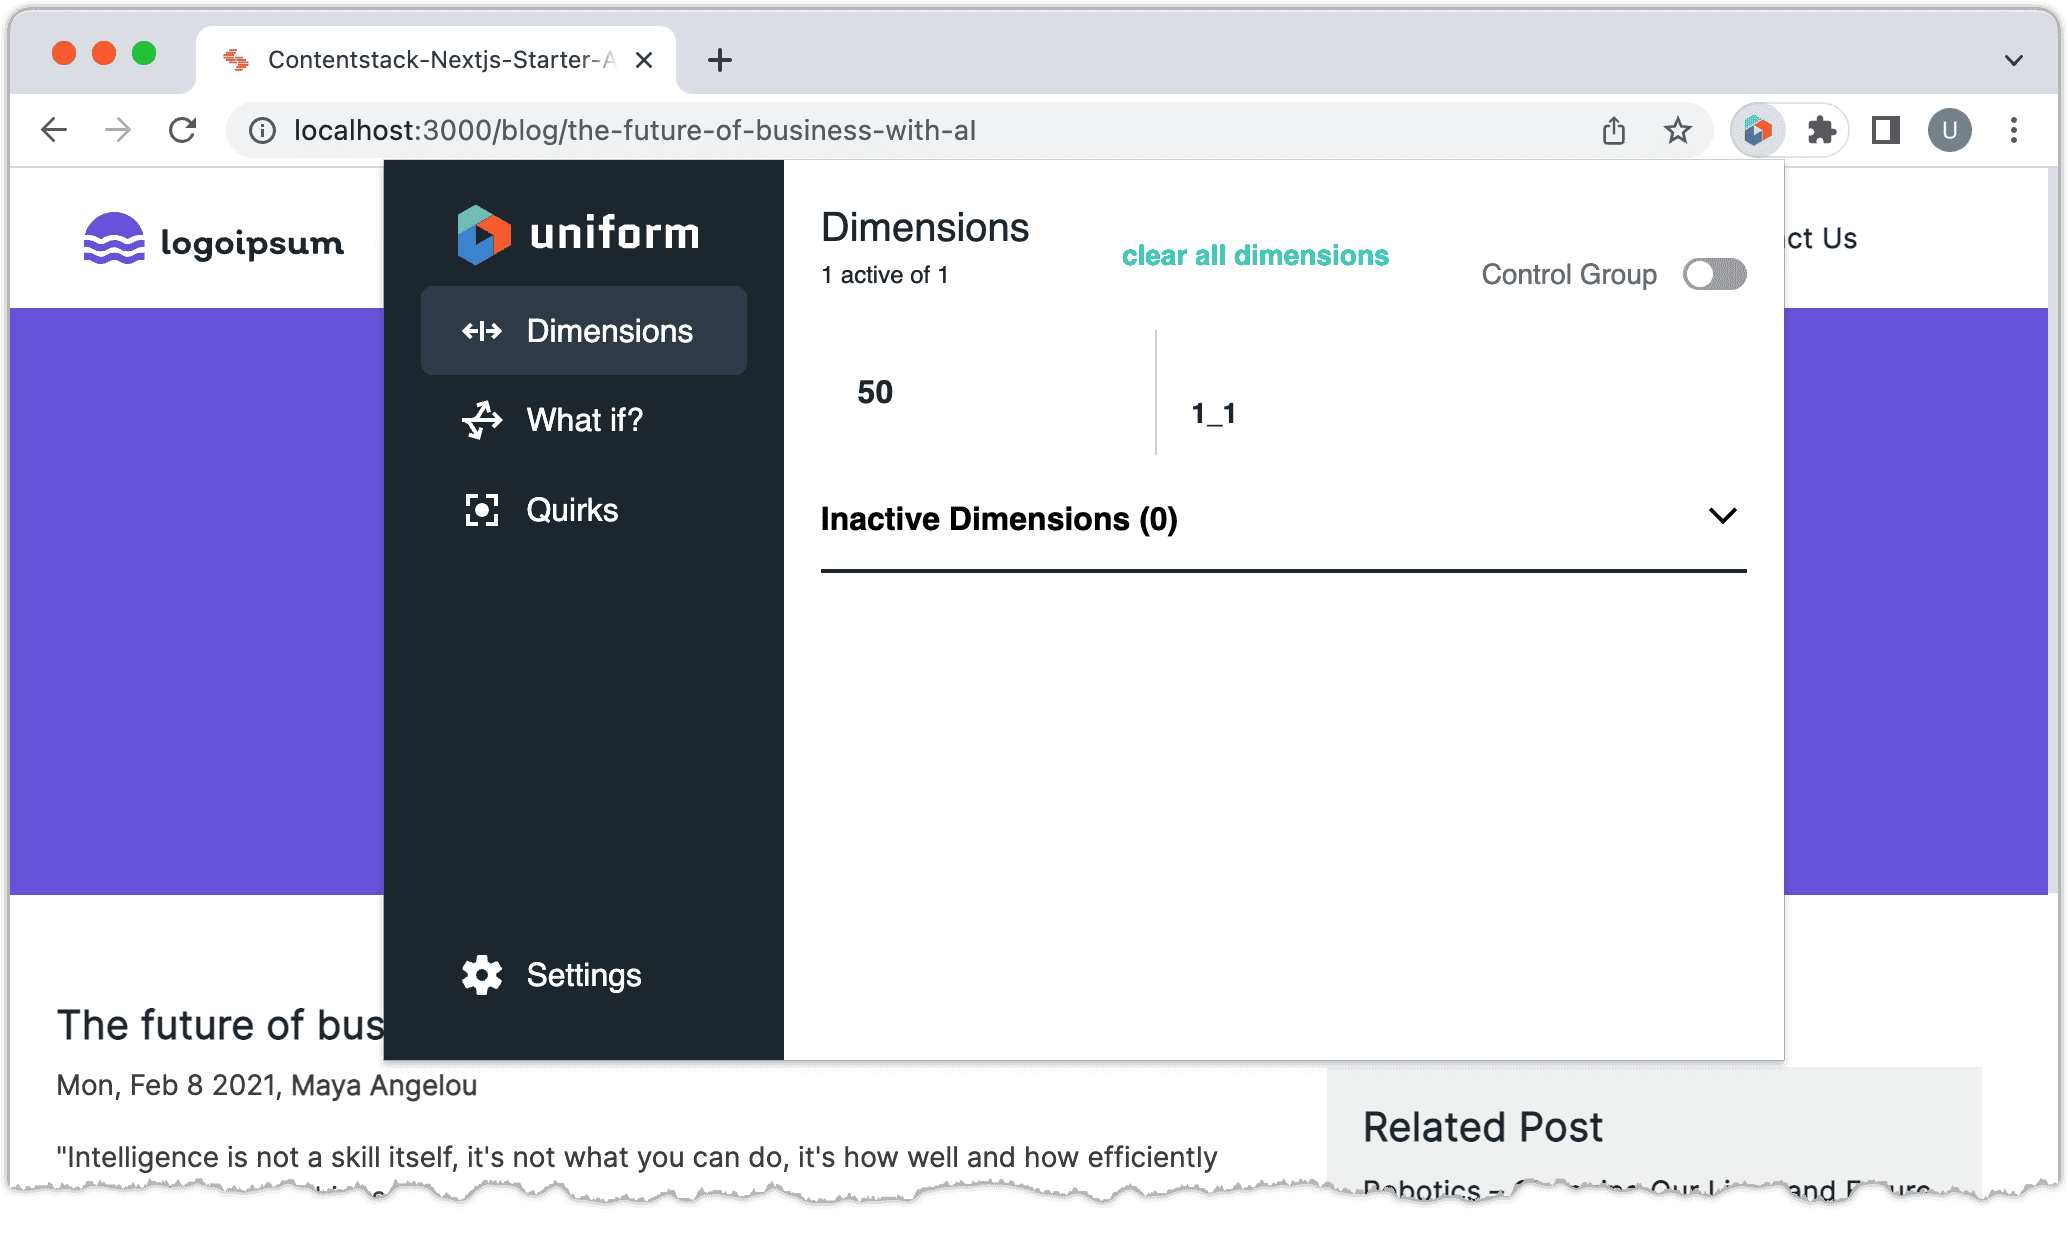
About this step
This shows that the tracker collected data, but it's not very intuitive. It says that the dimension "1_1" has a score of "50." The "1_1" is a combination of the public IDs for the enrichment Topic and the enrichment value Futuristic.
In the extension, click Settings.

Enter the Uniform API key and project ID values that you added to the file
.envand click Save.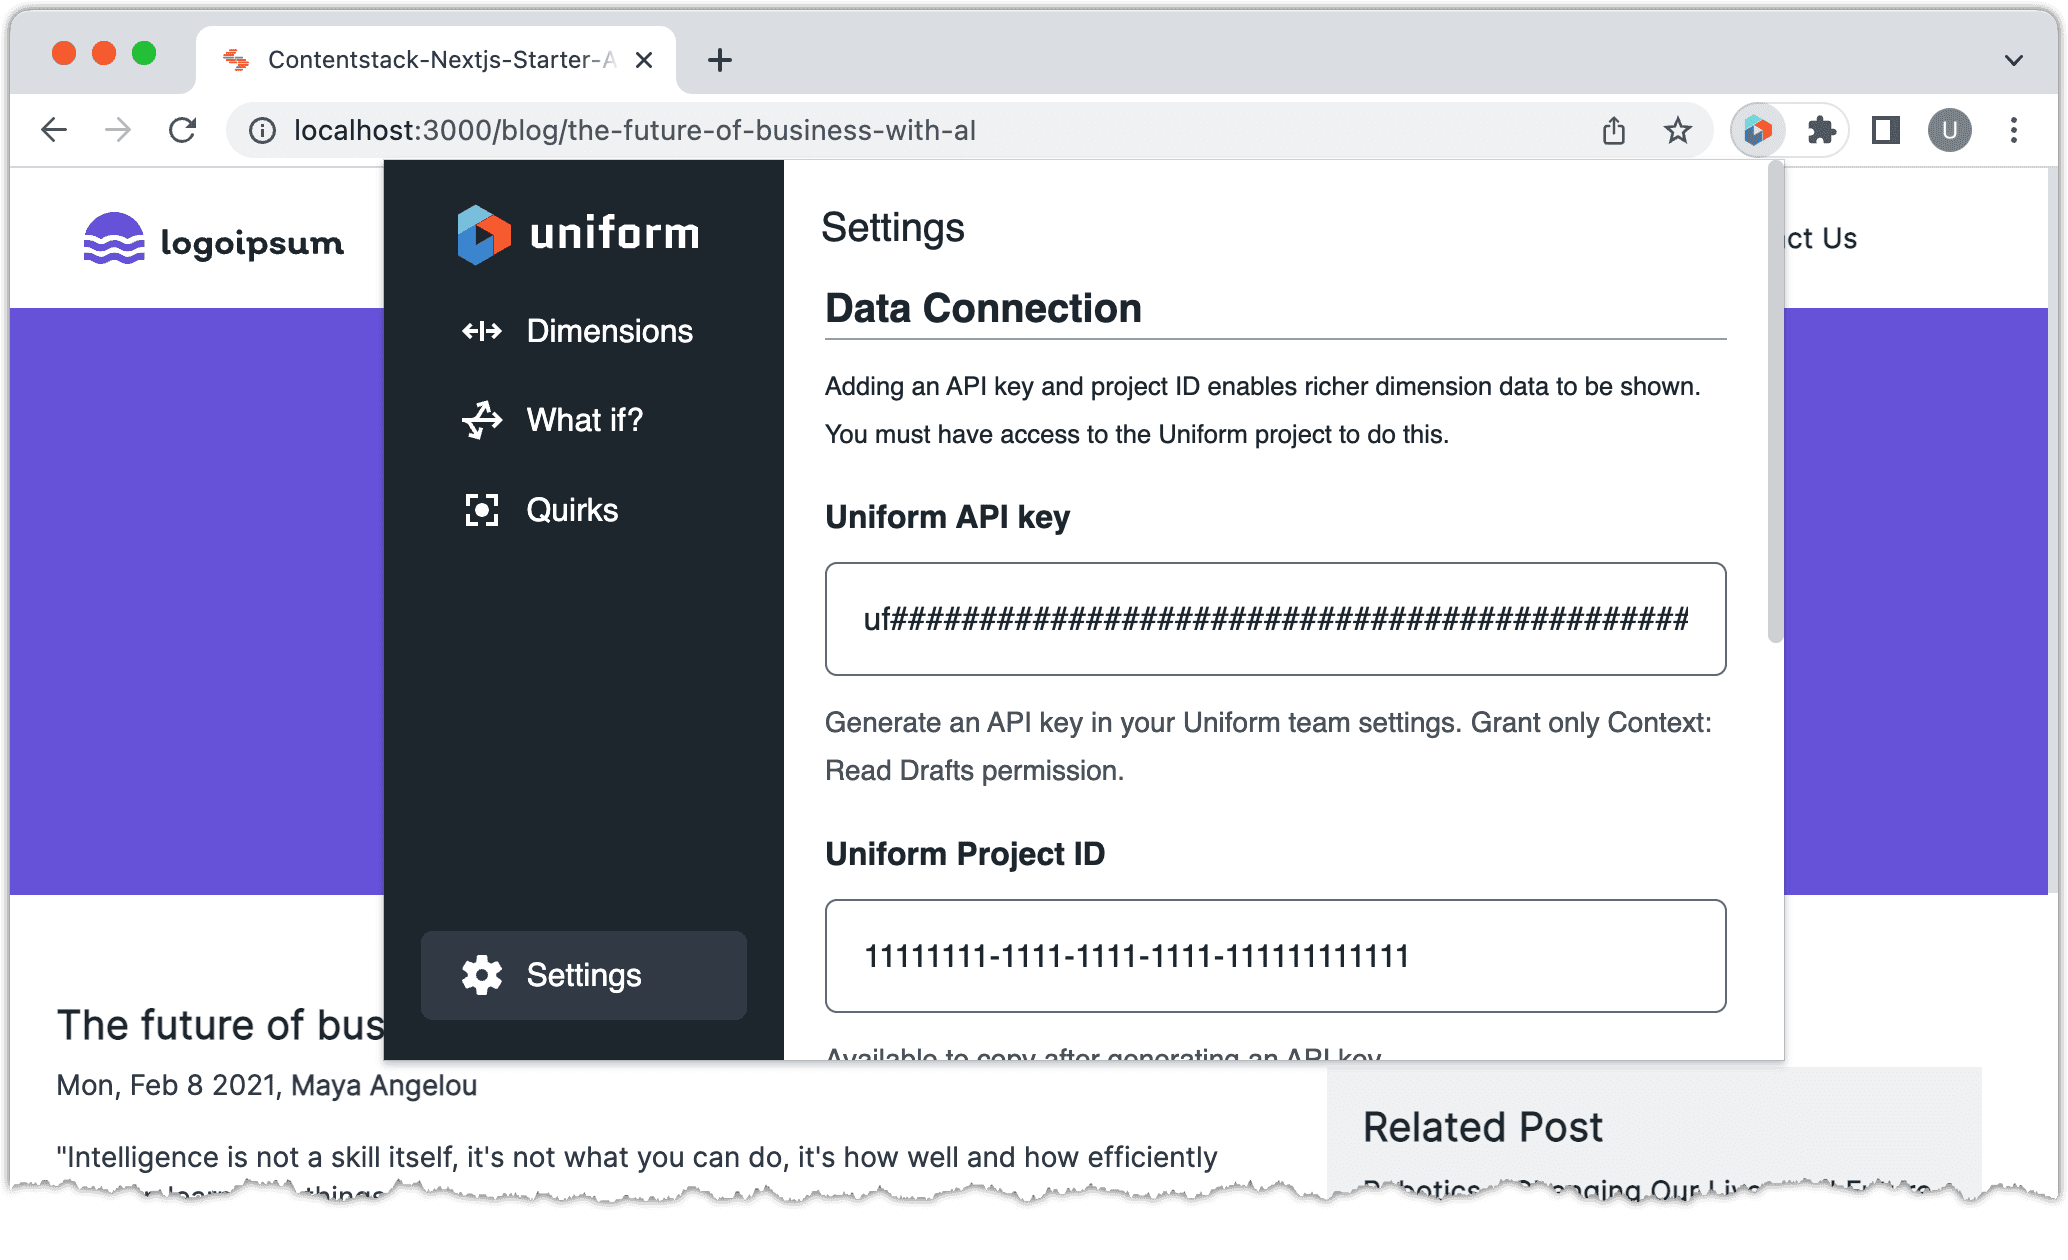
About this step
These settings give the browser extension the ability to read metadata directly from Uniform. This makes it possible to translate "1_1" into something meaningful.
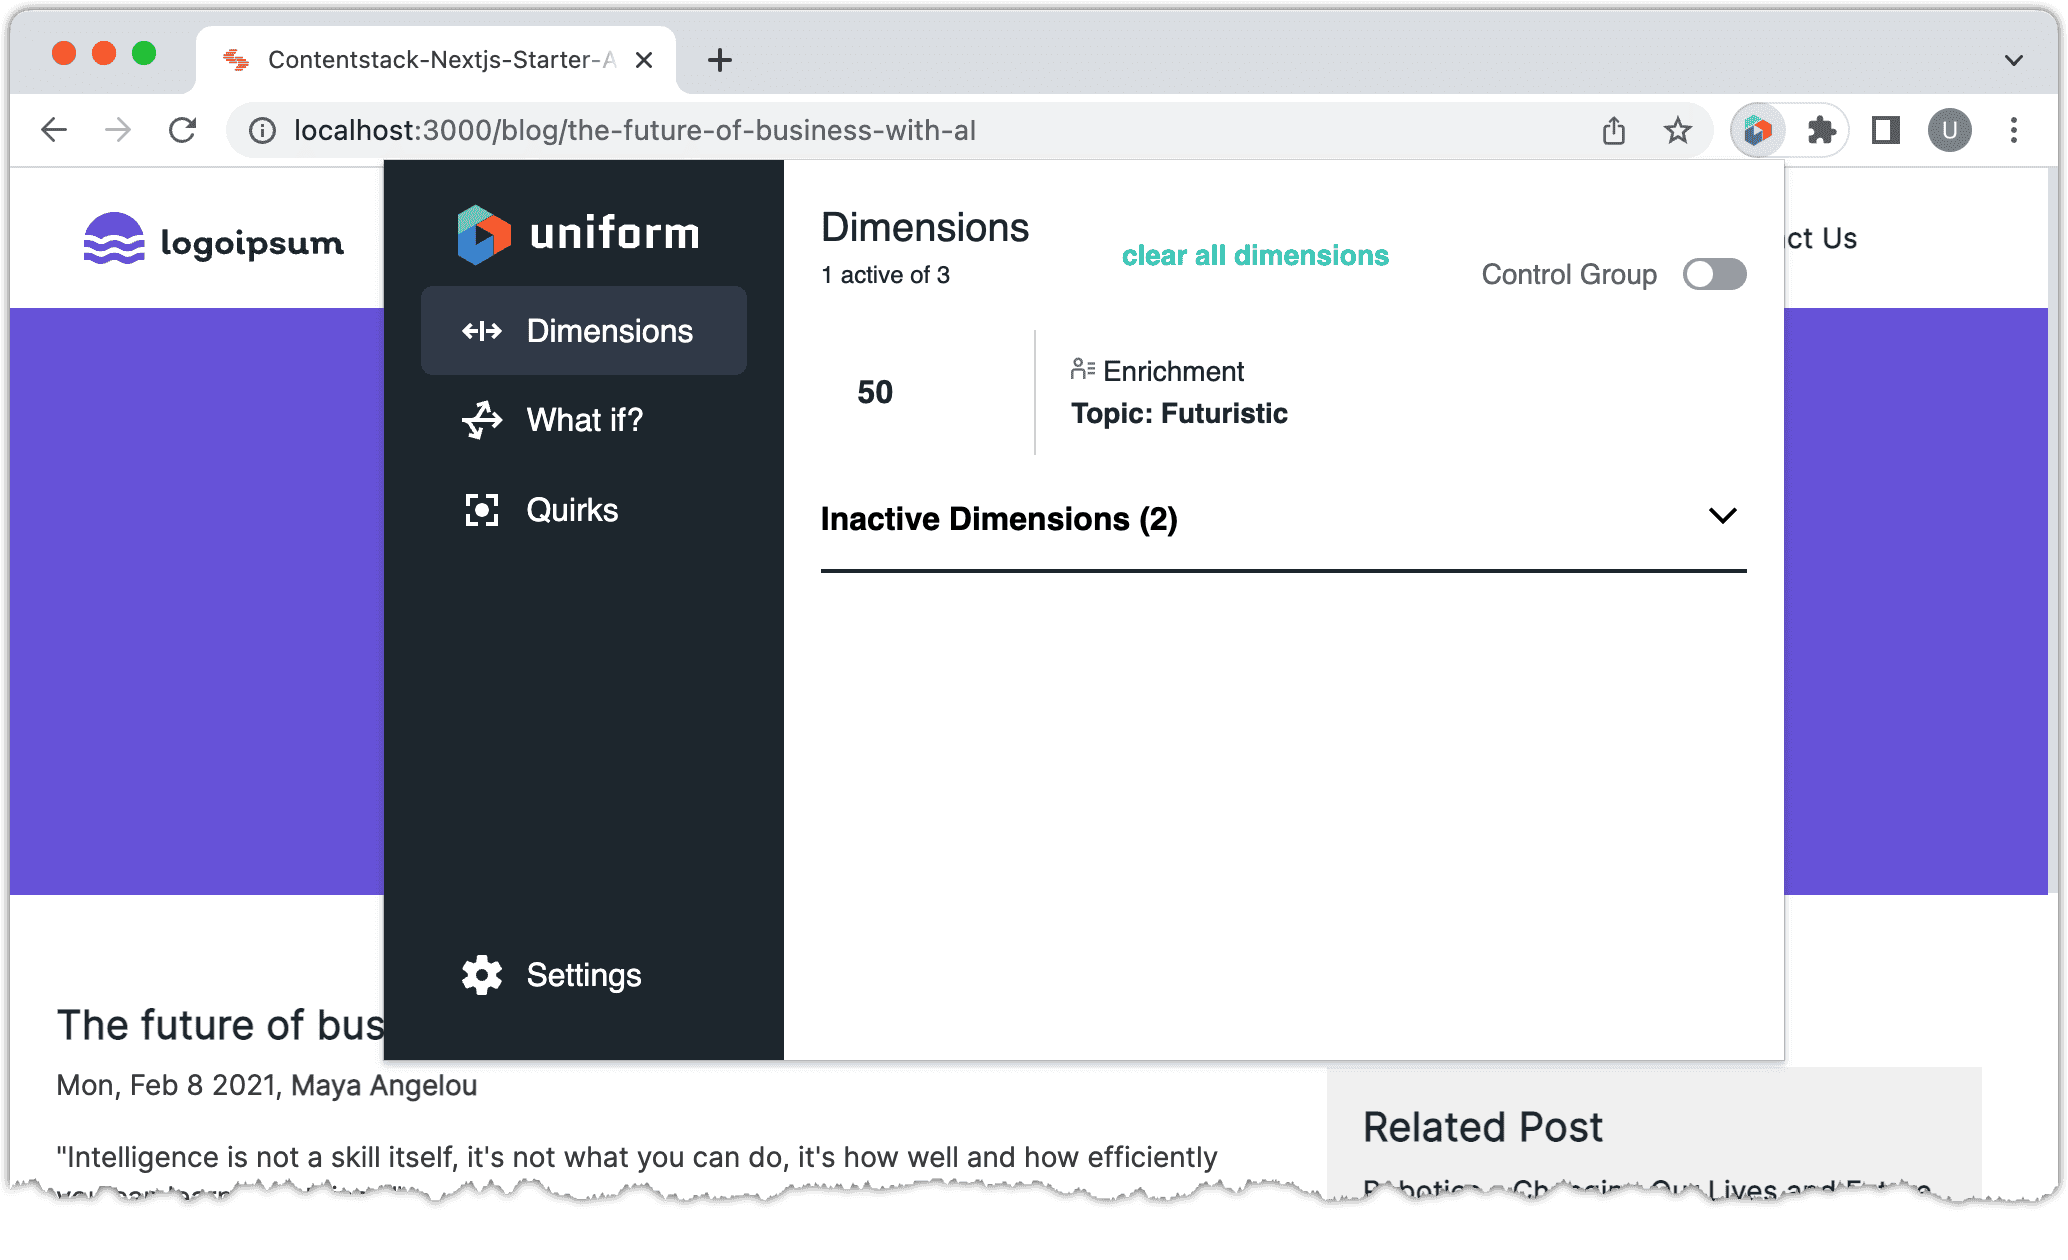
In the extension, click Dimensions. Now you will see more meaningful descriptions of what the tracker has collected.
In your browser, navigate to
http://localhost:3000/blog/the--modern-cloud-ecosystem.Open the browser extension. Now you will see that you have scores for 2 enrichments.
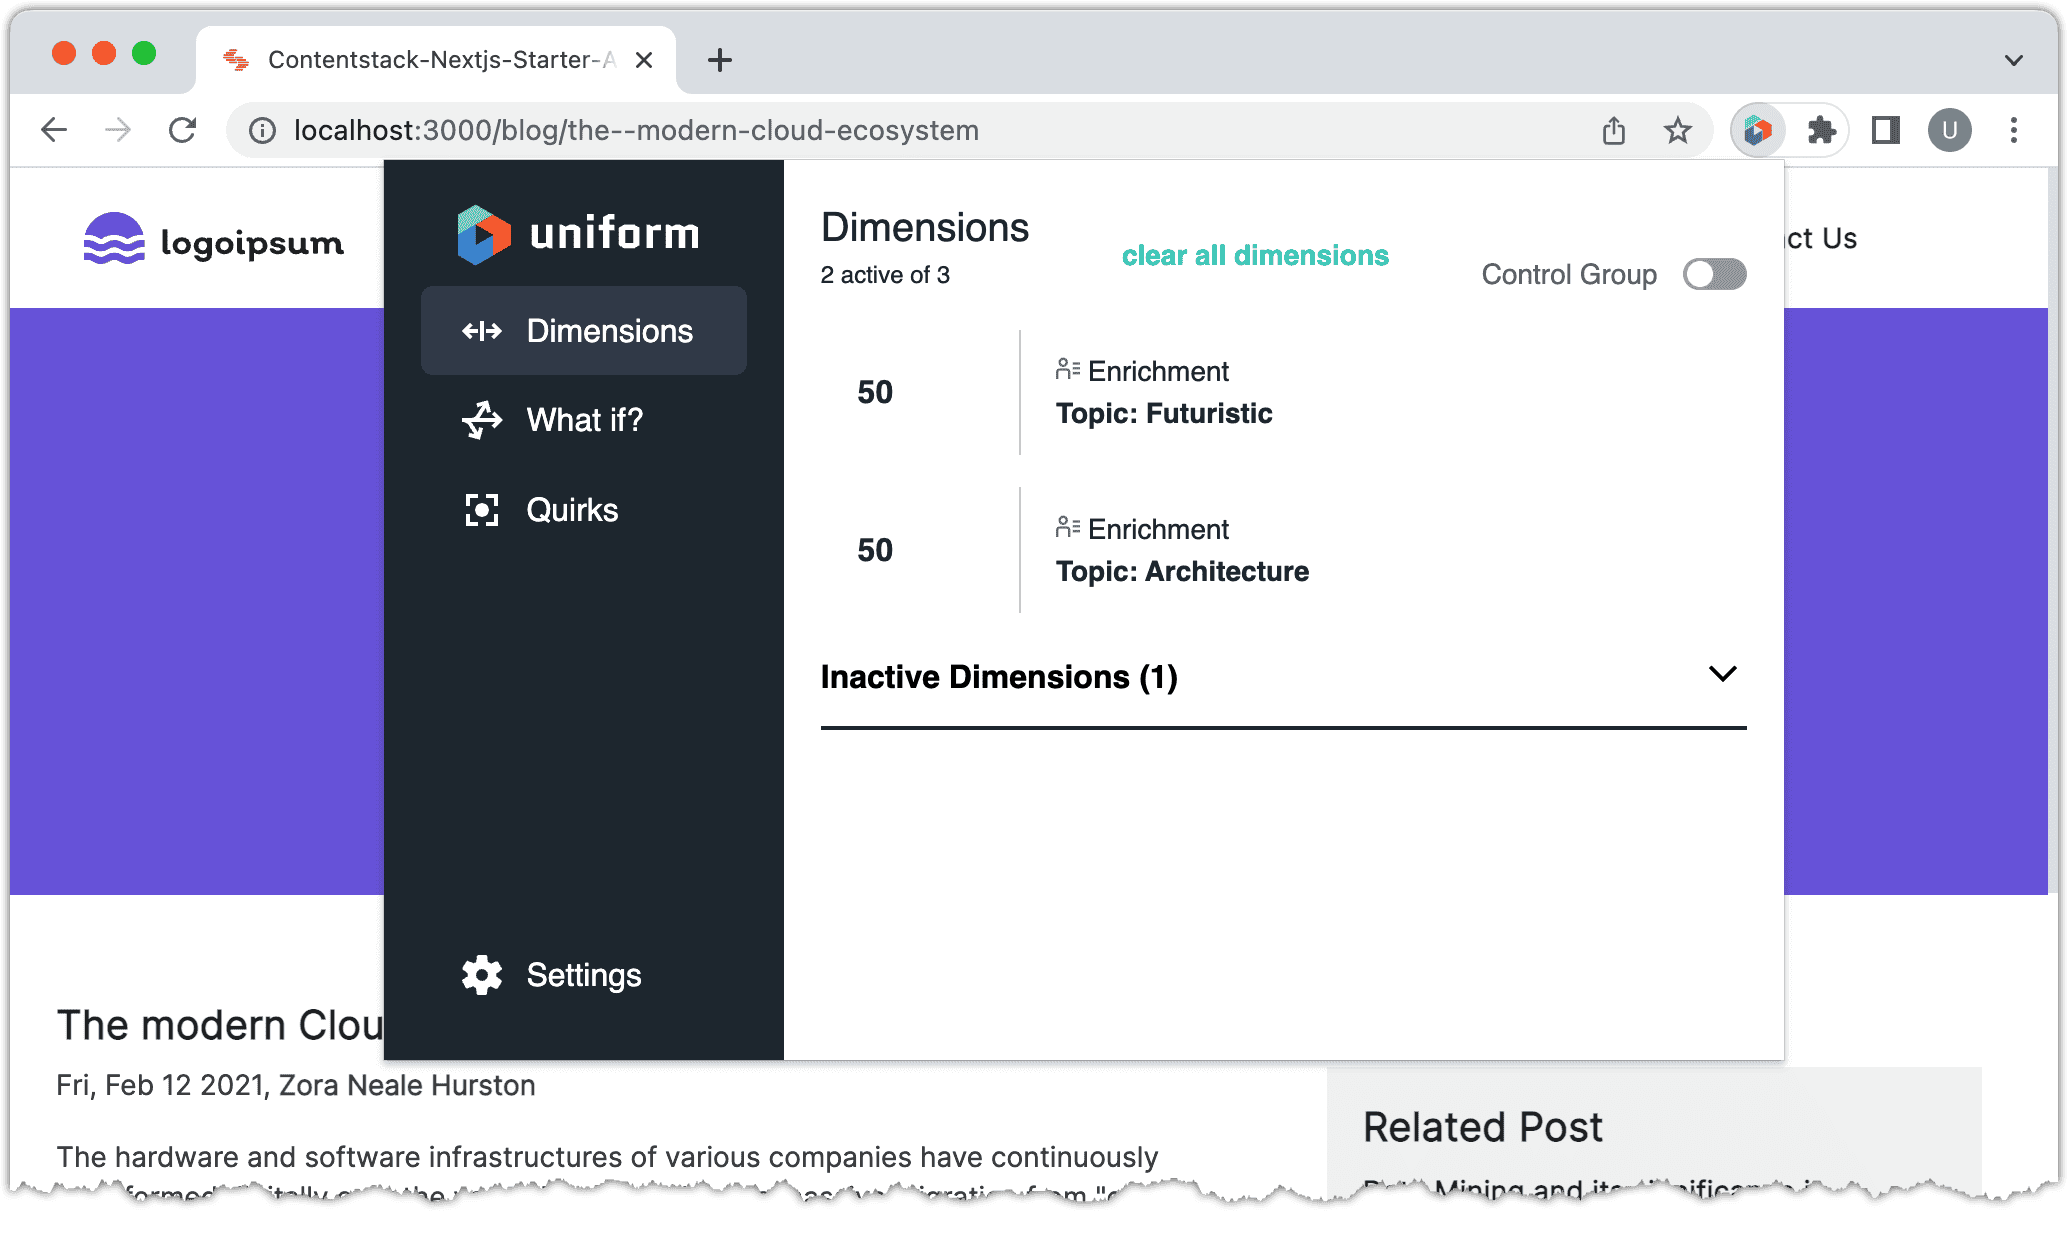
About this step
You can see that tracking is working. The next step is to personalize the visitor's experience based on this information that has been tracked.
Add personalized hero component#
In Contentstack you configured a number of hero entries, each of which had its own personalization criteria assigned. Uniform provides a React component that's able to determine which of those hero entries to displayed, based on the visitor activity that has been tracked.
You must add this React component to your Next.js application.
Create the file
./styles/personalization.css:.personalized-hero { margin: 10px 0 10px 0; padding: 40px 0 10px 0; text-align: center; background: #f7f7f7; }About this step
This defines some styles that are assigned to the personalized hero component you will create.
Open the file
./pages/_app.js.Add the following code to the top of the file:
import "../styles/personalization.css";Create the file
./components/personalized-hero.js:import React from "react"; import { Personalize } from "@uniformdev/context-react";About this step
This imports the React component that handles personalization.
Add the following code:
function Hero({ message, title }) { return ( <div> <div className="personalized-hero"> <h2>{title}</h2> <p>{message}</p> </div> </div> ); }About this step
This is the React component that represents the hero. The Personalize component handles determining the props to pass to this component.
Add the following code:
function reshape(variations) { if (!variations) return; let i = 0; return variations.map((variation) => { const { personalization_criteria, ...fixed } = variation; fixed.pz = variation.personalization_criteria?.name; fixed.id = i++; return fixed; }); }About this step
The Personalization component receives a collection of the possible variations of content that can be used as a result of personalization. Each of these variations must have at least two properties:
idandpz. This function ensures those properties are present.Add the following code:
export default function PersonalizedHero({ variations }) { return ( <div> <Personalize variations={reshape(variations)} component={Hero} /> </div> ); }About this step
This is a component that associates the Uniform Personalize component with the Hero component for this application. It also applies the reshape function to ensure the variations are in a format that's compatible with the Personalize component.
Open the file
./pages/index.jsx.Add the following code to the top of the file:
import PersonalizedHero from "../components/personalized-hero";About this step
This imports the personalized hero component so you can use it in this file.
Add the following code to the function
Home:export default function Home(props) { const { header, footer, result } = props; const { personalized_hero } = result; return ( <Layout header={header} footer={footer} page={result}> {result.page_components && ( <RenderComponents pageComponents={result.page_components} contentTypeUid="page" entryUid={result.uid} locale={result.locale} /> )} </Layout> ); }About this step
This creates a variable for accessing the value of the Personalized hero field from the Page content type.
Add the following code:
export default function Home(props) { const { header, footer, result } = props; const { personalized_hero } = result; return ( <Layout header={header} footer={footer} page={result}> {personalized_hero && <PersonalizedHero variations={personalized_hero} />} {result.page_components && ( <RenderComponents pageComponents={result.page_components} contentTypeUid="page" entryUid={result.uid} locale={result.locale} /> )} </Layout> ); }About this step
If the Personalized hero field has a value, then use the PersonalizedHero component.
Add the following code to the function
getServerSideProps:export async function getServerSideProps(context) { try { const result = await Stack.getEntryByUrl({ contentTypeUid: "page", entryUrl: context.resolvedUrl, referenceFieldPath: [ "page_components.from_blog.featured_blogs", "personalized_hero", ], jsonRtePath: [ "page_components.from_blog.featured_blogs.body", "page_components.section_with_buckets.buckets.description", ], }); ...About this step
The Personalized hero field on the Page content type is a reference field. When you retrieve data for an entry, you must specify which reference fields you want to include. This line ensures the Personalized hero reference field is included.
Finished code#
We provide a finished version of the NextJs Starter application that you can get running in your preferred environment.
import { StackblitzLink, CloneGithubRepoCommands } from '@site/src/components/FinishedApp'; const branch = "main" const path = "examples/docs/apps/contentstack/nextjs/finished" const title = "Contentstack App for Uniform - NextJs Starter - FINISH" const stackblitzOptions = { terminal: 'dev', file: '.env', };
Open StackBlitz to create your development environment.
After you open StackBlitz you will see an error in the terminal that environment variables aren't set. You must set the variables in
.envto match the settings that apply to your Contentstack and Uniform environments.Changing the
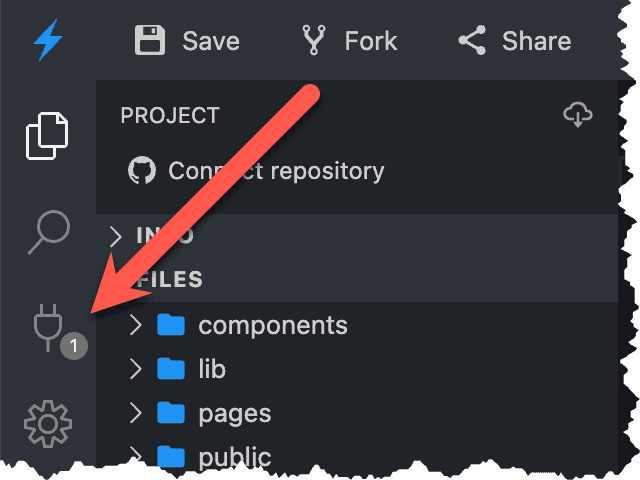
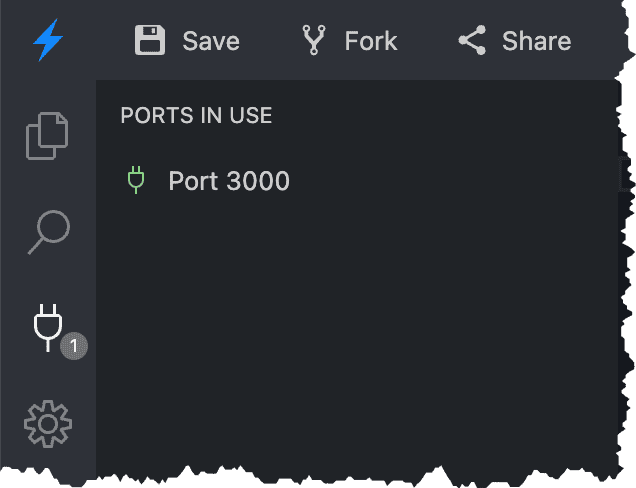
.envfile should cause the container to restart. If it doesn't, enter the following command in the StackBlitz terminal:npm run devIn the activity bar the plug icon indicates that 1 port is in use. Click this icon.
You will see links to the web app running on the 1 port. Click the link for Port 3000.
A new browser tab opens. This is your Next.js application running in develop mode.
https://uniformdev-uniform-docs-examples-######--3000.local.webcontainer.io/
Enter the following commands:
git clone https://github.com/uniformdev/examples cd examples cd examples/docs/apps/contentstack/nextjs/finishedSet variables in
.envto match the settings that apply to your Contentstack and Uniform environments.Enter the following command:
npm installEnter the following command:
npm run devThis will start the Next.js app in develop mode on port 3000.
note
Deploy changes to Vercel#
Now that you have your Next.js application running locally, you can deploy it to Vercel to make it publicly available.
In Vercel, open your project.
Navigate to Settings > Environment Variables.
Add the following environment variables:
- NPM_TOKEN
- UNIFORM_API_KEY
- UNIFORM_PROJECT_ID
Commit your changes to your source control repository.
About this step
This will trigger the build and deploy process on Vercel.
Edge-side personalization#
Unsupported for Next.js 12.2
Next.js 12.2 introduced breaking changes that prevent the approach Uniform uses to implement edge-side personalization from working on Vercel. This documentation will be updated when the required functionality is restored.
The example you just created delivers a personalized website, but the personalization runs on the client. Uniform enables you to move the execution of personalization logic to your preferred CDN, offering the advantages of SSR (server-side rendering) with SSG (static-site rendering).
Since the NextJs Starter is already configured to deploy to Vercel, next you will enable personalization on Vercel using Edge Functions.
tip
If you learn better by studying a fully implemented, working example, see the finished code section.
Npm access token required
Edge-side personalization requires a couple of private npm packages. To access these private packages you must use a special npm access token. Please contact us to request one.
StackBlitz not supported
Adding edge-side personalization involves using npm packages from a private registry. This requires StackBlitz Enterprise Edition. Unless you have a license for this product, you must set up a local development environment to continue.
Upgrade Next.js#
The NextJs Starter uses Next.js 11. The libraries that Uniform uses to enable edge-side personalization require Next.js 12.
Open a terminal in the root of the repository.
Enter the following command:
npm install next@12
Add npm packages#
You must add a couple of npm packages to the Next.js application before you can enable edge-side personalization.
Create a file
.npmrcin the root of the repository://registry.npmjs.org/:_authToken=${NPM_TOKEN}About this step
You must use the npm access token you received from Uniform here. You can either set an environment variable
NPM_TOKENon your local development machine to the value, or you can replace${NPM_TOKEN}in the.npmrcfile with the value.Open a terminal in the root of the repository.
Enter the following command:
npm install @uniformdev/context-edge @uniformdev/context-edge-vercel @uniformdev/context-nextAbout this step
This adds references to the private packages that support edge-side personalization on Vercel.
Enter the following command:
npm install -D bufferAbout this step
This npm package provides functionality needed for edge-side personalization to run properly on the edge.
Enable edge personalization#
Enabling edge-side personalization in the Next.js application requires a couple of changes to the application.
Create the file
./pages/_middleware.js:import { NextResponse } from "next/server"; import { createEdgeContext } from "@uniformdev/context-edge"; import { createUniformEdgeMiddleware } from "@uniformdev/context-edge-vercel"; import manifest from "../lib/context/manifest.json"; const IGNORED_PATHS = /^\/.*\.(ico|png|jpg|jpeg|svg)$/g; export default async function middleware(request) { if (process.env.NODE_ENV === "development") { console.log("Middleware disabled in development"); return; } if (!process.env.VERCEL_URL) { console.error("VERCEL_URL environment is not defined"); return new Response("Configuration Error", { status: 500, }); } if ( request.method.toUpperCase() !== "GET" || request.nextUrl.pathname.match(IGNORED_PATHS) ) { return NextResponse.next(); } const context = createEdgeContext({ manifest, request, }); const middleware = createUniformEdgeMiddleware(); const response = await middleware({ context, origin: new URL(`https://${process.env.VERCEL_URL}`), request, }); return new Response(response.body, { ...response, headers: { ...response.headers, "Cache-Control": "no-store, must-revalidate", Expires: "0", }, }); }Open the file
./pages/_app.jsin your text editor.Add the following code:
... import { NextCookieTransitionDataStore } from "@uniformdev/context-next"; ... const context = new Context({ manifest, defaultConsent: true, plugins: [ enableContextDevTools(), ], transitionStore: new NextCookieTransitionDataStore({}), });Add the following code:
function MyApp({ Component, pageProps, serverUniformContext }) { return ( <UniformContext context={serverUniformContext ?? context} outputType="edge"> <Component {...pageProps} /> </UniformContext> ); }
Finished code {#finished-code-edge}#
We provide a finished version of the NextJs Starter application with edge-side personalization activated so that you can get running in your preferred environment.
Enter the following commands:
git clone https://github.com/uniformdev/examples cd examples cd /examples/docs/apps/contentstack/nextjs/finished-edge
Deploy changes to Vercel#
In order to see edge-side personalization work, you must deploy the Next.js application to Vercel.
Commit your changes to your source code repository.
About this step
This will trigger the build and deploy process on Vercel.
Open your browser to the Vercel deployment URL.
Visit a couple of blog entry pages so you get the personalized home page.
Disable JavaScript in your browser.
Reload the home page. You will see the personalized hero.
About performance#
Even though personalization is fast to execute on Vercel, you are still at the mercy of your Next.js application when it comes to performance.
The NextJs Starter site isn't tuned for performance. For example, if you look at the size of the page response, you will see relatively large numbers. This affects page load times.
In addition, if you are running your application on the Vercel Hobby tier, you won't have the fastest performance. You will get much better performance on the Pro and Enterprise tiers.
Next steps#
Now that you have a fully functional Next.js application powered with content from Contentstack and personalized using Uniform Context, you can use this as a starting point for exploring everything Uniform has to offer, including:
- Presentation builder - Uniform Canvas offers a tool that gives content authors control over presentation within constraints defined by developers, in a way that fits into modern digital production processes.