Operate search
This guide is for team admins who operate Uniform Search for a project. It tells you how to re-index the search index and keep it up to date. It also tells you how to monitor search, manage keys, and move configuration.
Prerequisites
- The team admin role in your Uniform team. For more information, see roles and permissions.
- A project with Uniform Search. Uniform activates Uniform Search and sets it up for your project. To get it, request activation.
- A search collection schema and an indexing scope. For more information, see configure search.
Goals
- Read the health and the status of the search index.
- Do a re-index with zero downtime, and cancel it if necessary.
- Make sure that incremental updates keep the search index up to date.
- Use search analytics to find content gaps.
- Manage the search API key and the push API keys.
- Move the search configuration to a different project or environment.
Who can operate search#
The Uniform Search tool is visible only to team admins. Other users do not see it in Tools. In the Uniform Search tool, all team admins can do all the tasks on this page.
Uniform Search saves the name of the user with each action. The indexing history shows the user in Triggered by. The Connect drawer shows the user who made the search API key.
Content authors do not need the Uniform Search tool. They use the search components and the data connector in Canvas. For more information, see build search experiences.
Open the Uniform Search tool#
- In the Uniform dashboard, open your project.
- In the project navigation, select Tools.
- Click Uniform Search.
The Uniform Search tool has 5 tabs: Overview, Schema, Search, Relevance, and Analytics. The status strip is above the tabs. It is on every tab.
The status strip#
The status strip shows the state of the search index. It also has the controls for a re-index and for the search API key.
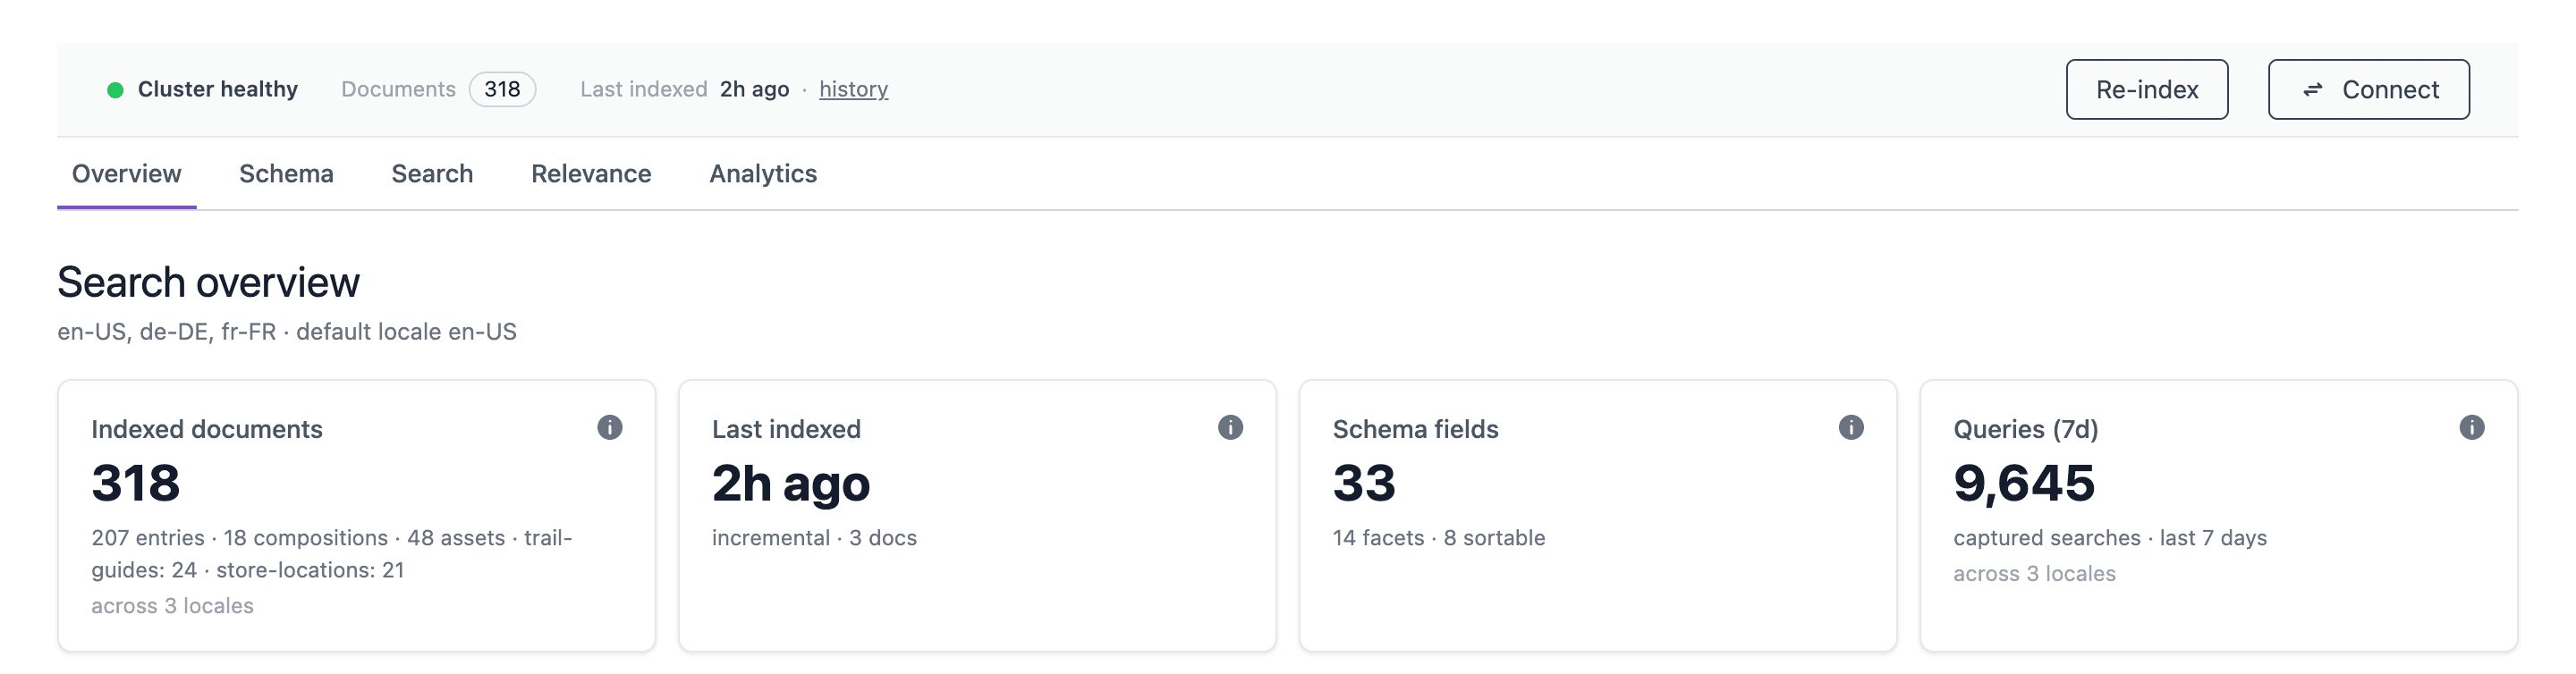
| Item | What it shows |
|---|---|
| Health dot and label | The result of the health checks. Click it to open the Cluster health panel. |
| Documents | The number of documents in the search index. |
| Last indexed | The time of the last indexing run. Put the pointer on the time to see the exact date and time. |
| history | A link that opens the Indexing history drawer. |
| Re-index | The button that starts a re-index. When a run is in progress, a progress pill shows in its place. |
| Connect | The button that opens the Connect your frontend drawer. |
The Re-index button does not show before a search collection exists. On a new project, start from the Overview tab.
Check the health of search#
The health dot shows the result of a set of health checks. The Uniform Search tool does the checks again every 60 seconds.
| Label | What it means |
|---|---|
| Cluster healthy | All checks passed. |
| Cluster degraded | Some checks failed. |
| Cluster unhealthy | All checks failed. |
| Checking cluster… | The checks are in progress. |
To see the result of each check, do these steps:
- In the status strip, click the health dot.
- Read the chip of each check:
pass,warn, orfail. - To do the checks again now, click Re-check.
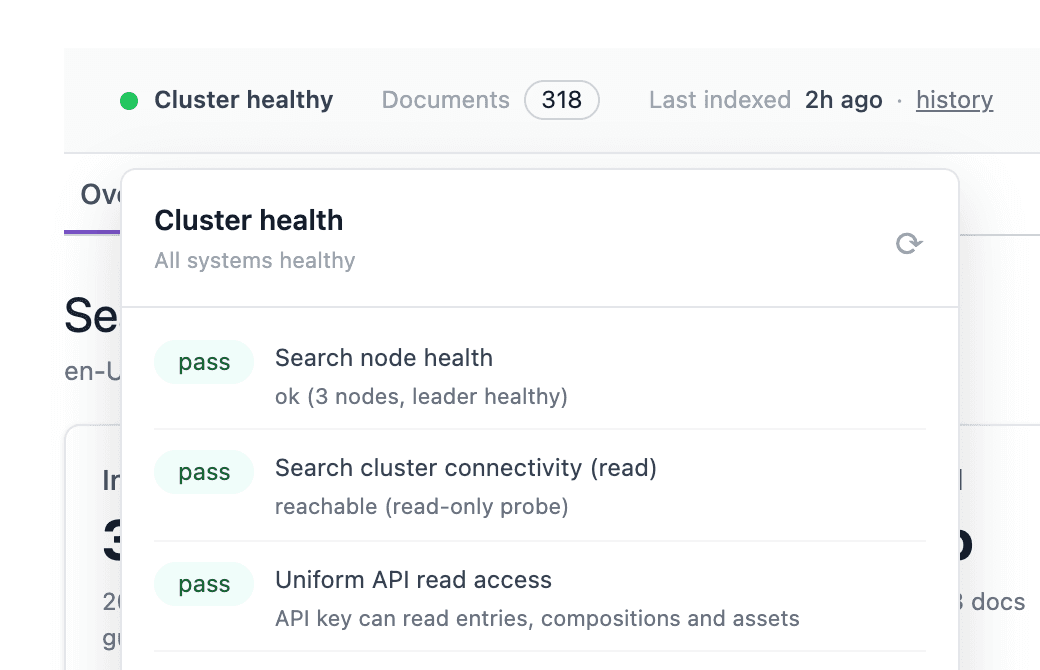
These checks are the most important for you:
| Check | What it tells you |
|---|---|
| Search node health | The search service answers requests. |
| Search cluster connectivity (read) | Uniform Search can read the search collections of your project. |
| Uniform API read access | Uniform Search can read the content of your Uniform project. |
| Search endpoint | The public search endpoint is ready to answer your front end. |
| Semantic search | Semantic search works. This check shows only when semantic search is on for your project. |
The panel can show more checks for internal services. A warn chip does not change the overall status.
If a check shows fail, contact Uniform support. These failures come from the server side, and you cannot correct them in the Uniform Search tool. One exception is the Semantic search check: if its detail tells you to run a re-index, re-index the search index.
The Overview tab#
The Overview tab is the first tab of the Uniform Search tool. Its title is Search overview. Below the title, you see the locales of the search index and the default locale.
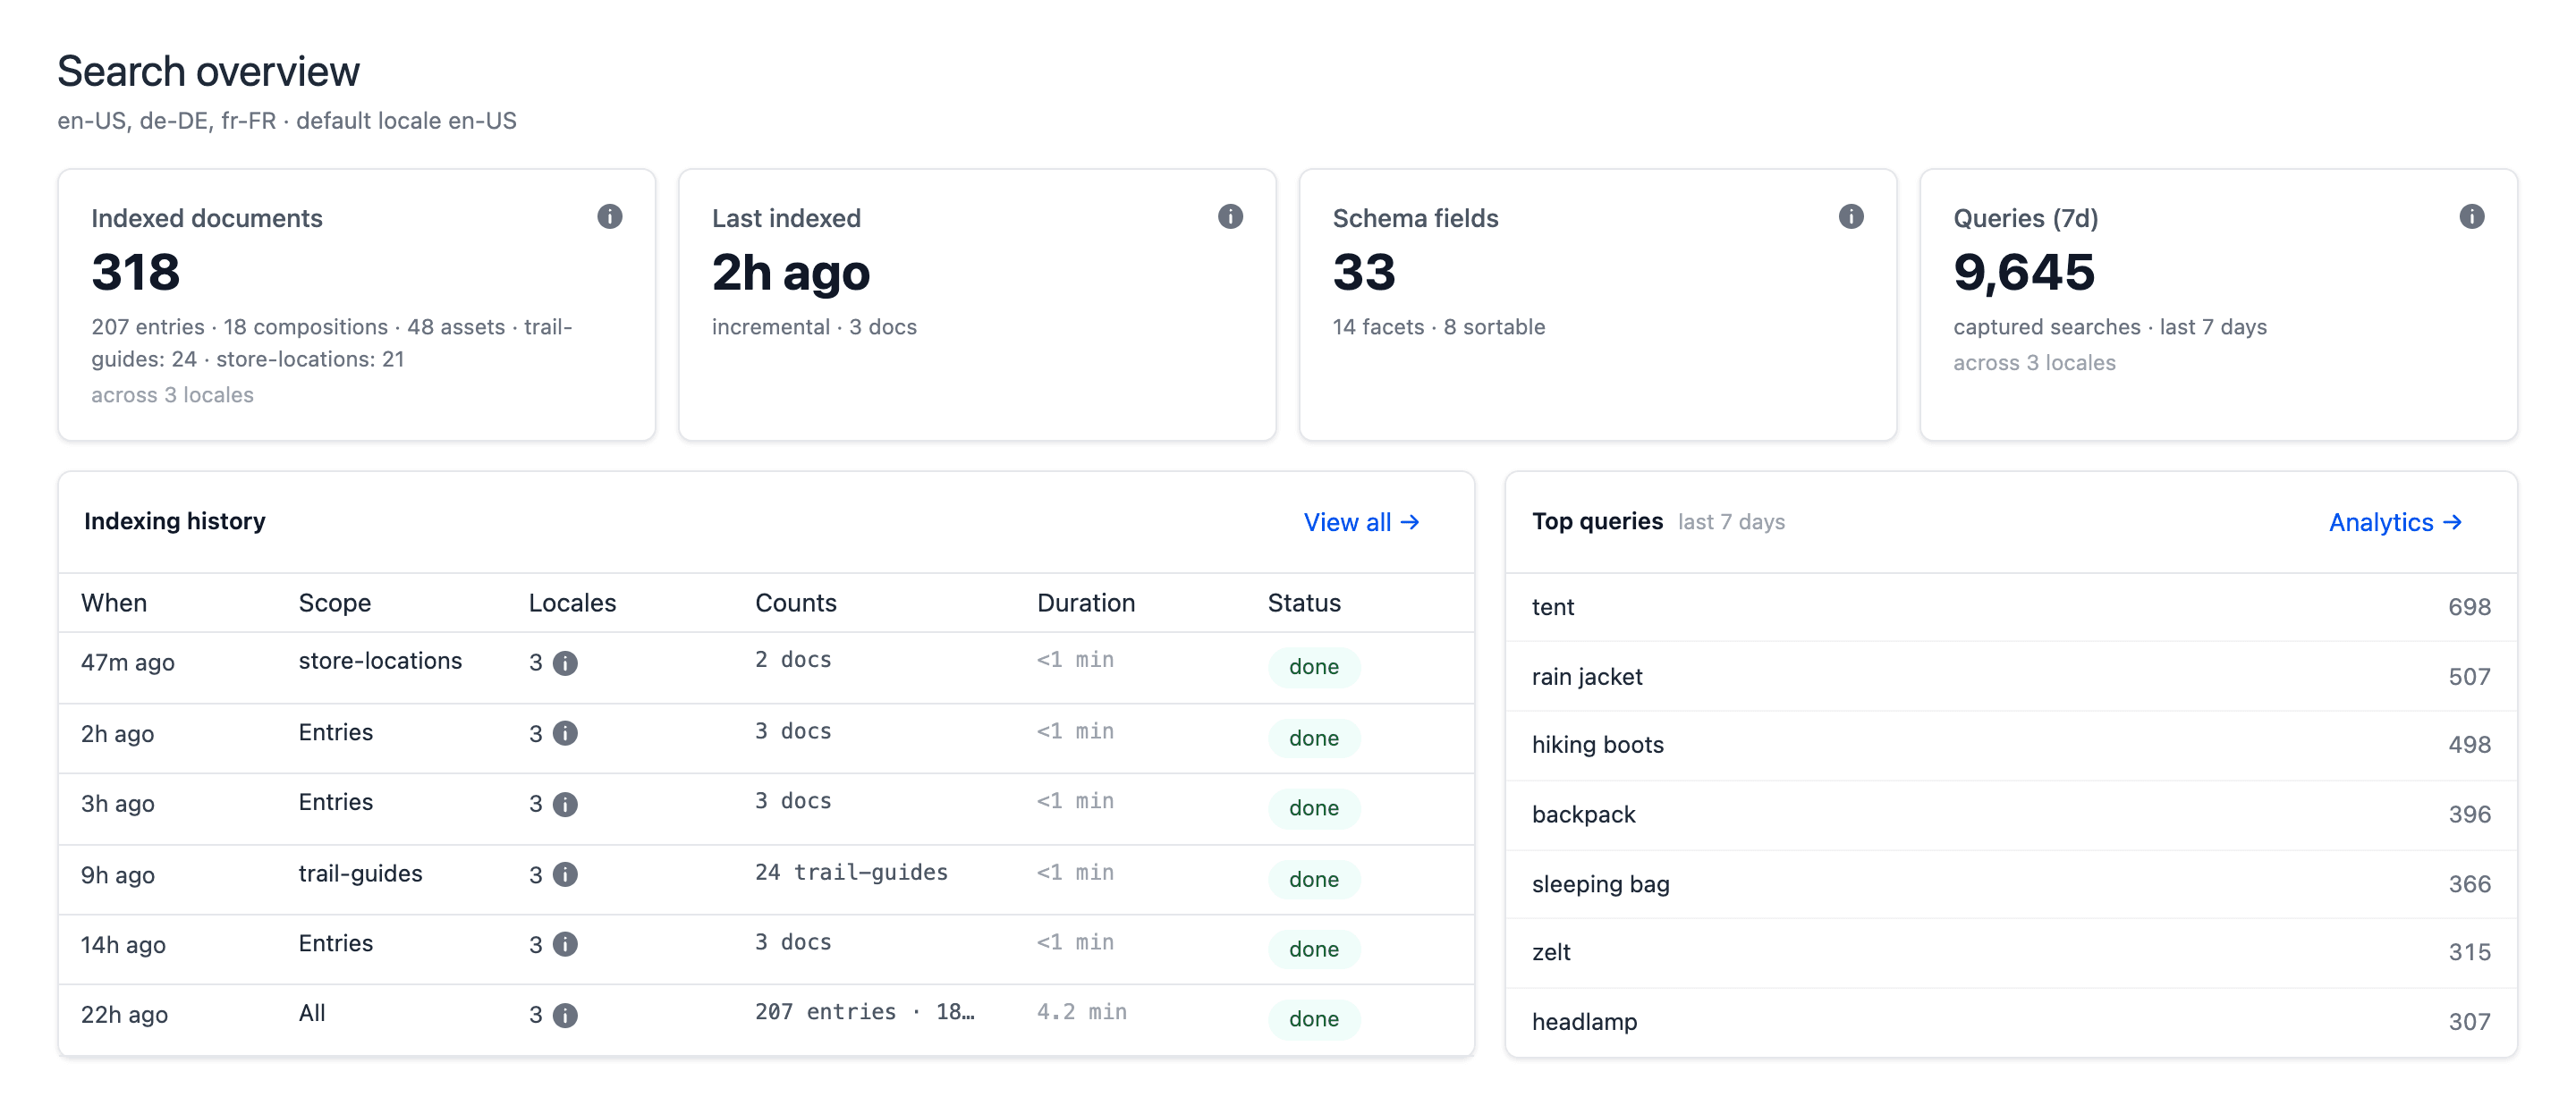
The stat cards give a summary of the search index:
| Stat card | What it shows |
|---|---|
| Indexed documents | The number of documents in the search index. The number is the total for all sources and all locales. |
| Last indexed | When content was last indexed, and what that run covered. It shows No indexing runs yet on a new project. |
| Semantic coverage | The percentage of documents in the last re-index that got a semantic vector. This card shows only when semantic search is on. |
| Schema fields | The number of fields in the schema, with the number of facet fields and sortable fields. |
| Queries (7d) | The number of searches from your visitors in the last 7 days. This card needs search analytics. If analytics is off, it shows Enable analytics. |
If Semantic coverage is less than 100%, some documents did not get a vector. Visitors can find these documents with keyword search, but semantic search does not find them. The next re-index corrects this.
Below the stat cards, you find 2 panels:
- Indexing history shows the last runs. Click View all → to open the Indexing history drawer.
- Top queries shows the most popular queries of the last 7 days. Click Analytics → to open the Analytics tab.
When to re-index#
A re-index (a full rebuild) of the search index reads all content again. It includes all content in the indexing scope, for all locales.
Do a re-index in these conditions:
| Condition | Why |
|---|---|
| You set up search for the first time. | The search collection is empty until the first run. |
| You changed the schema or the indexing scope. | The documents in the search index do not have the new fields or types. After a schema change, the Re-index button changes to a primary button as a reminder. |
| You added or changed a computed field. | The new value applies to all documents only after a re-index. |
| You added or changed a file parser. | The text of the files changes only after a re-index. |
| You changed a semantic search setting that needs a re-index. | The Uniform Search tool tells you when a change needs a full re-index. |
| You imported a schema or reset the schema to default. | These actions delete the indexed documents. |
You do not need a re-index in these conditions:
| Condition | Why |
|---|---|
| You changed synonyms, curations, stopwords, or semantic ranking in the Relevance tab. | Relevance changes apply to searches immediately. |
| An author published or deleted content in Uniform. | Incremental updates change the search index automatically. For more information, see incremental updates. |
| A pull source has new data. | You can refresh that source only. For more information, see refresh a pull source. |
How a re-index works#
A re-index has zero downtime. Visitors can search during the full run.
Uniform Search builds a new version of each search collection next to the live version. The live version continues to answer searches. When the new version of a locale is complete, it replaces the live version of that locale. If the run fails or you cancel it, Uniform Search discards the new version. The live version does not change.
A re-index includes these search sources:
- Entries, compositions, and assets in the indexing scope.
- Pull sources that are on. A pull source with the update strategy Manually is not part of a re-index. Uniform Search keeps its documents.
- Push sources. Uniform Search keeps their documents, because your system sends them.
Content changes that authors publish during a re-index are not lost. Uniform Search adds them to the new version before the new version goes live.
Only 1 indexing run can be in progress for a project at a time. This applies to a re-index and to a source refresh. If you start a re-index while a run is in progress, the Uniform Search tool shows the progress of that run.
If a re-index does not complete in 6 hours, Uniform Search stops it. The live version of the search index does not change.
The duration of a re-index depends on the quantity of content, the number of locales, computed fields, and file parsers. For example, in 1 test, a re-index of about 20,000 documents in 2 locales took about 1.4 minutes. Your results can be different.
Re-index the search index#
In the status strip, click Re-index.
The Re-index button changes to a progress pill. The pill shows Re-indexing and the percentage of the run.
To see the progress, click the progress pill.
The Re-indexing content panel opens.
Continue your work, or close the panel.
tip
The re-index continues in the background. It continues if you reload the page or close the Uniform Search tool. Other admins see the same progress.
When the pill shows Re-indexed, click the pill.
In the Re-indexing complete panel, click Done.
While a re-index is in progress, you cannot edit the Schema tab.
If the progress pill does not show after you click Re-index, the run did not start. Wait 1 minute, and then click Re-index again. If the run does not start again, open the Cluster health panel. If a check shows fail, contact Uniform support.
The progress panel#
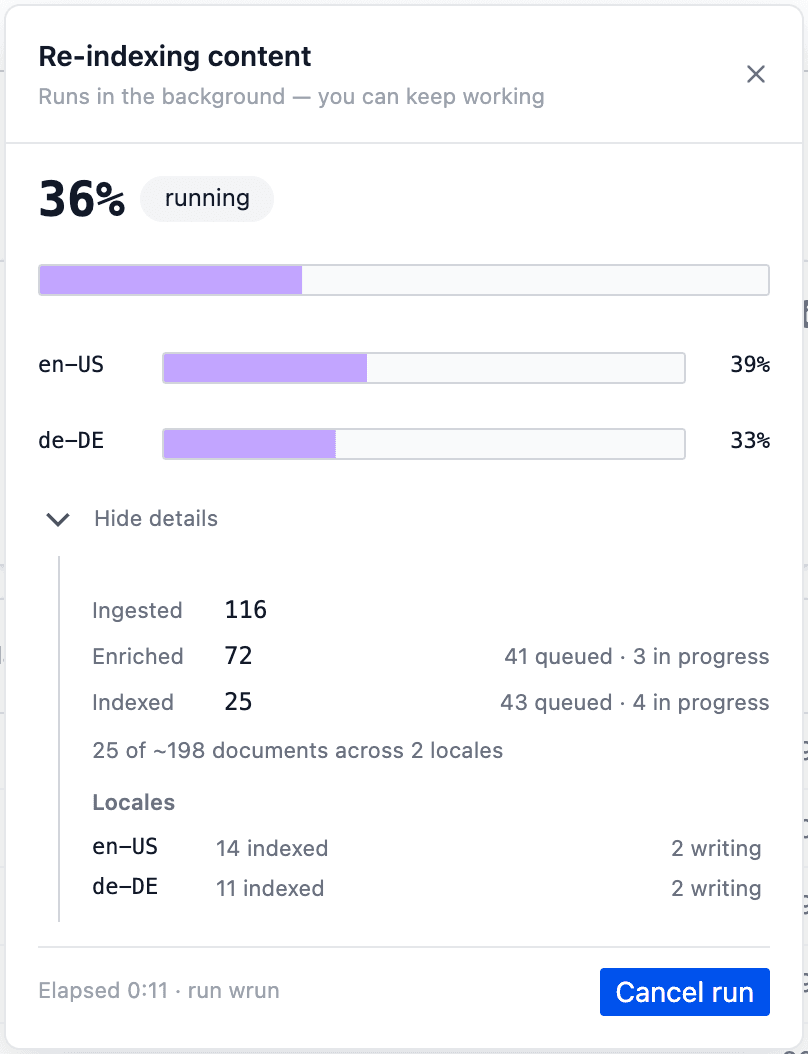
| Item | What it shows |
|---|---|
| Percentage | The progress of the full run. It shows counting… until all sources report their totals. The percentage does not go down. |
| Locale bars | 1 bar for each locale. They show only when the search index has more than 1 locale. Put the pointer on a bar to see the number of indexed documents. |
| Failures | The number of documents that failed, if there are failures. See the indexing history for the details. |
| Show details | The counts for each stage: Ingested, Enriched, and Indexed. It also shows the status of each locale. |
| Elapsed | The time since the run started, and the ID of the run. |
Cancel a re-index#
When you cancel a re-index, the live version of the search index does not change. Uniform Search discards the new version.
In the status strip, click the progress pill.
In the panel footer, click Cancel run.
The panel shows the text Stop? Live index is unaffected.
Click Confirm.
The indexing history shows the run with the status cancelled.
Refresh a pull source#
You can get new data from 1 pull source without a full re-index. A source refresh updates the documents of that source in the live search index. Search stays available during the refresh.
Open the Schema tab.
Open the External sources sub-tab.
On the row of the pull source, click the More actions menu (⋯).
Click Refresh now.
The status strip shows a progress pill with the text Refreshing source.
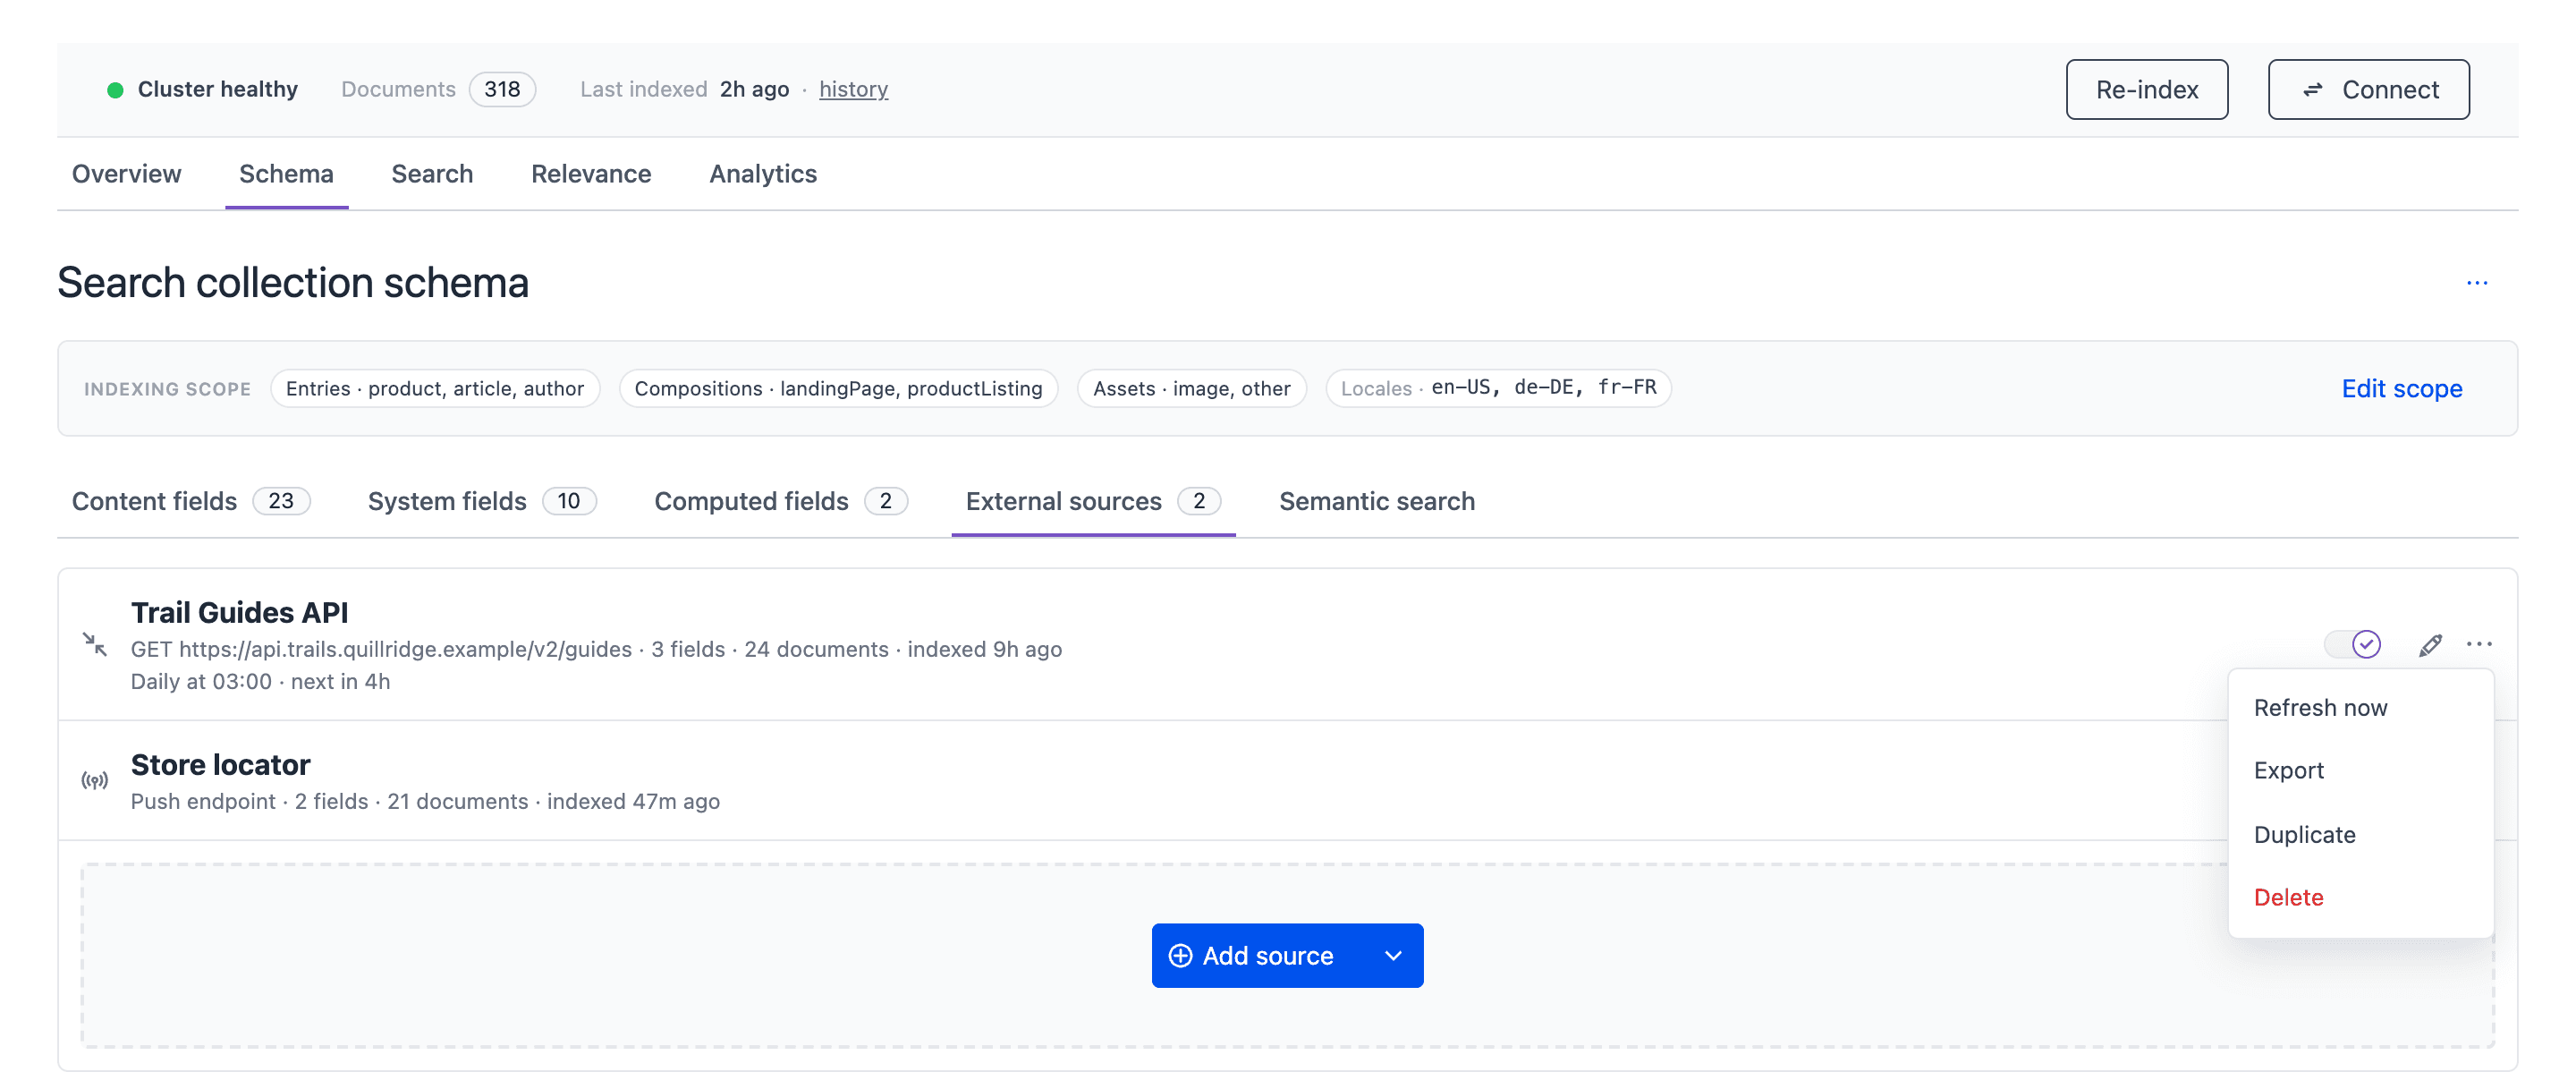
Refresh now is available only for pull sources that are on. A push source does not need a refresh, because your system sends its records.
If the row of a pull source shows last refresh failed, put the pointer on the text to see the error. Correct the problem in the source, and then click Refresh now again.
Incremental updates#
Incremental updates keep the search index up to date without a re-index. When an author publishes or deletes content in Uniform, Uniform sends a webhook to Uniform Search. Uniform Search then updates only the related documents, in all locales of the indexing scope.
The Uniform team sets up the webhooks for your project. You do not need to do this. For more information about webhooks in Uniform, see webhooks.
Uniform Search handles these 9 events:
| Event | Action in the search index |
|---|---|
entry.published | Adds or updates the entry. |
entry.deleted | Removes the entry. |
composition.published | Adds or updates the composition. |
composition.deleted | Removes the composition. |
asset.published | Adds or updates the asset. |
asset.deleted | Removes the asset. |
projectmap.node.insert | Updates the composition of the new node, with its URL. |
projectmap.node.update | Updates the composition of the node, with its new URL. |
projectmap.node.delete | Updates the composition of the node. Removes it from search only if no other node uses it. |
Incremental updates obey the indexing scope. If a type or a locale is not in the scope, Uniform Search skips the document. Computed fields and file parsers apply in the same way as in a re-index. For more information about project map nodes, see project maps.
Make sure that incremental updates work#
In Uniform, publish an entry or a composition that is in the indexing scope.
In the Uniform Search tool, in the status strip, click history.
Find the newest run with the operation Incremental (webhook).
Click the row to open the run detail.
Read the Entity, Locales, and Skipped fields.
Read the message at the top of the run detail.
The message tells you how many locale collections Uniform Search updated. If Uniform Search skipped the document, the message gives the reason.
Open the Search tab, and search for the changed content.
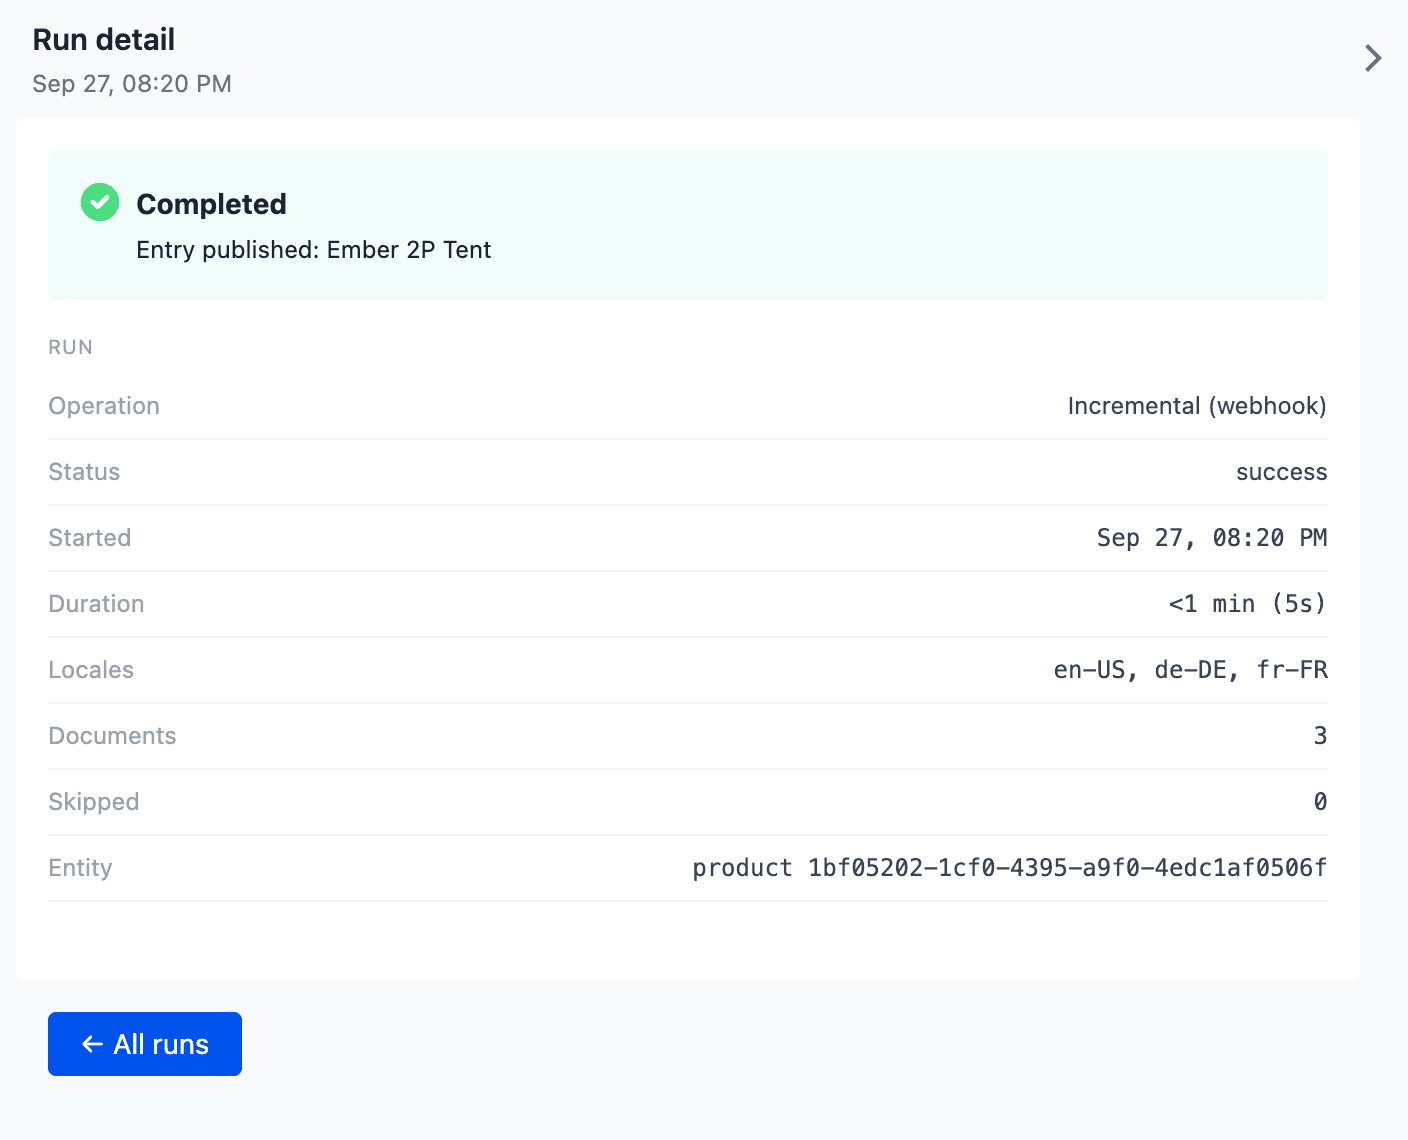
If no Incremental (webhook) run shows after you publish content, contact Uniform support. The webhook possibly did not get to Uniform Search.
Indexing history#
The Indexing history drawer shows each indexing run and each schema change for the project. The newest run is at the top.
To open the drawer, do one of these steps:
- In the status strip, click history.
- On the Overview tab, in the Indexing history panel, click View all →.
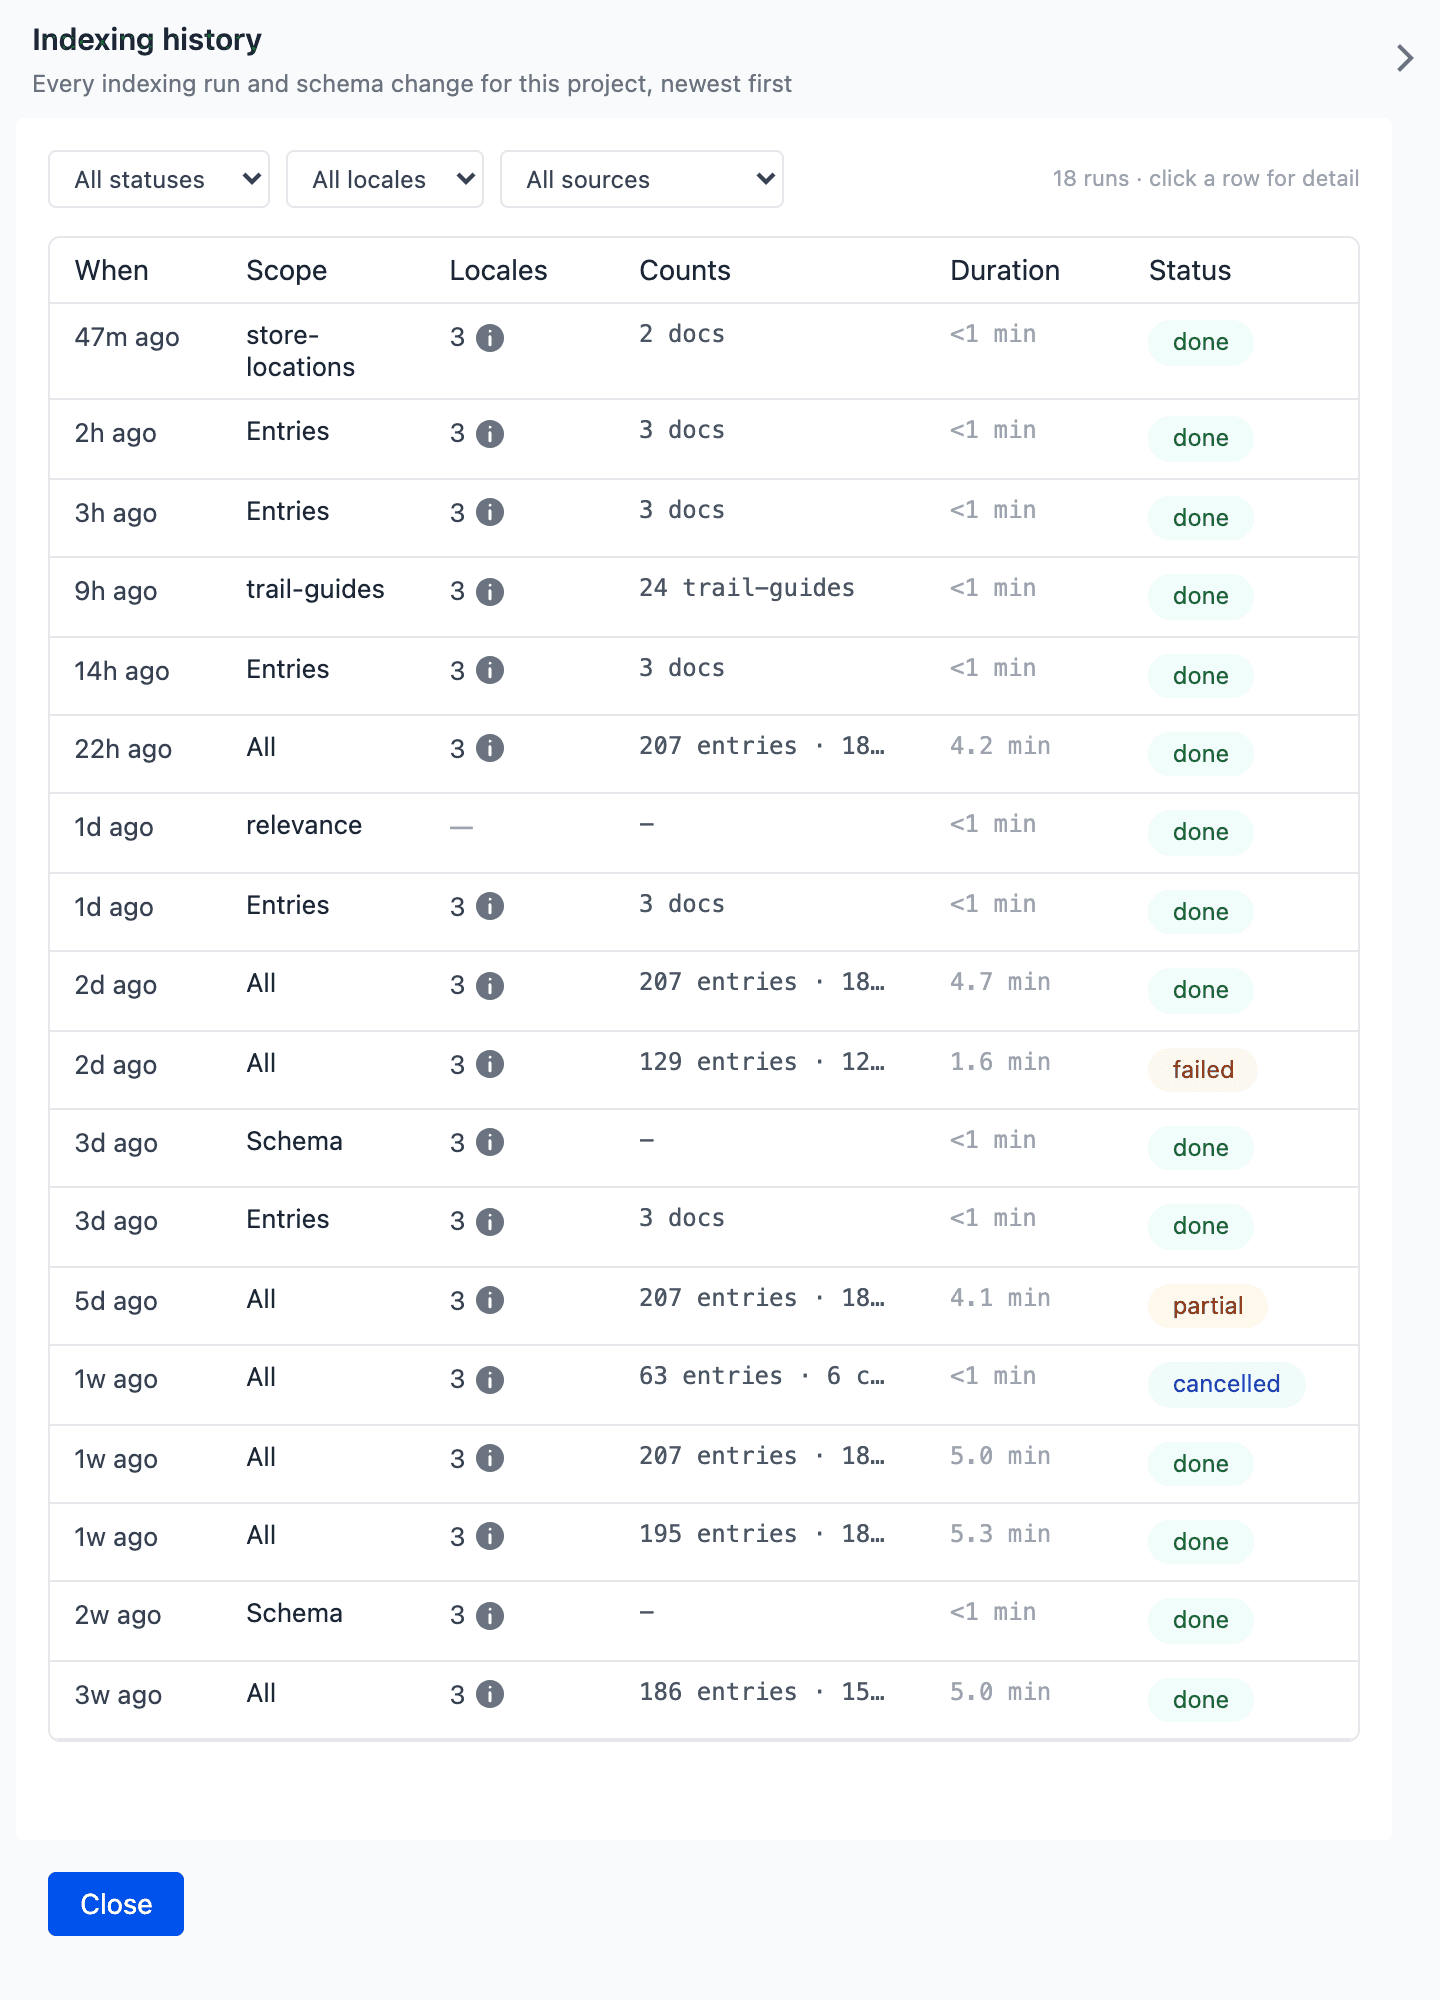
Use the filters to find a run:
- All statuses
- All locales
- All sources: Entries, Compositions, Assets, or Schema.
The table has the columns When, Scope, Locales, Counts, Duration, and Status. To see older runs, click Load more.
The history shows these operations:
| Operation | What it means |
|---|---|
| Full reindex | A re-index. |
| Incremental (webhook) | An incremental update after a publish or a delete. |
| Source refresh | A refresh of 1 or more pull sources. |
| Schema import | An import of a schema file. |
| Schema export | An export of a schema file. |
| Schema reset | A reset of the schema to default. |
The Status column shows one of these values:
| Status | What it means |
|---|---|
done | The run completed. |
partial | The run completed, but with issues. For example, some documents failed. |
failed | The run failed. For a re-index, the live search index did not change. |
cancelled | The run stopped before it completed, for example because an admin cancelled it. The live search index did not change. |
Run detail#
Click a row to open the Run detail view. To go back to the list, click ← All runs.
The run detail shows these items:
- A callout with the result and a message. The result is Completed, Completed with issues, or Failed.
- The Run section: Operation, Status, Started, Triggered by, Duration, Locales, Documents, Skipped, Failed, and Entity. Some fields show only for some operations.
- The Indexed per locale section: the number of documents from each source, for each locale.
- The Log section: the log lines of the run. The history keeps a maximum of 200 log lines for each run.
The history keeps the last 1,000 indexing runs and the last 1,000 schema changes. Uniform Search deletes older entries automatically.
Find the cause of a failed run#
- Open the Indexing history drawer.
- In the All statuses filter, select
failedorpartial. - Click the run to open the run detail.
- Read the message in the callout at the top.
- Read the Log section. Look for the documents or the sources that failed.
- If the cause is in your content or in an external source, correct it.
- Start a new re-index.
If the same run fails again, contact Uniform support. Give them the run ID from the progress panel or from the run detail.
Search analytics#
Search analytics shows what your visitors search for and what they click. It is off by default. By default, queries from the Search tab of the Uniform Search tool are not part of analytics.
Turn on analytics#
Analytics is off for a new project. You must turn it on before Uniform Search records searches and clicks.
Open the Analytics tab.
If analytics is off, the tab shows Search analytics is off.
Click Enable analytics.
The tab shows the Overview sub-tab with no data. The Searches and Clicks tiles show needs snapshot history. The Popular queries panel shows No captured queries yet.
Set up click tracking in your front end. For more information, see set up click tracking.
The first data shows after about 5 minutes. After that, the data updates about every 5 minutes. Only queries that give results show in Popular queries.
If you cannot turn on analytics, contact your Uniform representative.
Set up click tracking#
Uniform Search records searches automatically when analytics is on. It does not record clicks automatically. Your front end must report each click on a search result. Until it does, the Clicks tile and the Top clicked documents panel stay empty.
When no clicks are recorded, the Top clicked documents panel shows the code to report clicks. The code already contains the Search URL and the project ID of your project.
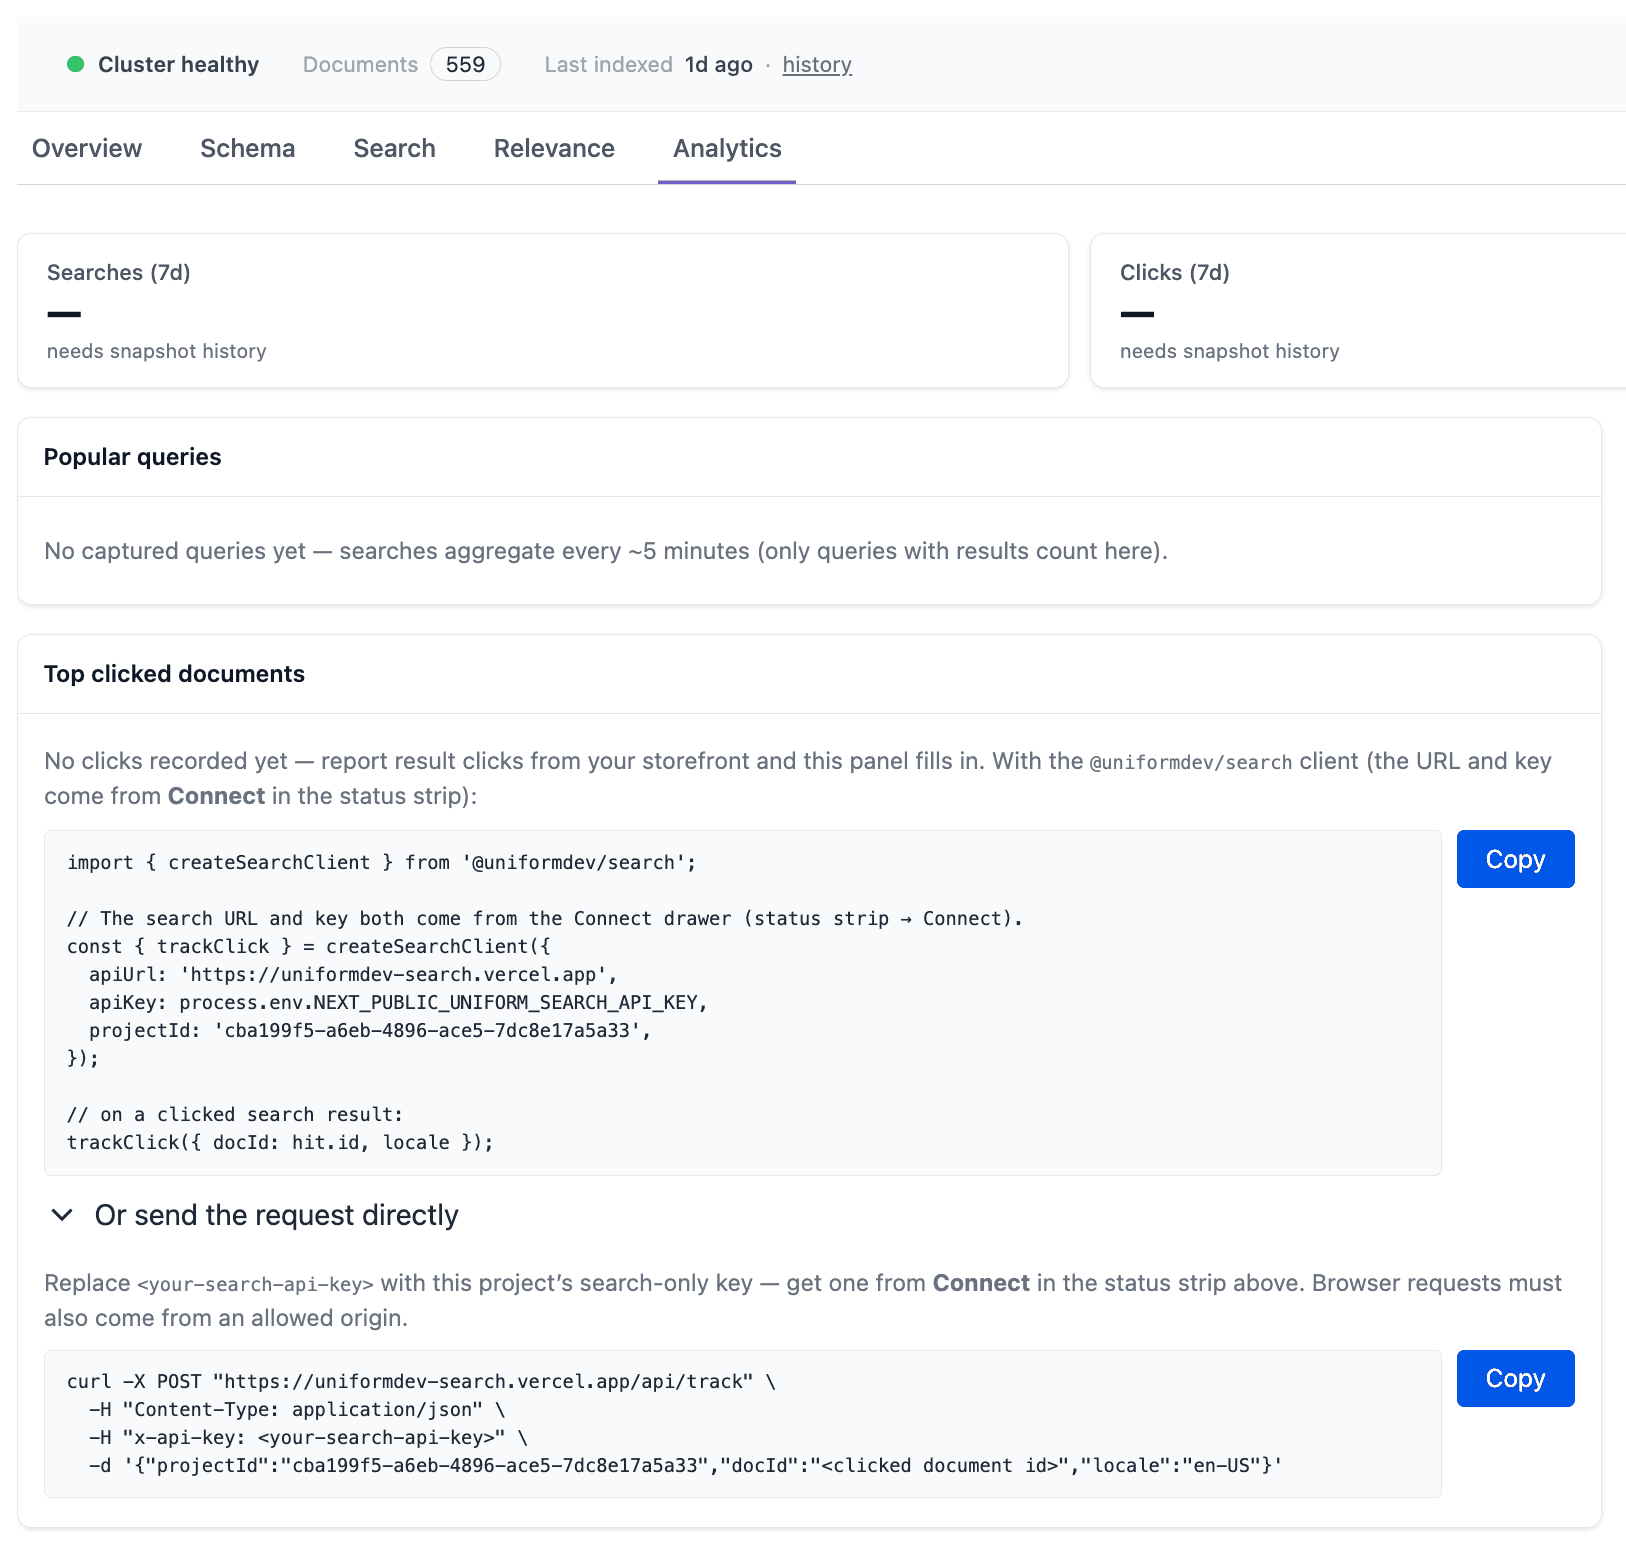
To report clicks, do these steps:
Get the search API key. In the status strip, click Connect. For more information, see manage search API keys.
In the Top clicked documents panel, click Copy to copy the code.
Add the code to your front end. Call
trackClickwhen a visitor clicks a search result. Use the ID of the clicked document and the locale of the search.If you cannot use the
@uniformdev/searchpackage, expand Or send the request directly. Then send aPOSTrequest to the/api/trackendpoint from your front end. Replace<your-search-api-key>with the search API key. Browser requests must come from an allowed origin. To add the domain of your site, contact your Uniform representative.Deploy your front end.
On your site, search and click a result.
After about 5 minutes, make sure that the Clicks tile and the Top clicked documents panel show the click.
For more information about trackClick and the /api/track endpoint, see report clicks on results.
If the Click tracking feature is off in the Settings sub-tab, Uniform Search does not record clicks. For more information, see change the analytics settings.
Read the analytics#
The Analytics tab has 2 sub-tabs: Overview and Settings. On the Overview sub-tab, select a time range: 7 days, 30 days, 1 year, or All time. To see the data of 1 locale, use the Locale filter.
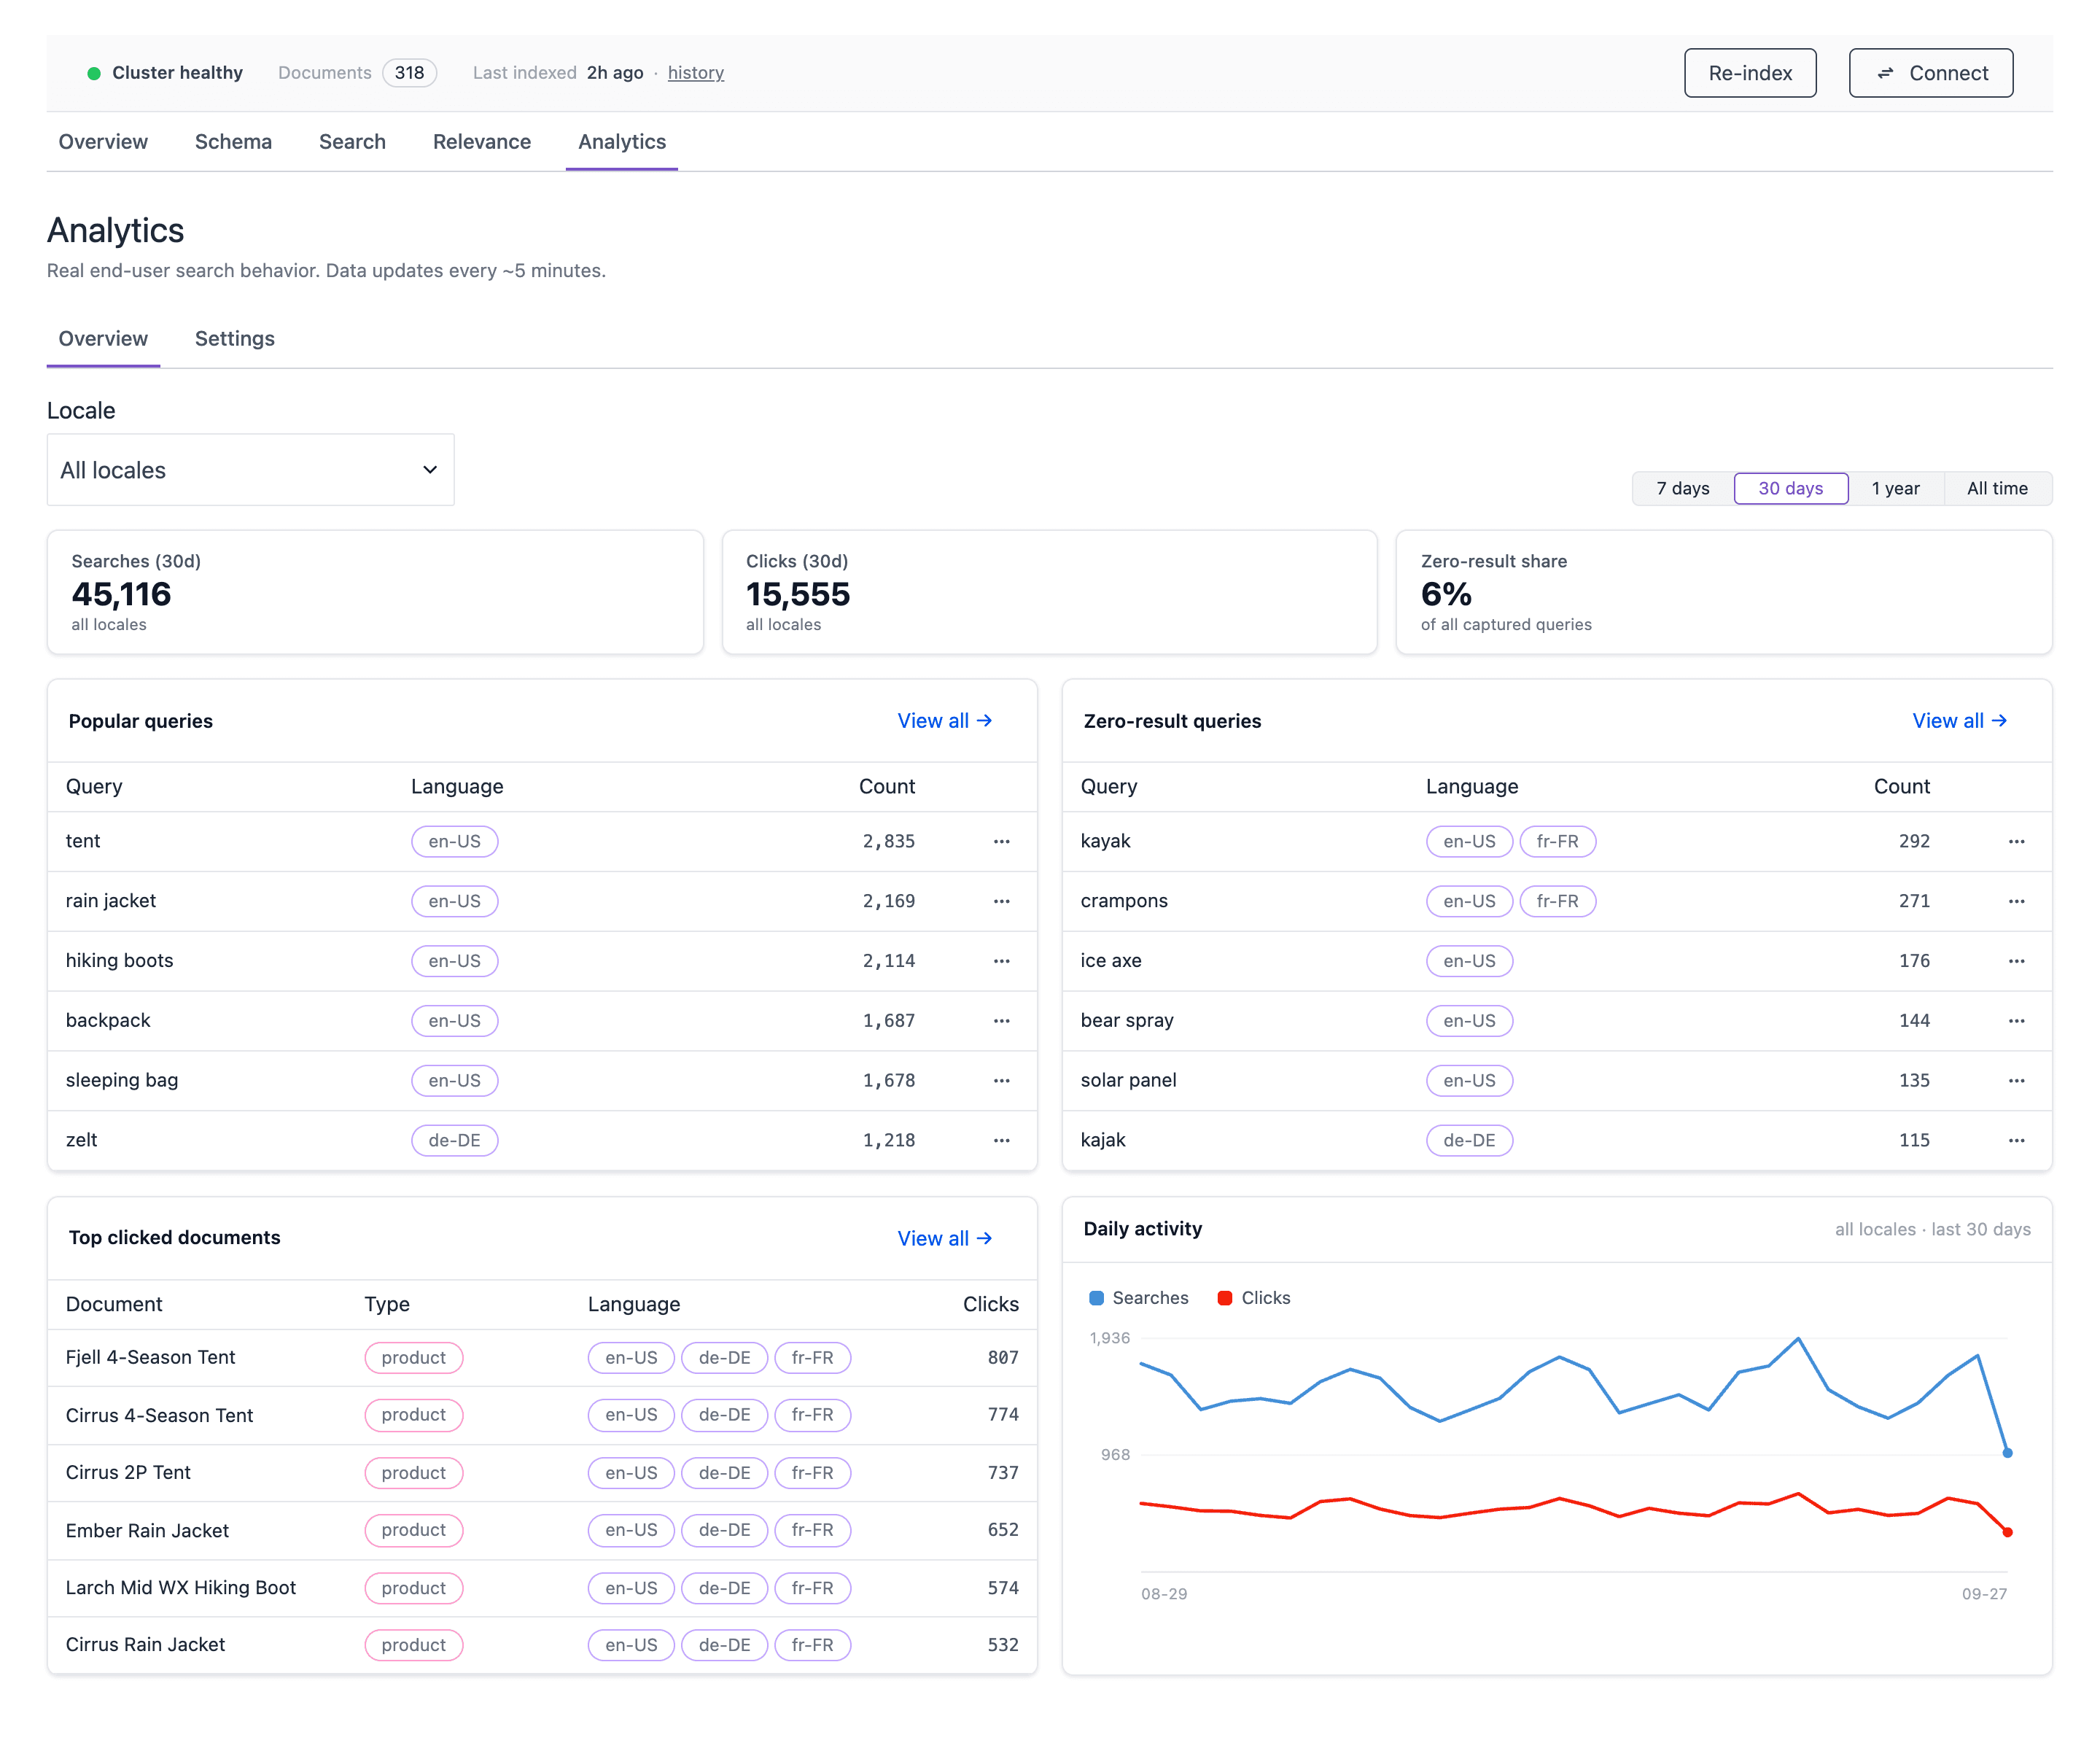
| Panel | What it shows |
|---|---|
| Searches and Clicks tiles | The number of searches and clicks in the time range. |
| Zero-result share | The percentage of queries that gave no results. |
| Popular queries | The most frequent queries that gave results. |
| Zero-result queries | The queries that gave no results. These queries show gaps in your content or in your synonyms. |
| Top clicked documents | The documents that visitors click most in the search results. |
| Daily activity | A chart of the searches and the clicks for each day. |
The Top clicked documents panel needs click events from your front end. If the panel is empty, see set up click tracking.
Act on the analytics#
Use the analytics to improve the relevance of search. The actions open the Relevance tab with the query already filled in.
To add a synonym for a query without results, do these steps:
- In the Zero-result queries panel, click the menu (⋯) on the row of the query.
- Click Add synonym.
- In the Relevance tab, complete the synonym, and save it.
To change the results of a popular query, do these steps:
- In the Popular queries panel, click the menu (⋯) on the row of the query.
- Click Curate results.
- In the Relevance tab, complete the curation, and save it.
For more information about synonyms and curations, see configure search.
Export analytics data#
- In a panel, click View all →.
- Optional: filter the list by Query, Language, Type, or Period.
- Click Export CSV.
The CSV file contains the rows that agree with your filters.
Change the analytics settings#
Open the Analytics tab, and then open the Settings sub-tab.
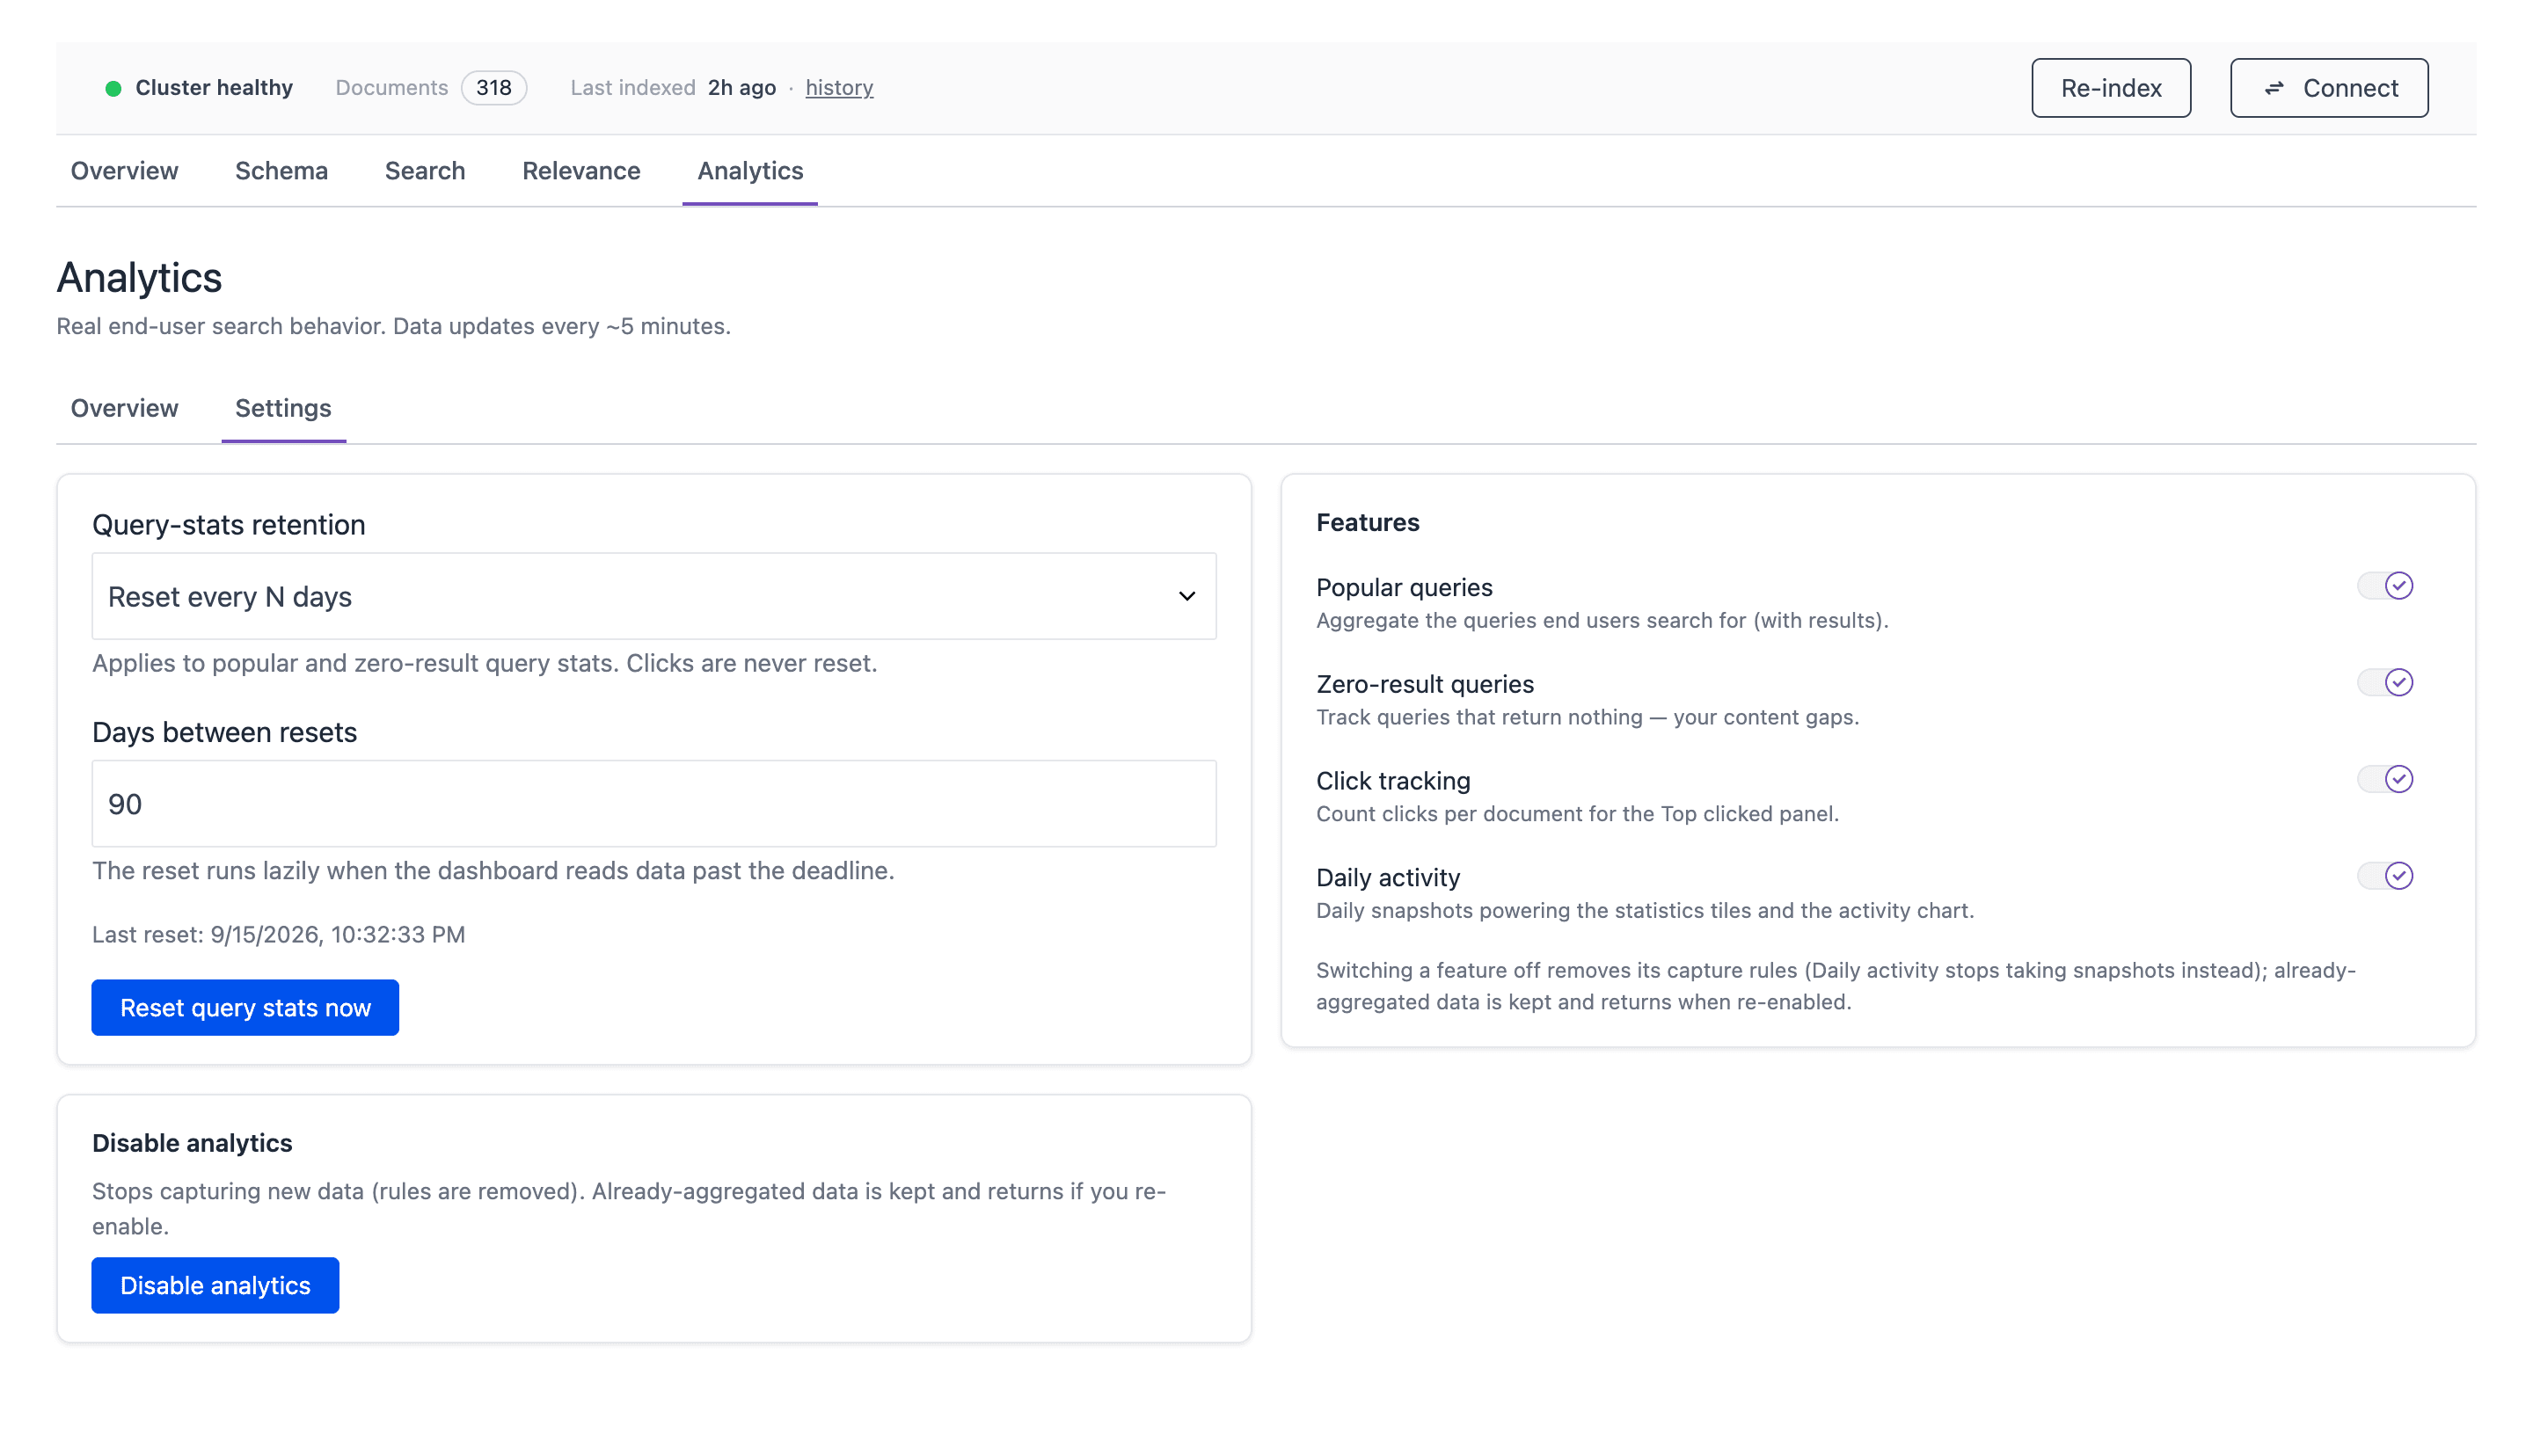
| Setting | What it does |
|---|---|
| Features | Switches for Popular queries, Zero-result queries, Click tracking, and Daily activity. When you turn off a feature, Uniform Search stops the capture for that feature. It keeps the data. |
| Query-stats retention | Select Keep forever, or select Reset every N days and set Days between resets. Then click Save retention. The retention applies to popular queries and zero-result queries. Click counts are never reset. |
| Reset query stats now | Deletes the popular query and zero-result query stats for all locales. Click counts stay. You cannot undo this action. |
| Disable analytics | Stops the capture of new data. Uniform Search keeps the data. The data shows again if you turn on analytics again. |
Manage search API keys#
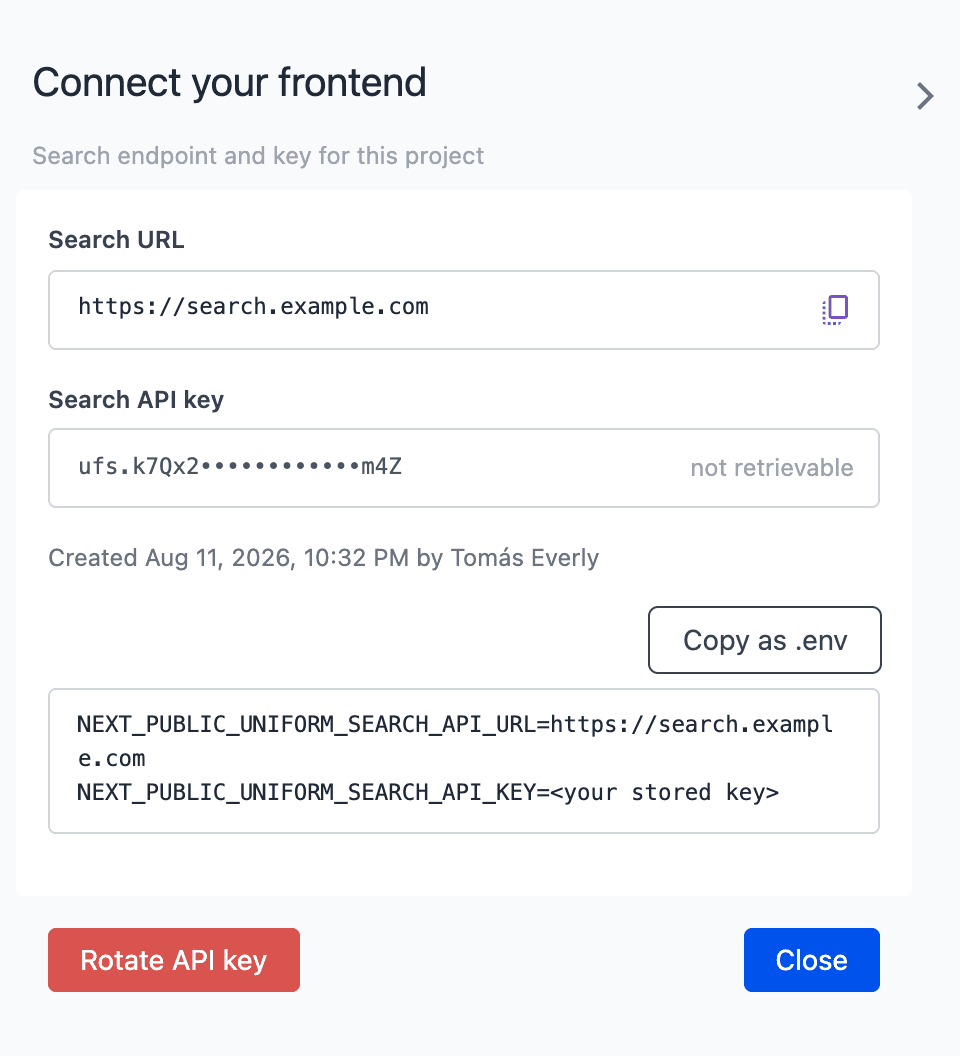
The search API key lets your front end send search queries and report clicks. It cannot change the search index. It is safe to use in client code. Each project has 1 current search API key. The key starts with ufs..
You manage the key in the Connect your frontend drawer. To open it, click Connect in the status strip. The drawer also shows the Search URL of your project.
Generate a search API key#
warning
The Uniform Search tool shows the new key 1 time only. Uniform Search keeps only a hash of the key. Copy the key before you close the drawer. If you lose the key, you must rotate it and update all front ends.
- In the status strip, click Connect.
- Click Generate key.
- Copy the key, or click Copy as .env.
- Keep the key in a safe location, for example in the environment variables of your front end.
- Click I’ve stored the key.
After this, the drawer shows only the start and the end of the key. It also shows the date and the user who made the key.
Rotate the search API key#
Rotate the key if you think that it is not safe, or as a regular security task. The old key continues to work for 24 hours. This gives you time to update your front ends without downtime.
- In the status strip, click Connect.
- Click Rotate API key.
- In the Rotate the search key? dialog, click Rotate key.
- Copy the new key, and keep it in a safe location.
- Update all front ends that use the old key.
The drawer shows the date and time when the old key becomes invalid.
Revoke the old search API key now#
warning
Revoke the old key only after you update all front ends. A front end that uses the old key gets 401 Unauthorized errors.
- In the status strip, click Connect.
- In the callout about the old key, click Revoke now.
- In the Revoke the previous key now? dialog, click Revoke now.
The old key becomes invalid. It can take up to 60 seconds before all servers reject the old key.
Manage push API keys#
Each push source has its own push API key. Your system uses this key to send records to Uniform Search. Use the push API key only from a server. Do not put it in client code.
Uniform Search shows a push API key 1 time only. This occurs when you make the push source, and when you rotate its key. The dialog is Save this API key now or New API key for this source. Copy the key before you click I’ve saved it.
warning
When you rotate a push API key, the old key becomes invalid immediately. There is no overlap time. Your system gets 401 Unauthorized errors until you update it with the new key.
To rotate a push API key, do these steps:
- Open the Schema tab.
- Open the External sources sub-tab.
- On the row of the push source, click Edit source (pen icon).
- Click Rotate API key.
- In the Rotate this API key? dialog, click Rotate key.
- Copy the new key.
- Update your system with the new key.
For more information about push sources, see configure search.
Move configuration between projects or environments#
You can export the search configuration from 1 project and import it into a different project or environment. The files do not contain a project ID.
| What | Export | Import | File |
|---|---|---|---|
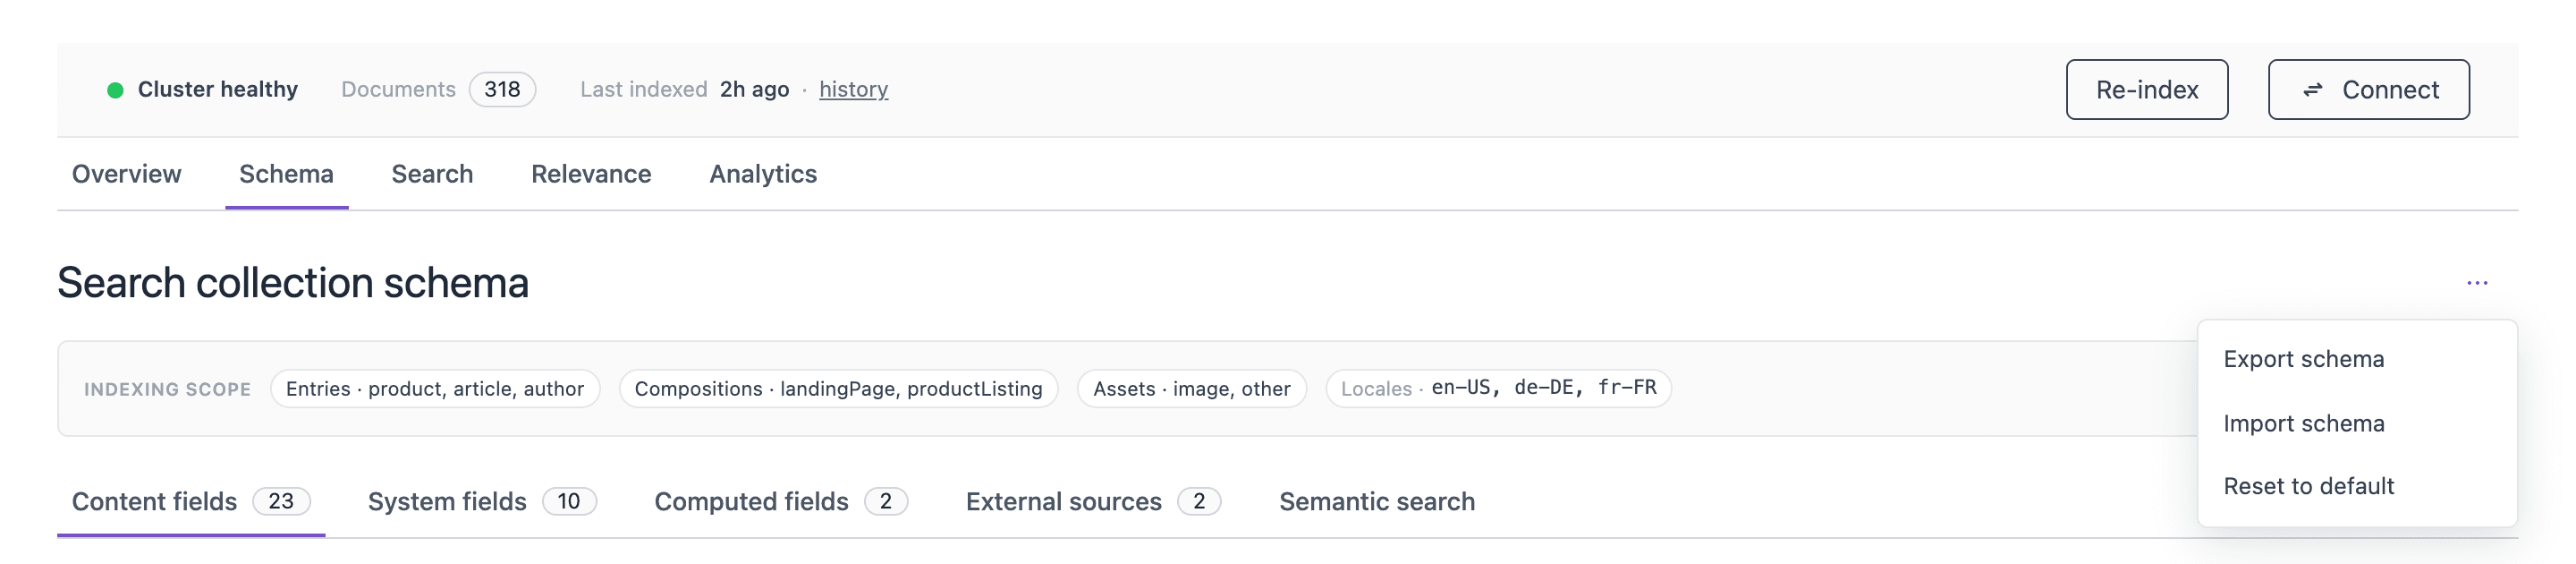
| Schema, indexing scope, computed fields, and external sources | Schema tab > menu (⋯) > Export schema | Schema tab > menu (⋯) > Import schema, or Import schema on the Overview tab of a new project | search-schema-PROJECT_ID.json |
| Synonym sets, curation sets, stopwords, and semantic ranking | Relevance tab > menu (⋯) > Export relevance settings | Relevance tab > menu (⋯) > Import relevance settings | relevance-settings.json |
| An external source | Schema tab > External sources > row menu (⋯) > Export | Schema tab > External sources > Add source > Import external data | JSON file |
| Analytics lists | Analytics tab > View all → > Export CSV | Not available | CSV file |
The exports do not contain secrets. After an import, enter the credentials of each pull source again. Search API keys, push API keys, analytics settings, and the indexing history are not part of an export.
Export the schema#
- Open the Schema tab.
- Click the menu (⋯).
- Click Export schema.
The browser downloads the file.
Import the schema#
warning
An import replaces the indexing scope and the search collection schema. It deletes all indexed documents in the project. Search gives no results until the next re-index completes. You cannot undo the import.
The file does not contain secrets. After the import, you must enter the credentials of each pull source again.
Do the import at a time with little traffic, or in a project that is not live.
- Open the Schema tab of the target project.
- Click the menu (⋯).
- Click Import schema.
- Select the exported file.
- In the Overwrite existing configuration? dialog, click Overwrite & import.
- If a dialog tells you that an external source already exists, enter a new Source type, and then click Import.
- Enter the credentials of each pull source again.
- In the status strip, click Re-index.
Import the relevance settings#
Open the Relevance tab of the target project.
Click the menu (⋯).
Click Import relevance settings.
Select the
relevance-settings.jsonfile.Select the items to import.
info
An item with the text already exists — will be overridden replaces the item with the same name.
Click Import.
For each imported synonym set and curation set, turn on Use in this project.
Imported synonym sets and curation sets are not active in the project until you turn on Use in this project.
Import an external source#
- Open the Schema tab of the target project.
- Open the External sources sub-tab.
- Click Add source.
- Click Import external data.
- Select the exported file.
- Enter the credentials of the source again.
- On the row of the source, click the menu (⋯), and then click Refresh now.
Monitor search from your own tools#
The Uniform team monitors the search infrastructure. You can also connect your own uptime tool to the health endpoint of your project. The endpoint does not need a key.
The health endpoint is GET /api/health on the Search URL of your project. You find the Search URL in the Connect your frontend drawer. Replace YOUR_SEARCH_URL with that URL.
Check the health endpoint
If the service is available, the endpoint returns HTTP status 200 and a JSON body with "status": "ok". If it is not available, the endpoint returns HTTP status 503 and "status": "error". Use the HTTP status code in your uptime tool. Do not use other fields of the body, because they can change.
The endpoint accepts only GET requests. It checks only the search service. For the full set of checks, open the Cluster health panel in the Uniform Search tool.
Troubleshooting#
| Problem | Possible cause | What to do |
|---|---|---|
| You cannot find Uniform Search in Tools. | You do not have the team admin role. | Ask a team admin to give you the role. See roles and permissions. |
| Published content is not in the search results. | The type or the locale is not in the indexing scope. | Do a check of the indexing scope on the Schema tab. If you change it, do a re-index. |
| Published content is not in the search results. | Exclude From Index is on for the content. | Turn off Exclude From Index, and publish again. |
| Published content is not in the search results. | The composition has a dynamic route. Uniform Search indexes dynamic route content through its entries. | Search for the entry. |
| Published content is not in the search results. | The incremental update did not arrive. | Look for an Incremental (webhook) run in the indexing history. If there is no run, do a re-index and contact Uniform support. |
| Documents are not in the search index after a schema import or a reset to default. | These actions delete the indexed documents. | Do a re-index. |
| The progress pill does not show after you click Re-index. | The run did not start. | Wait 1 minute, and click Re-index again. If it does not start, open the Cluster health panel and contact Uniform support. |
| The re-index shows Failed in the run detail. | A search source failed. | The live search index did not change. Read the Log section, correct the cause, and do a re-index again. If it fails again, contact Uniform support. |
| The re-index shows Completed with issues. | Some documents failed, or too many content changes arrived during the run. | Read the Log section. Correct the documents, and do a re-index again. |
| The health dot is red or half red. | A server-side check failed. | Open the Cluster health panel. If the Semantic search check tells you to run a re-index, do a re-index. For all other failures, contact Uniform support. |
| Semantic coverage is less than 100%. | Some documents did not get a vector in the last run. | Do a re-index. |
| The Analytics tab is empty. | Analytics is off, or the first data is not ready. | Click Enable analytics, and wait about 5 minutes. By default, queries from the Search tab are not in analytics. |
| Top clicked documents and the Clicks tile are empty. | Your front end does not report clicks, or Click tracking is off. | Add trackClick to your front end. For more information, see set up click tracking. In the Settings sub-tab, make sure that Click tracking is on. |
The front end gets 401 Unauthorized. | The search API key was rotated and the 24-hour overlap ended, or an admin revoked it. | Update the front end with the current search API key. |
A push source gets 401 Unauthorized. | An admin rotated the push API key. | Update your system with the new push API key. |
| A pull source row shows last refresh failed. | The external API gave an error, or the credentials are not correct. | Put the pointer on the text to see the error. Correct the problem, and click Refresh now. |
Next steps#
- Configure search: set the schema, the indexing scope, computed fields, external sources, and relevance.
- Search SDK and API: connect your front end with the search API key and send click events.
- Build search experiences: add the search components to compositions in Canvas.
- Roles and permissions: give the team admin role to the persons who operate search.
- Webhooks: learn how Uniform sends events when content changes.